Have you ever made hand-tossed ice cream? This interactive summer activity ends in a sweet treat that kids can’t resist! A few simple ingredients go into a bag, which goes into another bag filled with ice and salt. Then comes the fun: these bags get tossed and shaken until the contents freeze into delicious ice cream. (Don’t worry, they get taped up well!)

Ingredient and Equipment Notes
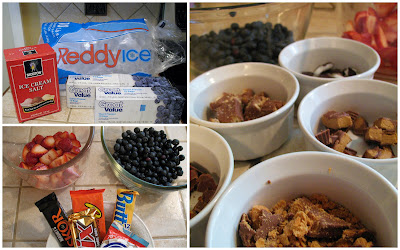
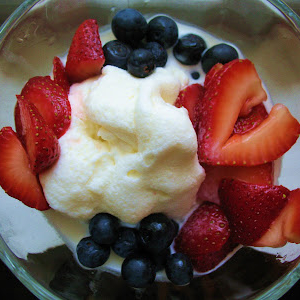
- Simple Ingredients – The ice cream itself requires 2% milk, cream (regular whipping cream or heavy cream will work), sugar, and vanilla. Feel free to grab your favorite toppings and mix ins, such as strawberries, blueberries, and crushed or chopped Butterfingers, Twix, peanut butter cups, or Skor bars.
- Ziploc Freezer Bags – Remember that these bags are going to be abused quite a bit! I would stick with name brand bags for this recipe. You’ll need quart sized freezer bags for the ice cream and gallon sized freezer bags for the ice.
- Ice – This recipe calls for 10 lbs of ice, which is one bag if buying from the store. You’ll need to be able to fill two gallon sized freezer bags initially, then possibly some more for refills as the ice melts during tossing. If using your own ice at home, fill several gallon bags ahead of time from your ice maker.
- Ice Cream Salt – You can find ice cream salt in the baking aisle next to the other salts. Rock salt works just as well.
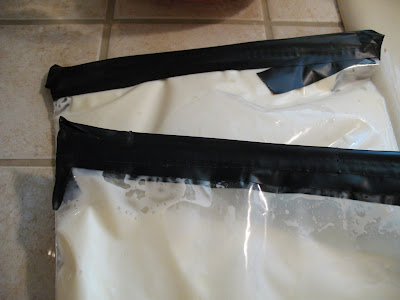
- Waterproof Tape – Duct tape works well. This is to seal the bags so your ice cream and salty ice don’t leak and mix.
- Gloves – Optional, but helpful to keep little fingers from getting too cold.
How To Make Hand Tossed Ice Cream
- In a large bowl, you’ll combine some sugar, milk, whipping cream, and vanilla. You’ll then divide this mixture between a couple of quart-sized freezer bags, squeeze out all of the air, seal, and tape shut.
Then you’ll place one filled bag inside one gallon-sized bag and sprinkle 1 cup of ice cream salt around the smaller bag. Add as much ice as you can comfortably fit into the gallon-sized bag, squeeze to remove excess air, and zip shut. Maneuver the ice around to make sure there’s ice on all sides of the smaller bag inside. Place in freezer while you repeat the process with the second bag.
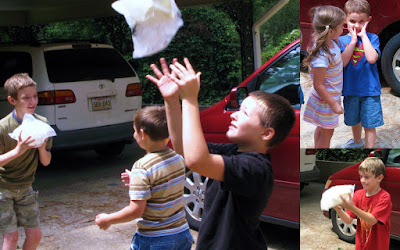
When the second bag has been prepared, head outside. Be sure to bring the leftover ice and rock salt because you’re probably going to need to drain some of the salty water and replenish the ice supply while you’re tossing the ice cream. Let each kid take a turn (or a couple) tossing the bags of ice cream into the air or to each other. It gets C-O-L-D, so a pair of gloves won’t hurt anybody!
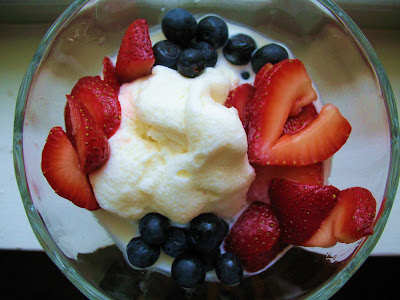
- After about 10-15 minutes, remove the quart-sized bag and rinse off the saltwater. Cut a hole in one corner of the bag and squeeze the ice cream into individual dishes. Let everyone add their desired toppings and have at it! It might be a little melty, but I promise, not a single person will complain!
Frequently Asked Questions
Does the ice cream freeze well if we have leftovers? This is a recipe that’s best enjoyed right after tossing. Because the ice cream is freezing, but not getting any air mixed into it like traditional ice cream, it’s more of a melty soft serve dessert.
How do I plan ahead/ plan this for a larger group of kids? Prep your ice cream mixture and complete the steps through taping the quart-sized bags closed. Store these in the fridge for up to a couple of days. When ready to use, help the kids add the smaller bags, ice, and salt to the larger bags and get shaking!
Serving Suggestions & Related Recipes
Air Fryer Crumble Topping or Homemade Magic Shell Topping would be fun additions here. Hot Fudge Sauce or Buttermilk Caramel Syrup would also be delicious!
Looking for more fun ideas to do with the kids? Check out these other Our Best Bites favorites:
Oven-Dried Apple Chips {Two Ways!}
Homemade Hot Pockets
Frozen Pudding Pops
Edible Playdough and Finger Paint
Did You Make This?
I’d love to hear from you! Snap a picture and tag me on Instagram, then come back and give this recipe a rating!
Kids Week: Hand-Tossed Ice Cream
- Total Time: 30 minutes
Description
This interactive summer activity ends in a sweet treat that kids can’t resist!
Ingredients
ICE CREAM
2 cups 2% milk
2 cups whipping cream
1 cup sugar
1 1/4 teaspoons vanilla
Desired ice cream toppings and mix-ins (we used sugared strawberries, blueberries, and crushed or chopped Butterfingers, Twix Bars, York Peppermint Patties, Reese’s PB Cups, and Skor Bars)
SUPPLIES
2 1-quart Ziploc freezer bags (I used Walmart brand and wished I’d sprung for the big guns)
2 1-gallon-sized Ziploc freezer bags (ditto on the name brand)
10 pounds ice (one bag)
2 cups ice cream salt
waterproof tape (like duct tape)
gloves (optional, but keeps little fingers from freezing)
Instructions
1. In a large bowl, combine sugar, milk, whipping cream, and vanilla. Have one of your larger little helpers hold open one quart-sized bag and pour half of the mixture into the bag and zip shut, squeezing out all the air. Use duct tape to tape the opening shut (we actually, in a pinch, used electrical tape and it was fine!). Repeat with second bag.
2. Place one filled bag inside one gallon-sized bag and sprinkle 1 cup of ice cream salt around the smaller bag. Add as much ice as you can comfortably fit into the gallon-sized bag, squeeze to remove excess air, and zip shut. Maneuver the ice around to make sure there’s ice on all sides of the smaller bag inside. Place in freezer while you repeat the process with the second bag.
3. When the second bag has been prepared, head outside. Be sure to bring the leftover ice and rock salt because you’re probably going to need to drain some of the salty water and replenish the ice supply while you’re tossing the ice cream. Let each kid take a turn (or a couple) tossing the bags of ice cream into the air or to each other. It gets C-O-L-D, so a pair of gloves won’t hurt anybody!
4. After about 10-15 minutes, remove the quart-sized bag and rinse off the saltwater. Cut a hole in one corner of the bag and squeeze the ice cream into individual dishes. Let everyone add their desired toppings and have at it! It might be a little melty, but I promise, not a single person will complain!


Questions & Reviews
yumm, homemade ice cream IS the best! too bad i don't have any kids to make it with. oh well, who needs kids, right??
FUN!! I think even a bunch of teenagers would love doing this!!
I always forget about this too, but when I remember it reminds me of school. It is such a fun activity for teachers to do.
My kids would love this, but I can definately see how it would be fun for big groups. Thanks!
Oh I totally forgot about this!!! I have seen this before, but it slipped my mind on how fun this would be to try out with the kiddos! Thanks for the yummy reminder! They're gonna love you for it! Thanks for sharing!
mmmm, pick me! pick me!
We used to do this every summer when we were younger! So much fun for the little ones.
Oh my kids are going to have a BLAST with this! Can't wait to try it.
I'm pretty new to your blog, but I'm so excited about this week's theme! Both the pudding pops and the ice cream look so easy and so fun! My kids are going to love it!
This looks so fun! I especially love the mix-in options and having a way to get the kids involved.
Have done it with large and regular coffee cans where you roll the can. Love that soft ice cream!!
How much fun is that?!
This looks like so much fun. We've done it in rolling coffee cans but not the bag toss. I love it!
MMMMMM! We just made ice-cream on Saturday. Should have thought of this to keep the kids entertained while waiting for it, instead of using the old ice-cream freezer!
Yum!! Sounds like a lot of fun!!
My 2 year old will LOVE this…and let's be honest so will my 28 year old (AKA my husband ;o)
We had a serious ice-cream-making disaster last week, and I really wish I had had this then. Henry was heartbroken over the lack of homemade ice cream… YUM! And so fun.
exciting!! i don't have an ice cream maker so this is awesome!
Ohhh, I can't wait to play catch! This is going to be fun.
We did this in preschool. I love it!
What a fun and YUMMY idea!! My kids are all older and would absolutely love doing this!
Thanks!
Mmmm! Looks good!
Now this looks like something kids would enjoy making!
Love it! Sometimes we use an old food storage can for the ice and salt and roll it. Fun no matter how you try it!
This is such a fun idea! And I bet it's YUMMY!
Can't wait to try this!
This is such a fun idea! And I bet it's YUMMY!
Can't wait to try this!
Oh Yummy! I'm excited to try this one out.
Yum. We are so trying this one. I might win 'mom of the day' award. =)
I love making ice cream in a bag! I do it with my students at the end of every year–always a big hit!
That looks SO good. And it's fun for the kids. I'm wishing I had some whipping cream in my fridge right now. Who cares if it's 10:30 PM? I'd make it anyway!