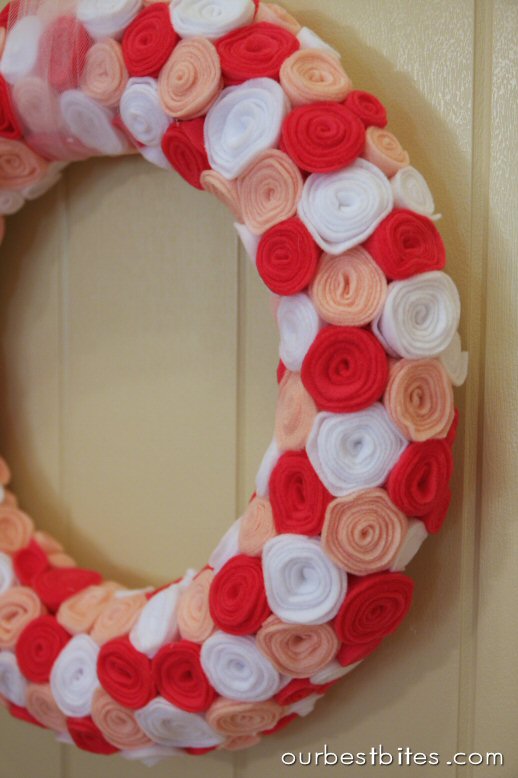
I have an obsession with wreaths lately. I think it’s because they’re generally a doable project for me. See, I’m sort of short-term crafter. I like projects that I can look at, say “hey that’s cute”, go out and buy some stuff, and have it made and displayed the next day. Any more than that and my projects just don’t get finished. I also like projects I can do while watching tv with my hubby after the kids are in bed. And wreaths are just so easy to customize for specific holidays. After I made a Christmas wreath I loved, I set out to make a Valentine’s Day version with rolled fabric flowers. But then I stumbled upon a post on Be Different Act Normal highlighting pretty Valentines wreaths. There was a wreath like this made out of beautiful paper roses from I’m a Yarner. Gorgeous, but way too time consuming for me, plus I was sure it would get destroyed at my house. (Hello- I’m a Mom to all boys. Wreaths are pretty much target practice around here.) So I had the idea to try it with felt. Success! Everyone who has come over lately has said the same thing, “That’s so cute! Is there a tutorial on your blog?” So here’s the dealio:
Supplies Needed:
wreath form- I used a 14″ foam form ($3 at the craft store)
felt- one color, or a variety (quantity explained below)
scissors
glue gun
ribbon or tulle for hanging
You could certainly buy felt by the yard, but I just bought the pre-cut rectangles you can get at the craft store in a rainbow of colors. You need squares to make your flowers, so you’ll have to cut the felt accordingly. If you’re using felt by the yard, a 4″ square works nicely. As you can see from the picture below, it’s totally fine to eyeball!
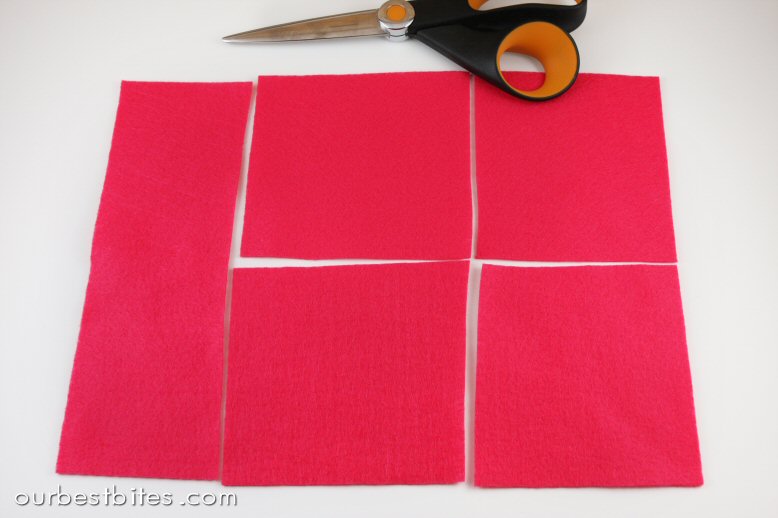
Save that strip on the side because we’ll use those later. I got 4 squares per sheet. When I was at the store I couldn’t decide what color to use so after a mild panic attack in the felt isle I decided to go multi-color and I bought 10 sheets of each color. I have white, light pink, and dark pink.

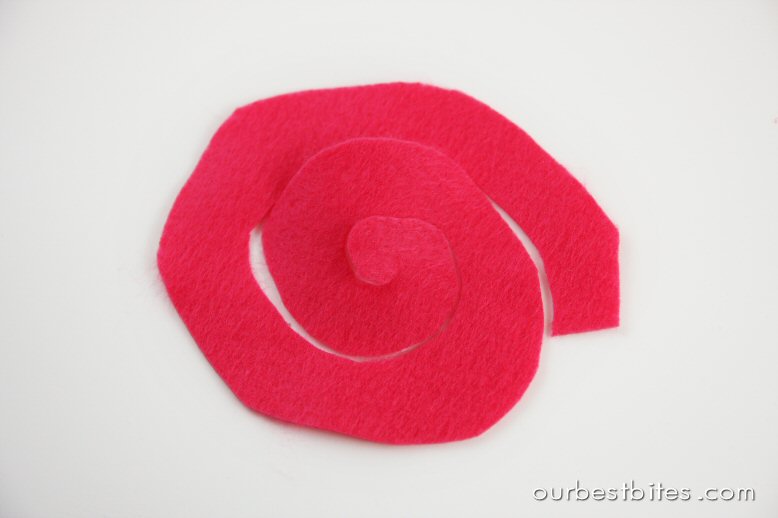
I’ve drawn out the shape you need to cut, just so you can see it. But when you’re doing this project you don’t need to measure anything. Really! Just eyeball your squares, then eyeball this swirly shape.
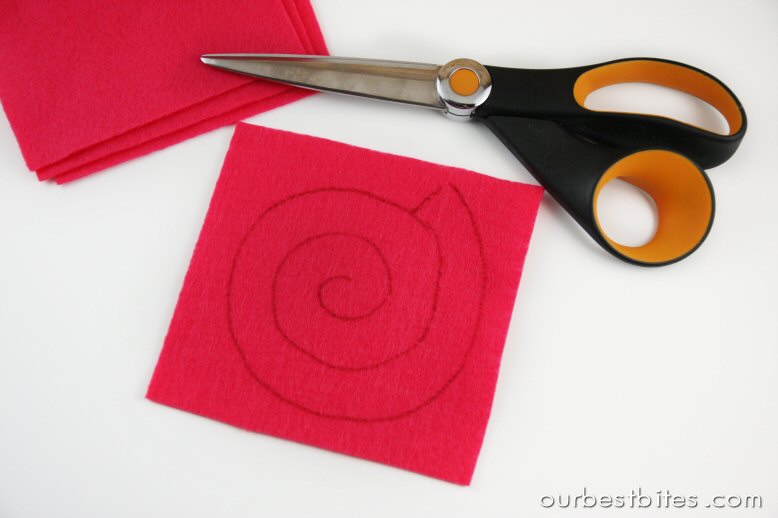
Start from the outside and just cut a spiral inward.
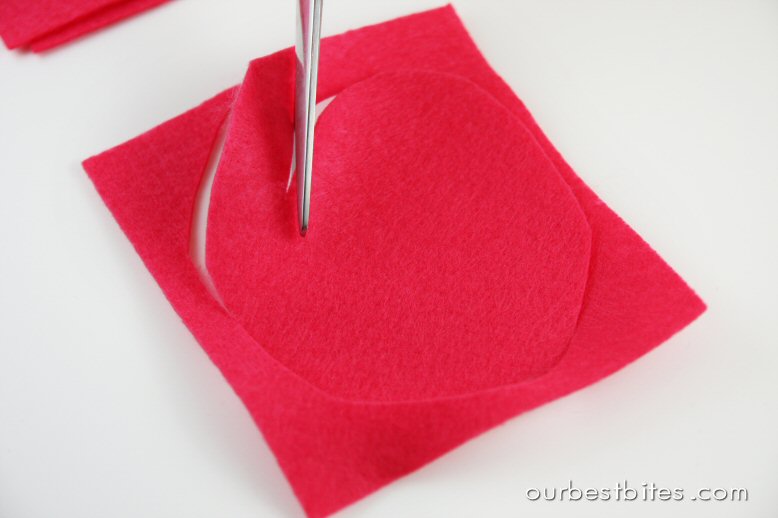
Until you have a shape like this.
Then start from the middle of the spiral and just roll it up.
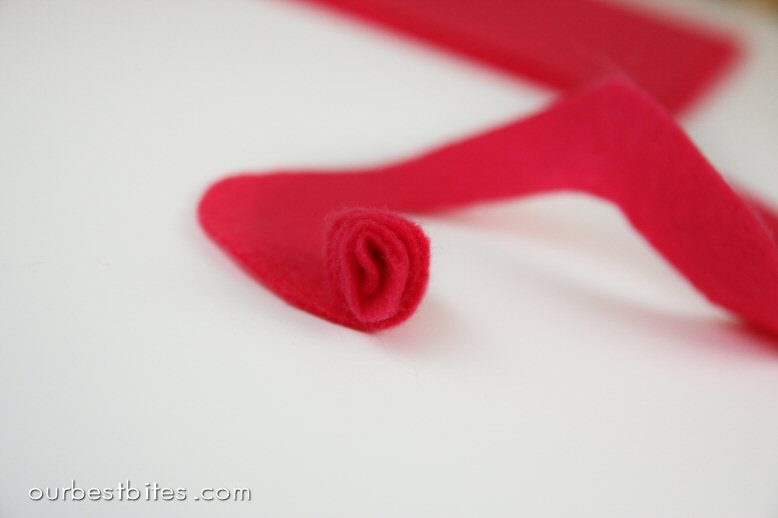
The great thing is that unlike the fabric flowers that you have to constantly glue, these just stick to themselves so you can just roll them up and set them aside.
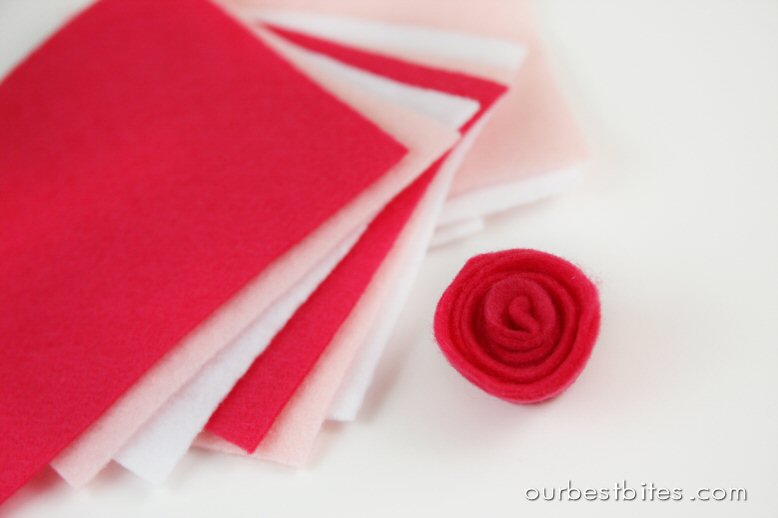
You’ll need a lot of roses, but they’re pretty fast to make- especially if you have a helper. When I did this project, I sat and cut spirals and my husband rolled them while we watched football. Real men can do that. Before half time we had a whole tray full of flowers.

The only other supplies you need are a wreath form and a glue gun. Since my wreath form was green, I decided at the last minute to give it a quick coat of white paint. Smart move since you may have some negative space showing through.

Then just start gluing. Place the flowers close to each other, but not so close that they smoosh each other.

Keep working your way around. I did the top part first to make sure it looked good, and then moved around the sides and into the middle. You’ll find you need a lot in order to fill all of the spaces so here’s a tip. With your fabric scraps, just cut long straight strips and roll them straight up, like sushi. They won’t look as pretty as the roses, but they’re perfect for filling in small spaces and for the sides that aren’t very visible. Including the straight strips of fabric, I had the perfect amount of felt sheets for the 14″ wreath.
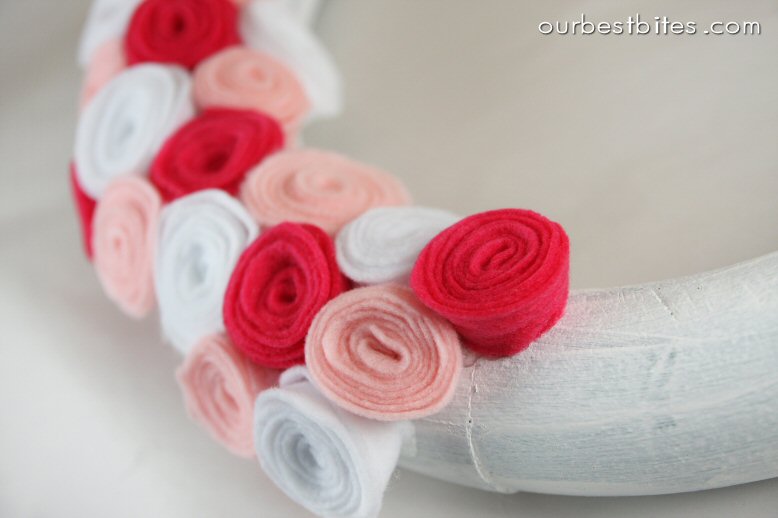
A good tip to see if you’re done is to hold your wreath up to a flat wall. Then peek around the sides and you’ll see what still needs to be covered. I left the back empty and just covered what’s visible when hanging.
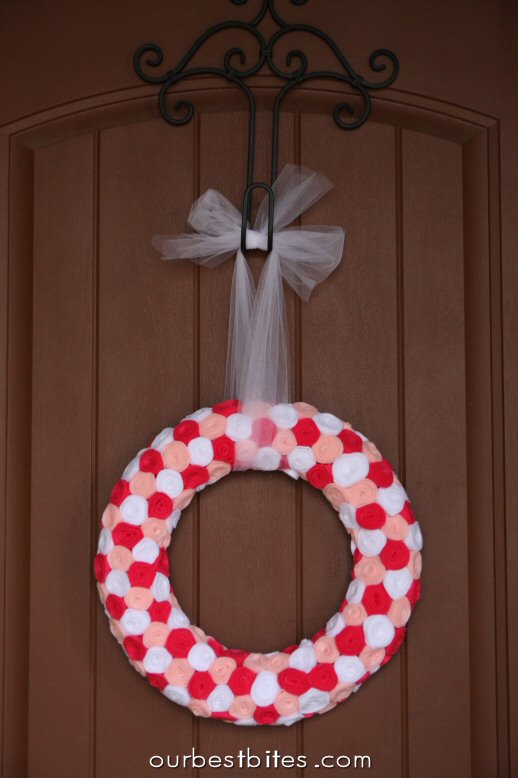
Once it’s all covered, just tie a ribbon, or tulle like I used and hang it up! I love the look of tulle for Valentine’s.
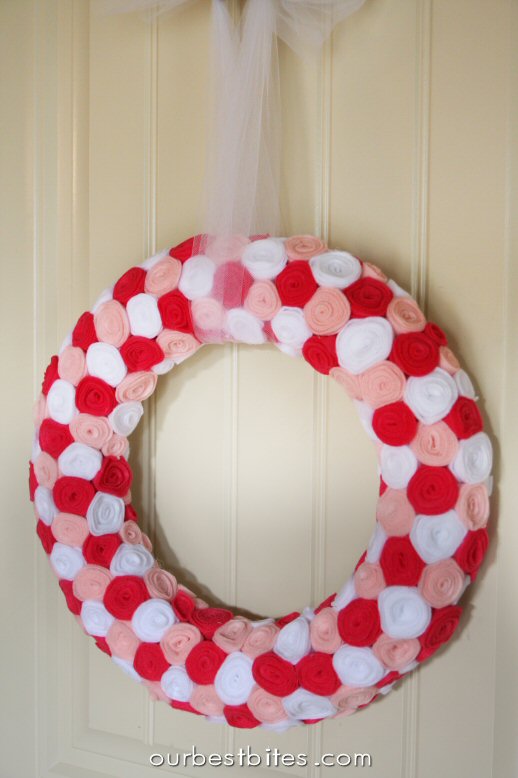
I hang mine on the inside of my front door, which is white. But here’s a pic of it outside on my red door:

If you make one, be sure to share a pic with us on Facebook!
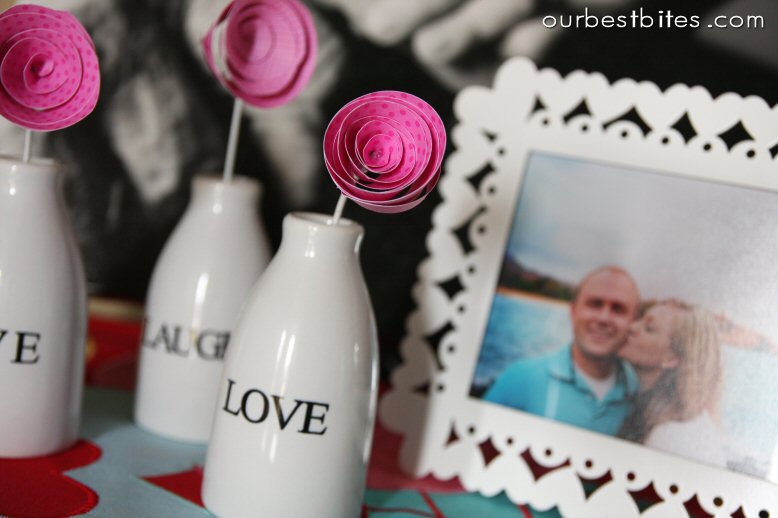
I also grabbed some pink paper and made a few paper roses for my entry table. I just snipped off pieces of a white metal hanger for the stems, and those cute ceramic milk jugs are from the Target dollar section (all three: ‘Live’ ‘Laugh’ ‘Love’ for $2.50) have I mentioned how much I love Target??

Did you notice the black and white picture in the background? I just got it printed onto canvas and I love it. Those are the sweet little chubby newborn hands of my baby Jack, grasping on to the wrinkled, worn hands of my Grandfather Jack, who he was named after. I smile every time I see it. I think it fits perfectly on my love-themed table 🙂
And…since I had felt scraps leftover from my wreath, I couldn’t resist one more little project. (I told you I’ve been crafty!) I’ll show you tomorrow! (see link here)
PS- you can save time and make less flowers if you make large ones. Check out this darling winter wreath a reader, Kim shared!


Questions & Reviews
Hi! I'm a new follower! I love this wreath.
Stefanie- I just used a sharpie. And really I just used a black one so you could see in the pictures. Once you do a couple you probably won't need to actually draw the shape on each felt. I didn't draw any except that one. If you do however want to draw them, I would just use a red or pink sharpie so it doesn't show up when you cut.
What kind of pencil/pen do you use to draw the spiral on the felt? I have a silver marking pencil, but its really hard to use on the felt. Any recommendations?
Just re-read my comment and noticed my "felt" pun. HEHE!! Didn't even mean to do that. 🙂
FYI, I have made a bunch of your recipes and my family and I love them! Keep them coming.
I am SO not crafty, but felt a bit of a craft bug and I loved the way this wreath looked. I'm almost done making it and am so glad that it was an easy project. Tried to get my husband to roll, but he was in and out so much this weekend with church stuff I decided to make it a go on my own. I love it!! Thanks so much for the idea!
LOVE this! So so cute!!
Thanks so much for posting this wreath. I saw the paper one, which was gorgeous, but VERY time consuming! I'm so excited to give this a try!
Okay, too funny. I did a variation of the flowers in the vases from Target a few weeks ago. http://020110.blogspot.com/2011/01/friday-friday-i-wanna-be-one-who-walks.html
Yours are fabulous!
Dianna- it probably took a couple of hours to cut and roll everything (with my husband helping) and then I spent a couple of hours the next day, on and off, gluing. You can also cut way down on the time by making larger flowers.
Oh man, this wreath looks so good! How long did it take you? I've been wanting to make something for V-Day to spruce up my apt, I'll think about this for sure! Thanks for posting this up!
yep, I must do one now! I might even make one for my MIL. 🙂
thanks for the idea/instructions!
this is so crafty and cute. I love using rosettes in projects.
I just love this idea! PLUS, I have those cute little vases from target and was just trying to decide what to put in them- you are a genius!!!!
I just got my own glue gun for Christmas this year and I think it's time to put it to work!! {My super-crafty friend could not believe I did not have one!} This is super cute and I could definitely use some more Valentine decorations. 🙂
Looks cute now, but 15 years from now it'll be my white elephant gift.
What will I need for tomorrow's craft? I am heading a ways away to my nearest Michael's with 5 little ones, I'd really like to avoid another trip.
This is great. How long would you say it took you from start to finish? And what about just the flower gluing part? I'd love to do this craft project with a group of kids I see, but have limited time.
Yep! I'm going to have to make this! Great looking!!!
super cute!
AA- the hanger is from Michael's Craft store. I love it!
That's are adorable! And I've been looking at those milk jug things at Target, trying to figure out what I could put in them for my daughter's room, and pink rosettes are perfect! 🙂 I also have a Jack who was named after my grandfather. My grandfather passed away this Christmas Eve and I'm so thankful that Jack and Pappy got to spend over 10 years with each other. 🙂
Where did you find the cute door hanger? Love it! The wreath is way fun and cute!
Dean Monson- the dark one is dark pink (it was my fave of the three!)And I just covered what was visible, so the back is uncovered.
Heather- that's right. Put your man to work! lol
Keely- aren't they so cute?! Love those little jugs. I should go buy more too- they'd be adorable gifts!
I ran out to Target and bought every last milk jug vase they had. Seriously. And I'm making those paper roses soon- to go in them!
What an AWESOME idea! I may need to try that!
super cute. I love the crafty ideas from my favorite food blog! Keep 'em coming!
ps. check out theidearoom.net for a little variation on how to make cute flowers.
That turned out so cute! I love it with all the different colors.
Oh dear you have really started something now. I have seen quite alot with these flowers but never really had a go.NOW i have lol. Could get very addictive and so good for using up odds and sods…
This wreath is too darn cute and looks so easy. Maybe I will be lucky enough to have my boyfriend 'help' me roll them too! ; ).
Sara, I just got done doing a few yarn, and felt flower wreaths, but I love yours…what colors did you use is that a Red or a hot pink…cant tell in the photo. Also did you put flowers on the back as well or just up to the sides? It is so cute. I'm going out to by another wreath today. Thanks for the amazing idea, and the wonderful food recipes..Now any idea's how to hint to my husband I would like your cookbook for my birthday in a couple of weeks?