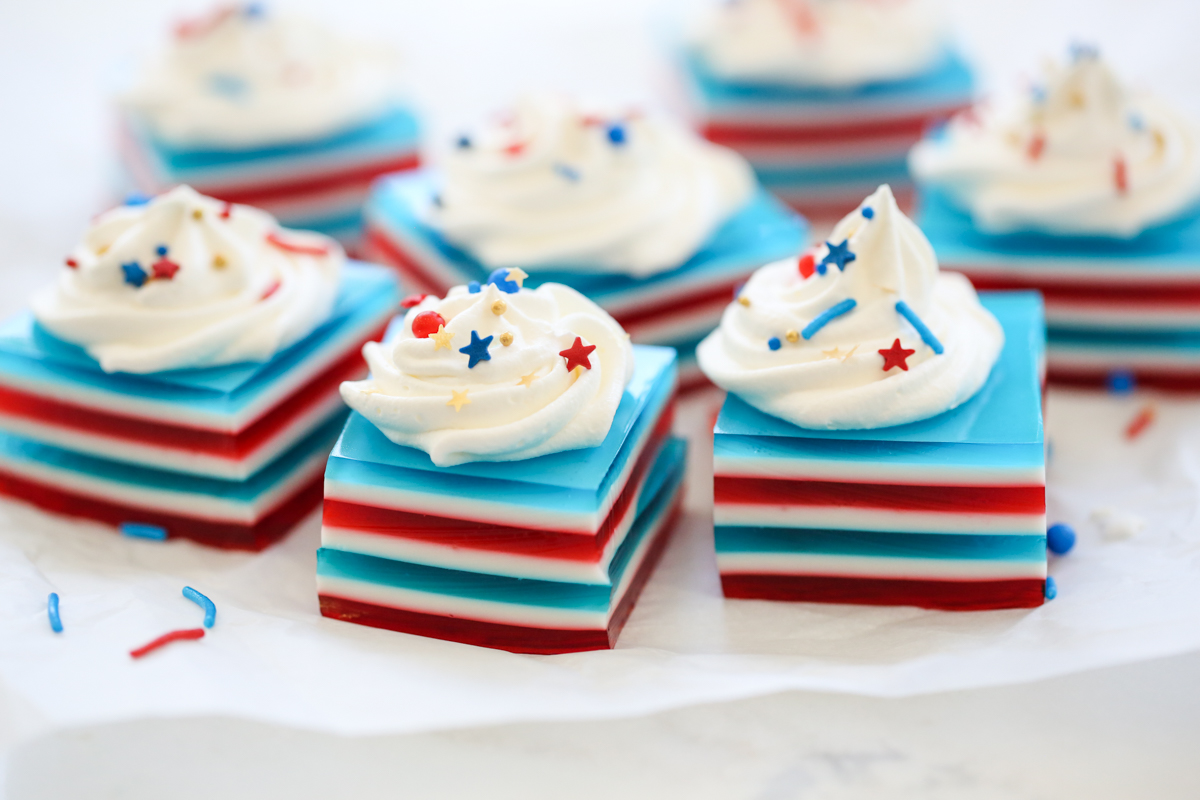
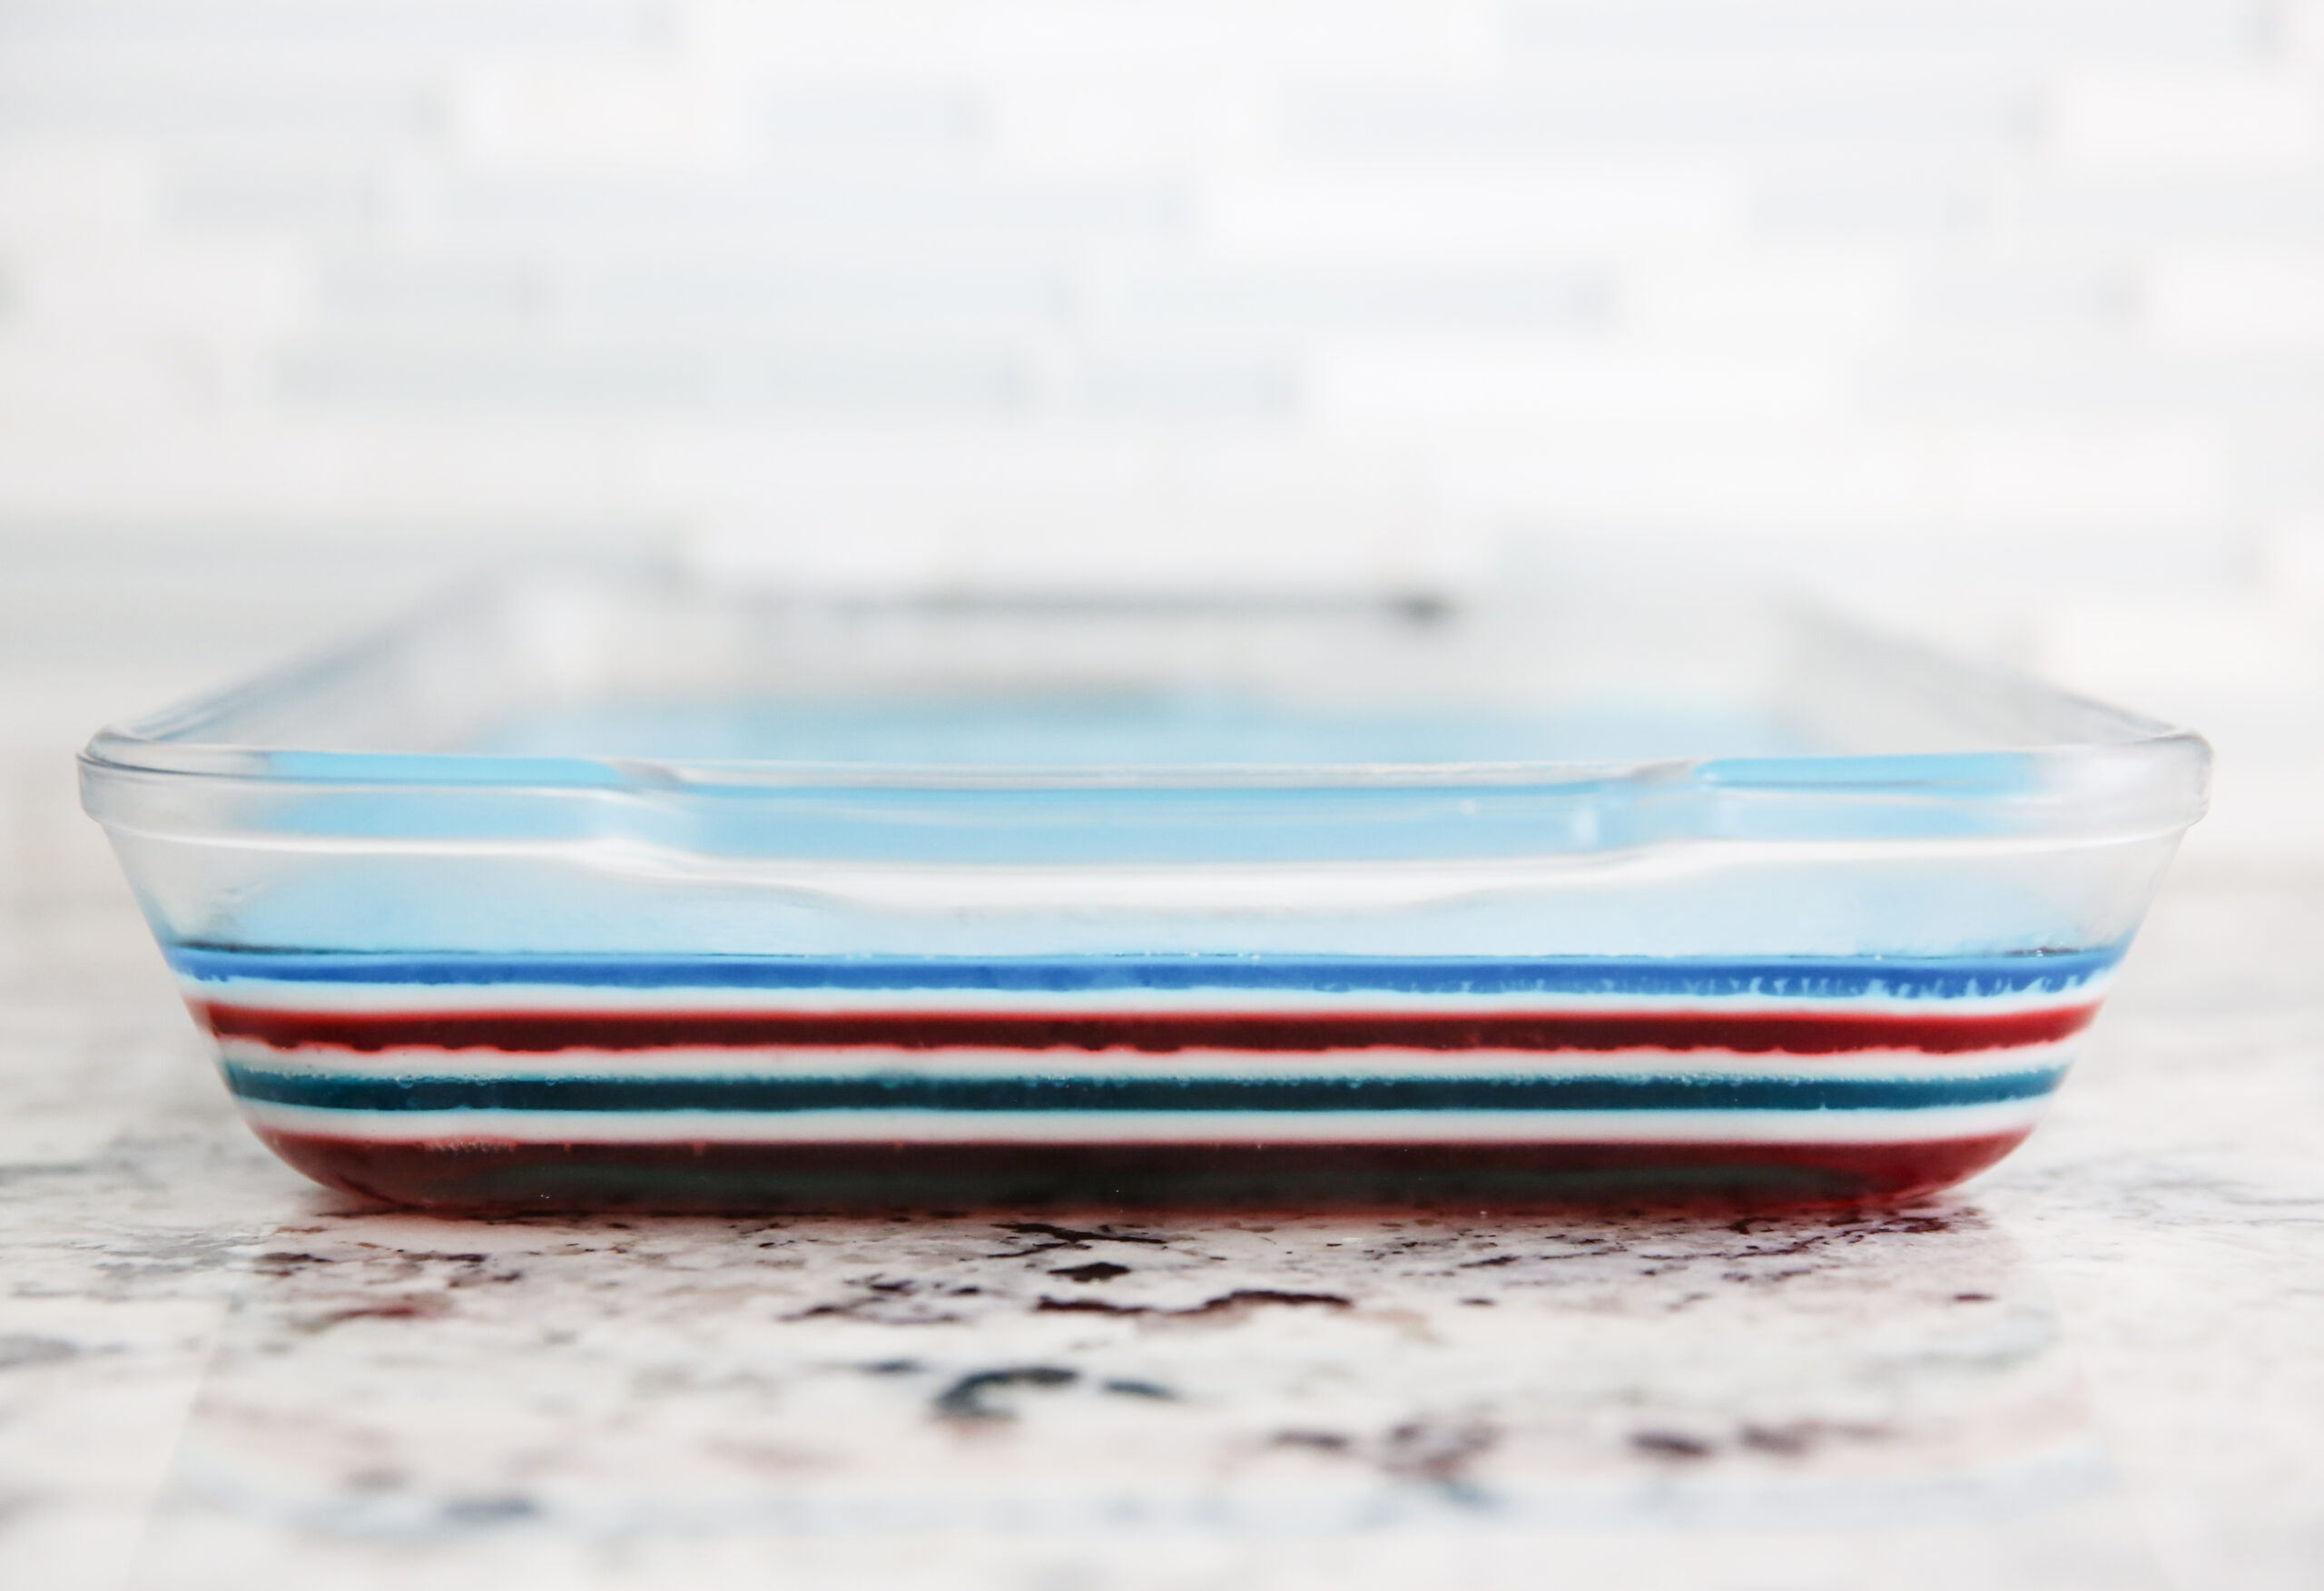
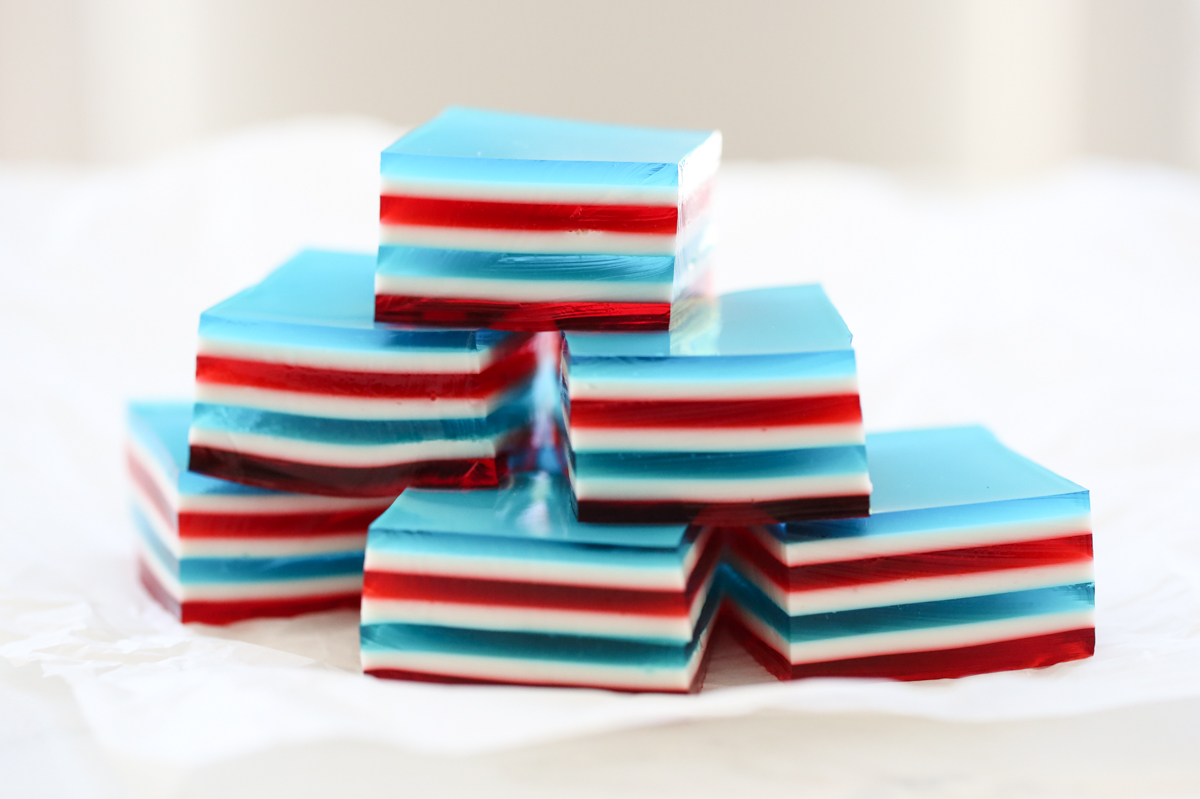
Layered Jell-O is a fun treat that’s perfect for holidays because you can customize your colors. (Another fun one is our Glass Block Holiday Jello.) It’s fun to make in a rainbow of colors, or just a few, depending on your preference. Today we’re going with red, white, and blue for the 4th of July.
Ingredient Notes
- Jell-O – You’ll need four 3-ounce packages of Jell-O (your colors) as well as 4 packets of unflavored gelatin (I use Knox packets, each of which have exactly 2 1/2 teaspoons in them). Unflavored gelatin is usually on the top shelf above the flavored varieties.
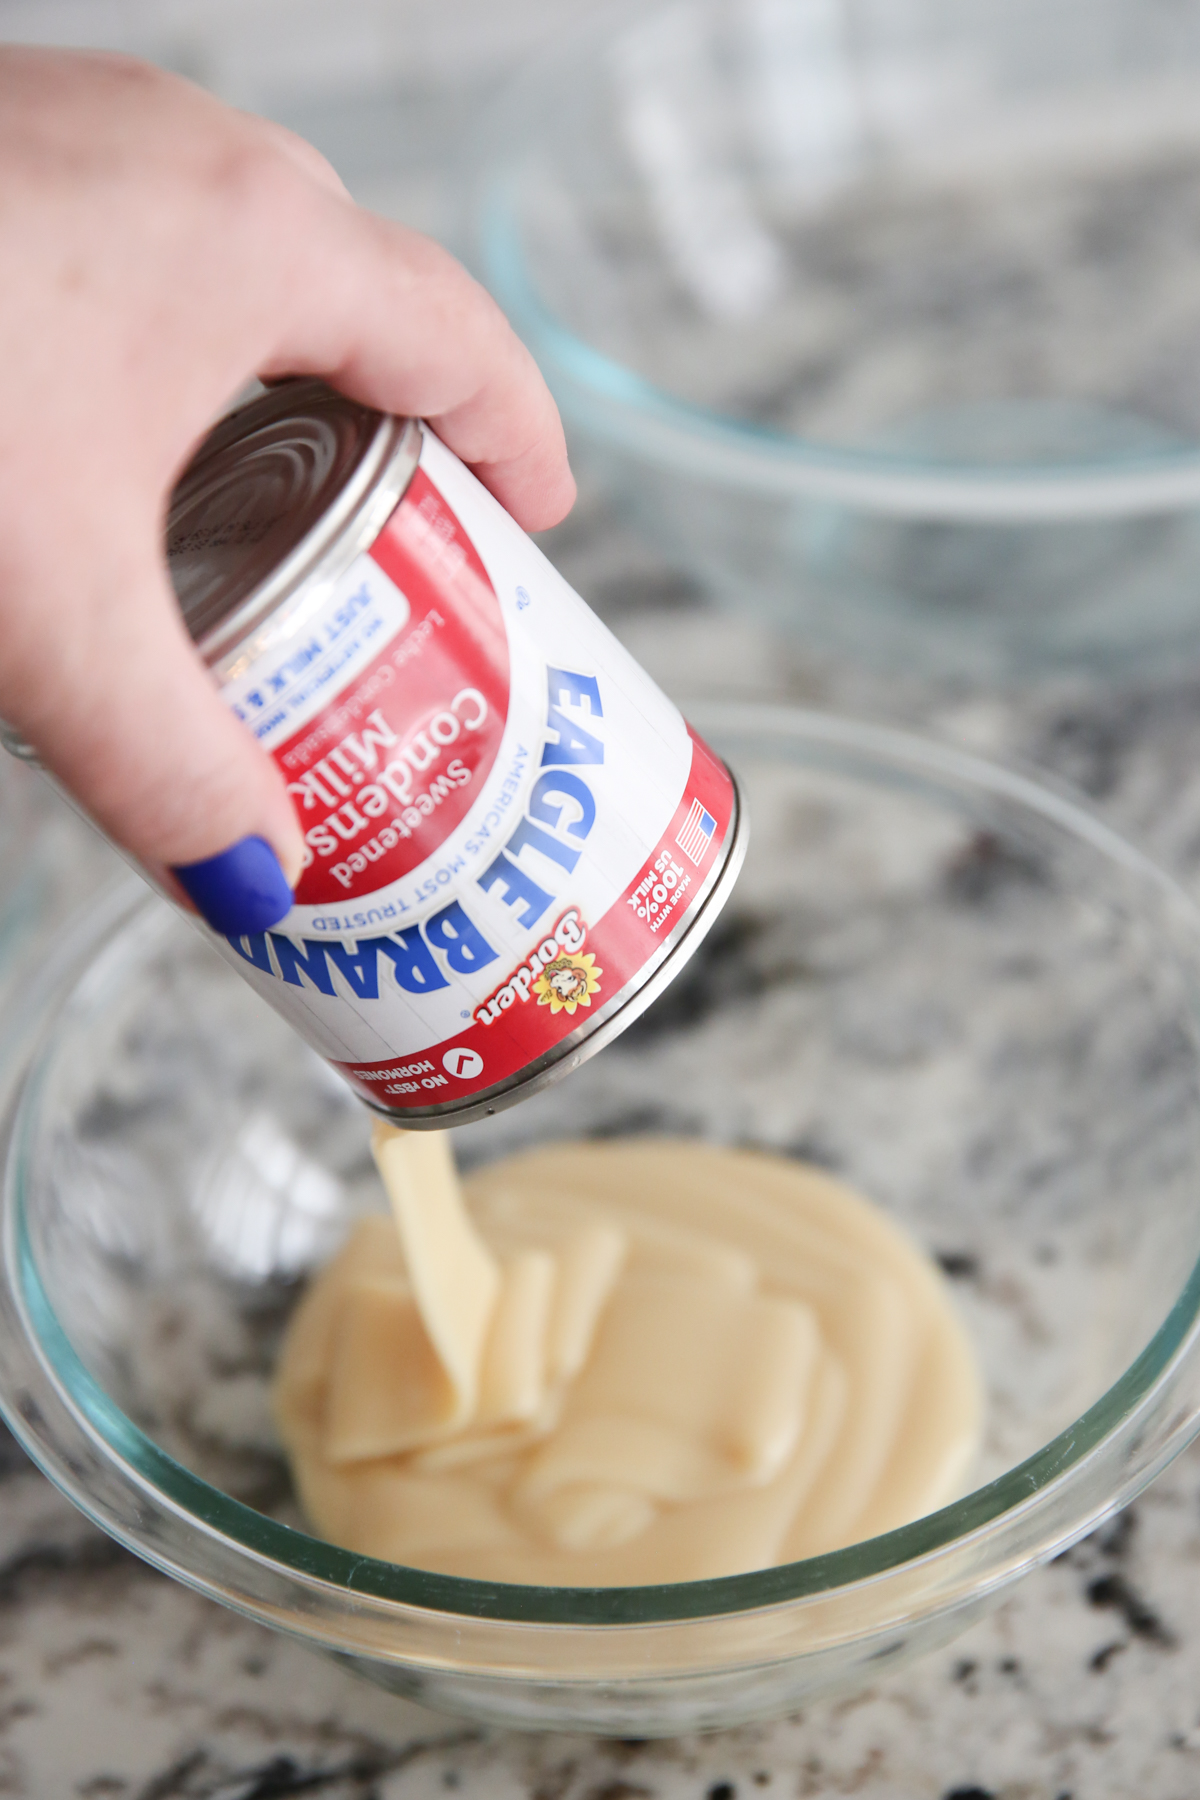
- Sweetened Condensed Milk – This creates your creamy white layers!
How To Make Layered Jell-O
This may see confusing at first, but after you get the idea, you literally just repeat the same steps with every layer. You’ll want to plan to make this 1 day ahead of time to allow time for all the layers to cool. The steps are very simple, but it does take some time.
Colored Layers: Your color labels are small boxes of Jello with additional unflavored gelatin mixed in. This keeps the layers firm for layering, but not too firm to enjoy!
Creamy Layer: This layer is made by combining sweetened condensed milk, water, and unflavored gelatin. It’s a sweet, creamy jello- which might sound strange, but it is actually such a great compliment to the fruity layers.

Here’s what the process looks like:
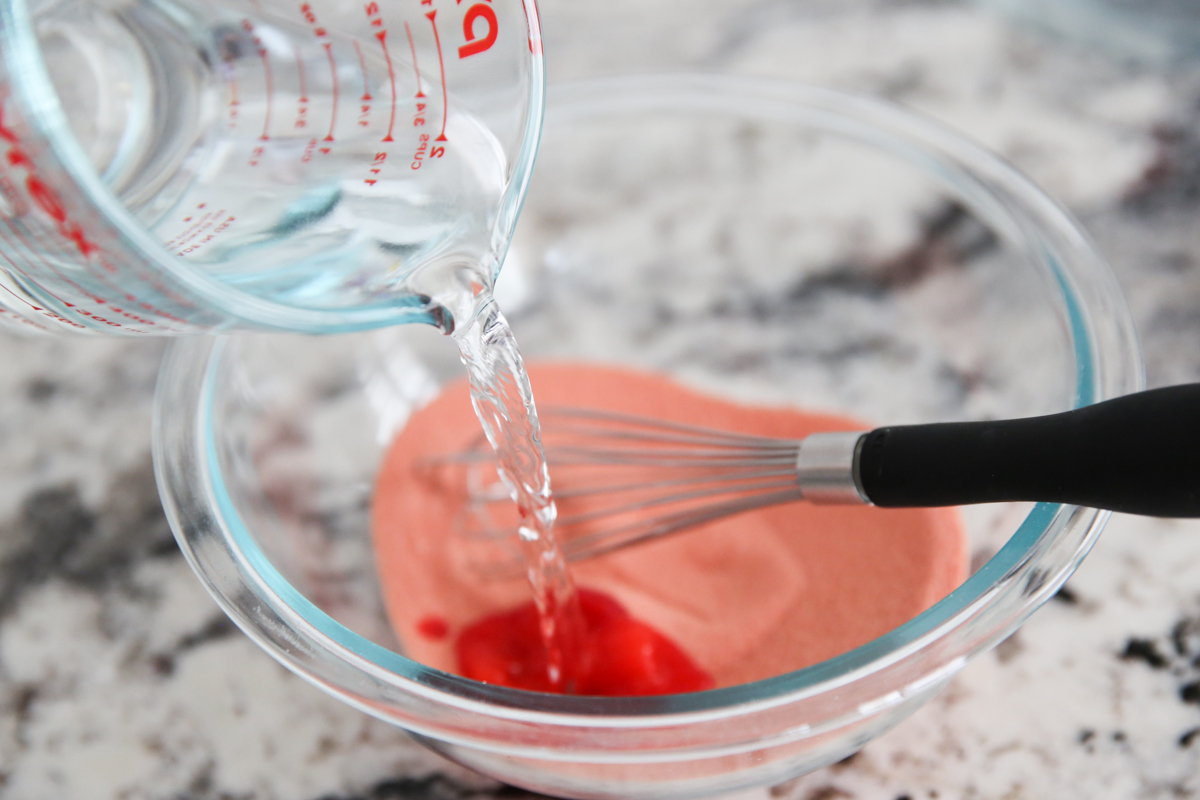
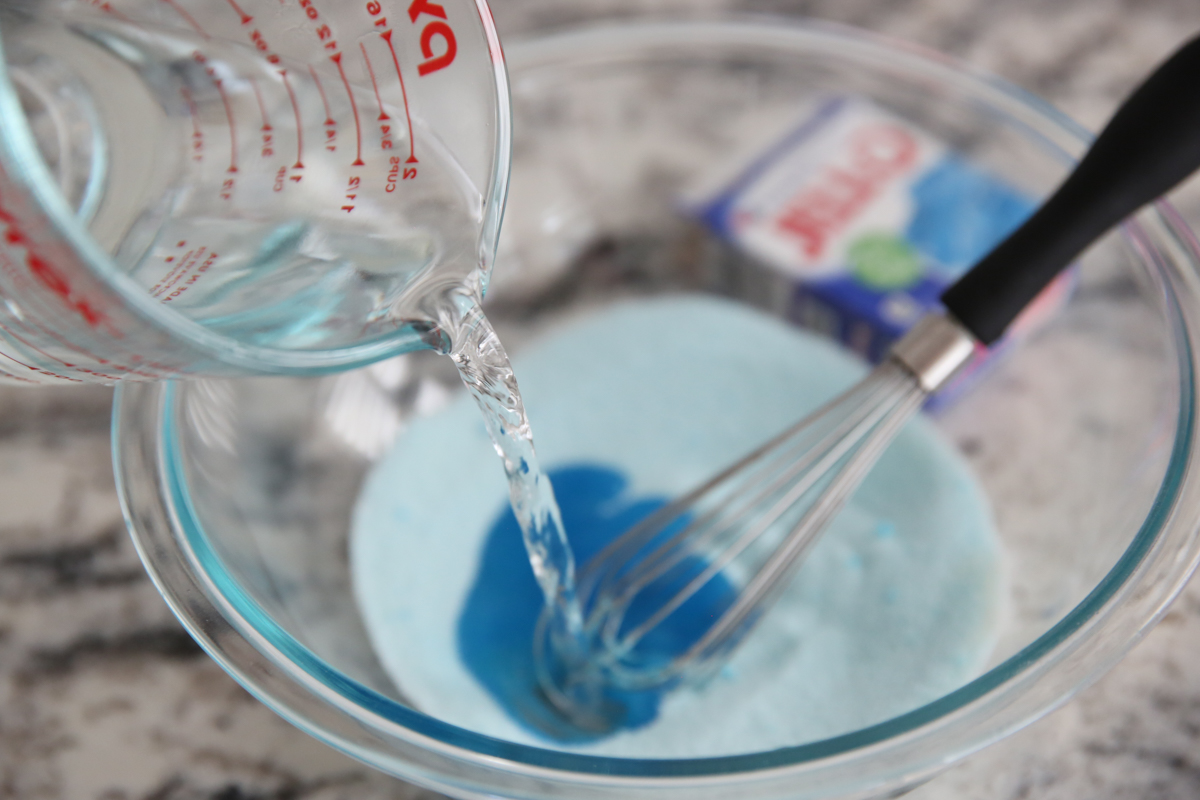
- In a small mixing bowl you’ll mix one 3-ounce package of Jell-O with 1 1/4 teaspoons (1/2 a packet) of unflavored gelatin and dissolve it in 1 cup of boiling water. Pour this mixture into your 9×13 pan and place that pan on a level shelf in the refrigerator. Because the jello layers are so thin, each one should be set rather quickly, in about 10-15 minutes.
- While your first layer of Jell-O is setting, you’ll make your sweetened condensed milk layer. This single batch will be the full amount and you’ll simply use one cup of it at a time between your colored layers.
- Each time you finish a layer and put it back into the fridge, you’ll start mixing your next layer. Letting it sit on the counter while your previous layer chills gives it a chance to cool off.
- When all 7 layers are complete (4 colored layers and 3 white layers) and have set up, carefully cut them into squares and serve!
Related Recipes
Looking for other fun, patriotic treats? Check out these other Our Best Bites favorites!
White Texas Sheet Cake (Red, White, & Blue Edition)
Glass Block Holiday Jello {Festive!}
Mini Cheesecake Tarts
Red, White, and Blue Patriotic Strawberries
Frequently Asked Questions
Can I make this ahead of time? You bet! Prepare the Jell-O in the pan and then store, covered, in the refrigerator until ready to serve. It’s good for a couple days at least! Cut as desired and enjoy!
Did You Make This?
I’d love to hear from you! Snap a picture and tag me on Instagram, then come back and give this recipe a rating!
Print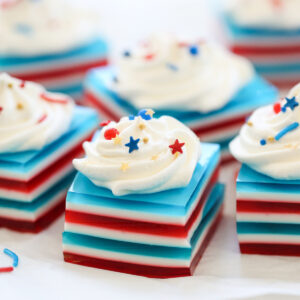
Layered Jell-O
- Total Time: 2-3 hours
- Yield: 9×13 pan
Description
Mix and match colors you love for with layered Jell-O! Pretty to look at and fun to eat.
Ingredients
- 4 3-ounce packages of Jell-O
- 1 14-ounce can sweetened condensed milk
- 4 packets unflavored gelatin
- Boiling water – I like to keep a tea kettle warm
Optional for topping: sweetened whipped cream or cool whip
Instructions
- Spray a 9×13″ pan with non-stick cooking spray and wipe out the excess with a paper towel. Set the pan aside.
- Mix 1 package of Jell-O with 1 1/4 teaspoons (1/2 packet) of unflavored gelatin. Add 1 cup boiling water and stir to combine completely. Pour the first layer into the prepared pan and refrigerate in a completely level shelf of the fridge for 20 minutes.
- While the first layer is setting, mix 1 cup boiling water with the can of sweetened condensed milk in a smallish-medium mixing bowl. Set aside.
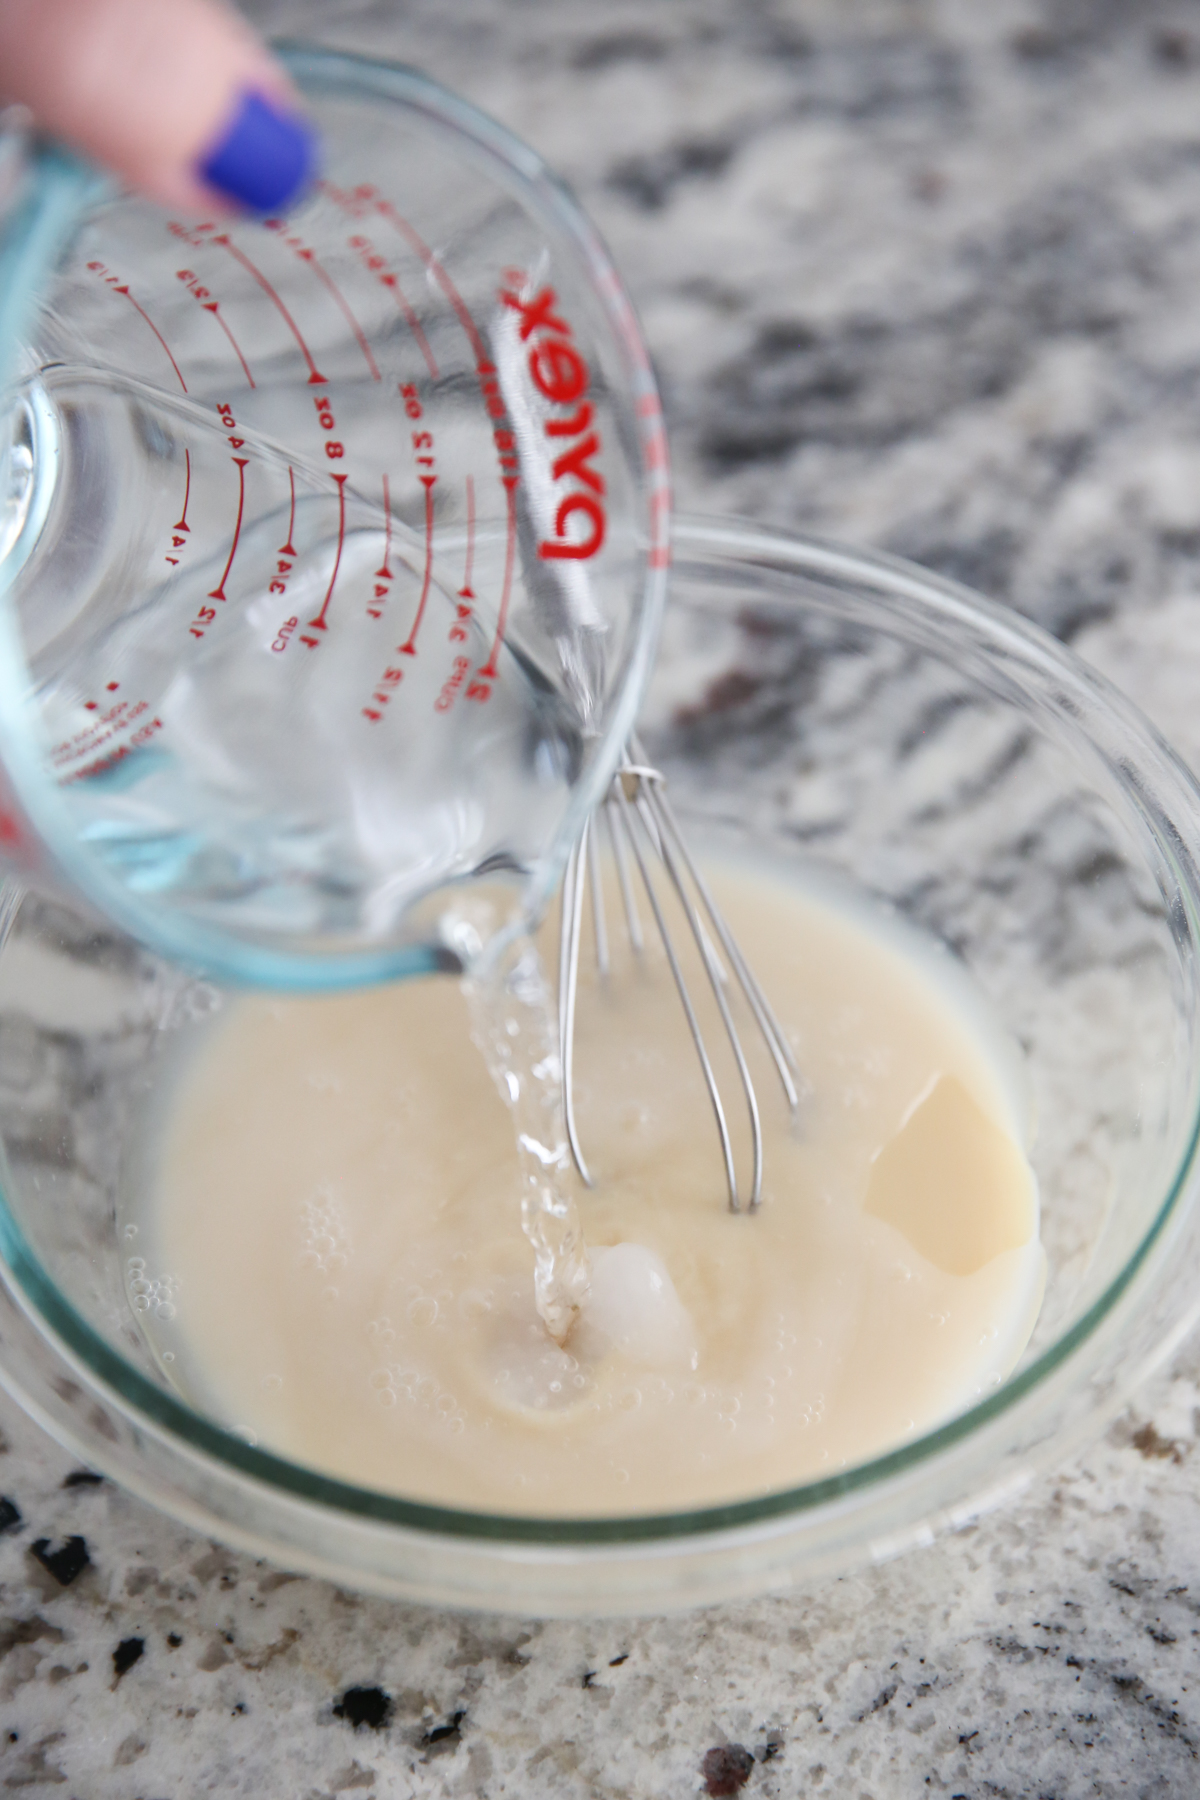
- In a small bowl, sprinkle 2 packets of gelatin over 1/2 cup cold water. Allow it to stand for 2-3 minutes or until the gelatin has absorbed the water and it becomes grainy. When it is ready, add 1/2 cup boiling water and stir until the gelatin is completely dissolved. Add the dissolved gelatin mixture to the sweetened condensed milk mixture and stir completely. Leave at room temperature.
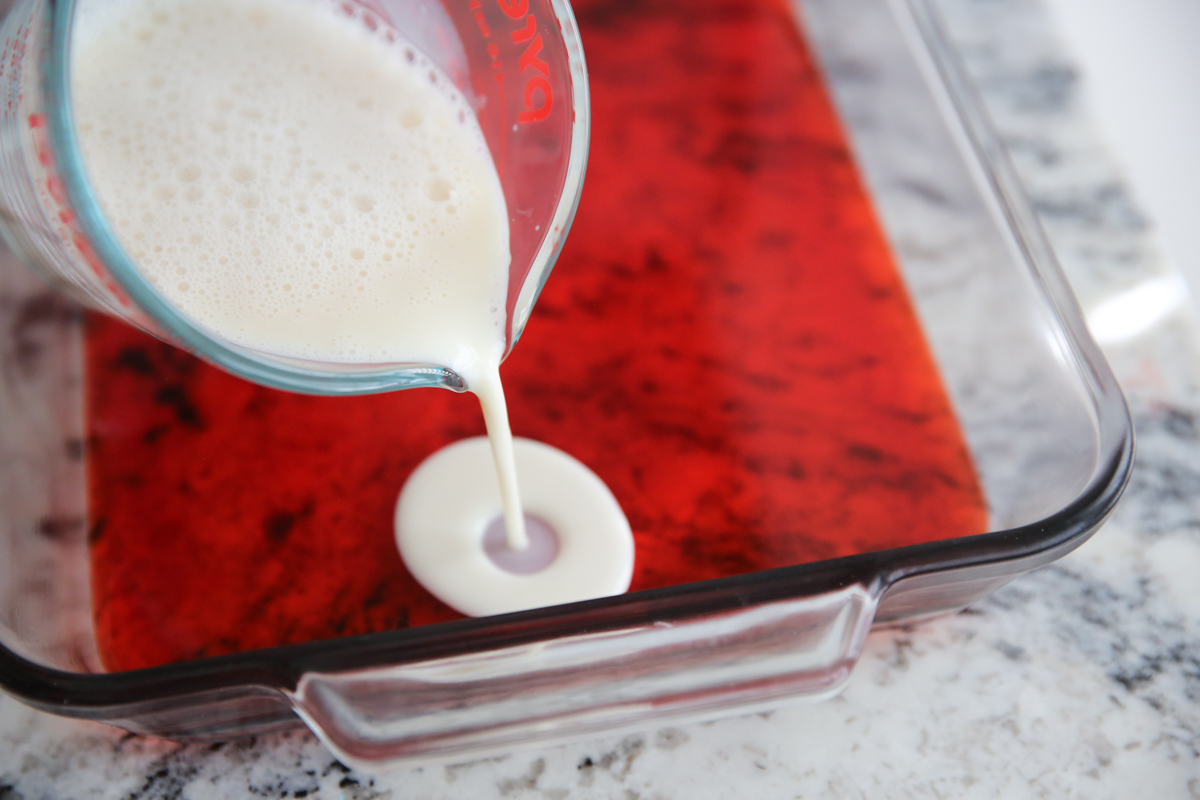
- When the first layer of Jell-O has set, carefully pour just 1 cup of the sweetened condensed milk mixture over the Jell-O layer and return the pan to the refrigerator. Chill for 15 minutes or until set.
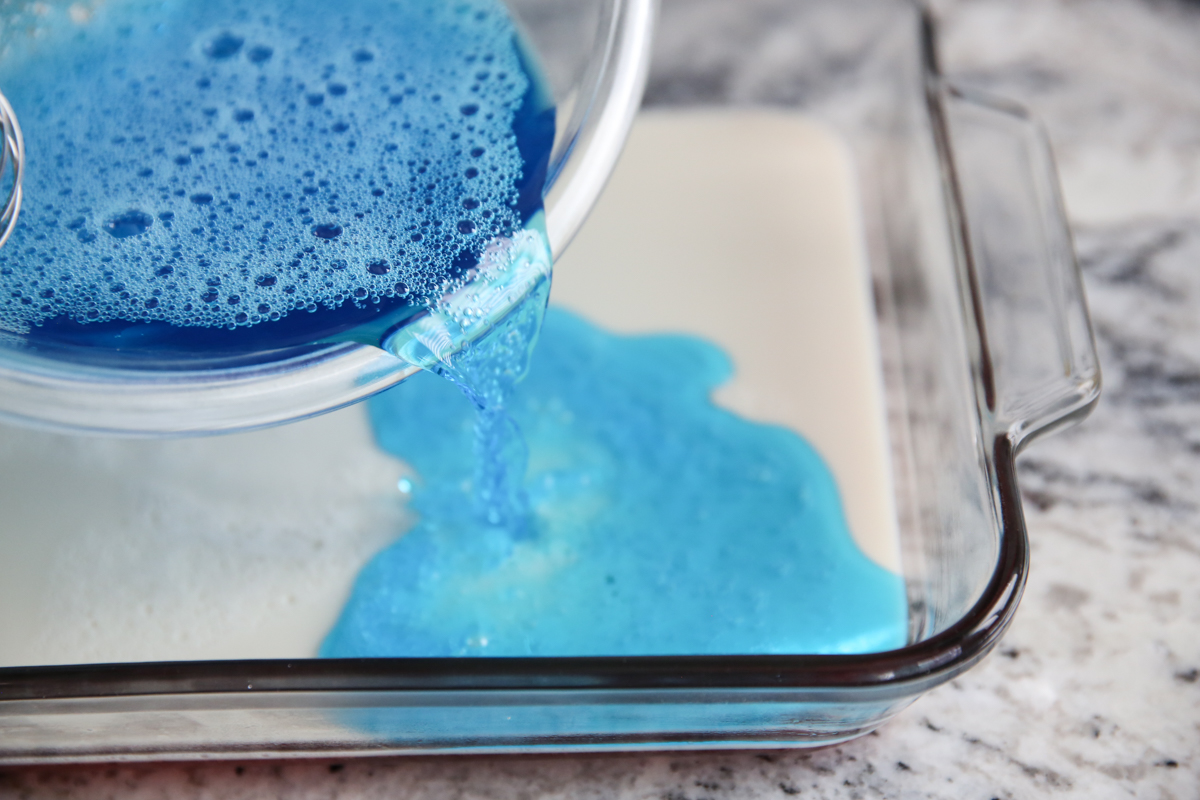
- After you return the pan to the refrigerator, repeat the Jell-O step (1 package Jell-O + 1 1/4 teaspoons unflavored gelatin + 1 cup boiling water). If you do it immediately after you put the pan back in the fridge, it should be room temperature by the time the sweetened condensed milk layer has set up. Pour it over the milk layer, chill, repeat with milk, then Jell-O, then milk, then Jell-O. You should begin and end with Jell-O layers and have 4 layers of Jell-O with 3 layers of milk in between. As you go, if the milk begins to set up, microwave it for 5-10 seconds to soften.
- When the last layer has set up, carefully cut into cubes. If you run your knife under hot water for a few seconds and then dry it, it will help make nice clean cuts. You can optionally top squares with some sweetened whipped cream or cool whip!
- Prep Time: 20 minutes
- Refrigerator Time: 2+ hours


Questions & Reviews
How would these come out with sugar free jello? Husband got all excited when he saw an end cap of jello and didn’t realize he bought the sugar free stuff. Trying to use the stuff up! This looks fun enough my people might try it!
I’m sure it would be fine! Let us know how it turns out if you try it!
I commented above before I saw your post. Personally, the unsweetened Jell-O doesn’t set up as firmly as the original Jell-O so you might need to let each layer cool longer before adding the next layer or take more care pouring the next layer onto the previous layer. I’ve even seen recipes that stated that you should not use unsweetened Jell-O.
I made this today & it looks really good, one suggestion that I have when pouring the second(third,fourth, fifth etc) layers pour the jello over the back of a spoon so it disperses more gently, my first layer got a little messed up but it was smooth sailing after that.
Also works great if you skip the gelatin and just mix every other jello layer with the condensed milk. Those layers will come out paler but makes for pretty rainbow layed jello
Can I freeze this ?
how far in advance could I make this recipe?
Thank you for the recipe! A note for your Readers – please DO be sure to let the first white layer cool to room temperature (as the recipe says) before pouring it in the pan. Otherwise, you will have a pink layer like I do – Ooops!!! =)
I always seem to end up with one layer that breaks through even though I think I’ve let it cool to room temp. I always pour the new layer over a spoon or rubber spatula held just above the lady layer to spread out the force of the new layer hitting the old layer – confusing?
how many grames in the unflavoured gelatin pack ??
You know, my mom always made this for Thanksgiving (a multi-colored version, 14 layers!) but she passed away before she was able to teach me how she made it. Thank you for putting this up. It brings back so many happy memories. 🙂
I have NEVER had a problem making jello in my life! However, I ruined an expensive recipe because it didn’t set up. I have bought a package of unflavored gelatine and want to add to this to see if I can salvage it. Thought before I do add it I would ask you for help. Thank you. Maggi
The unsweetened Jell-O never sets up as firmly for me as the original Jell-O.
This is so cool! Would be totally cute cut using a star cookie cutter!
Thanks a lot for ruining Jello for me! Growing up (and in true Mormon fashion), my mom always made a red, white & blue striped jello mold of the United States for the 4th of July. (My brother & I always fought over who got to eat Texas.) It still doesn’t feel like the 4th to me unless I have jello. Correction: it USED to not feel like the 4th unless I had jello. This year, I took one bite of the plain red jello I made for my kids (give me a break–we just moved & I’m still unpacking, no fancy desserts here), and all I could think of was “fruit flavored skin.” Ack!! You’re right! I don’t think I’ll be able to eat jello again!
Love your blog, guys. Keep it up!
Beautiful! My question is why do you leave out the cold water? In my experience doing that I have never liked how thick the jello tastes with less water, just wondering if this is an issue with this recipe. Would it mess it up to add more water and just have thicker layers? Thanks!
If you put more water, the jello won’t firm up as much. You would have to spoon it out onto plates, it would not hold its shape. This is basically the difference between plain jello and jello jigglers.
I made these for the first time and they were a hit and so simple, just takes a little time. I am planning on changing the colors up for many holidays to come. My kids loved peeling the layers apart. I even ate 2 squares and I really never eat Jell-o.
Thanks
I will have to try this. One of our Thanksgiving traditions is Rainbow Jello – similar to this but with a translucent layer and a whip cream opaque layer for each color – 8 layers total.
Just made these, LOVE THEM! Thank you!
I made these for a church contest yesterday and won several prizes! They looked beautiful and tasted great. Thanks so much for a great recipe (and for making me look good =)
What if I only wanted 3 layers? One red, one white, and one blue.
These look so beautiful!! I’m making them for our 4th of July/my daughter’s 8th birthday party. How far in advance can I make them before they start to get yucky? By the way, I’m just taking the brownie crust out of the oven for the ice-cream cake (your mint choc chip ice-cream squares recipe!!) – I made it on Easter, and now everyone wants it for their birthday cake!! Thanks so much for all the fabulous recipes, girls!!
Donna, you can definitely make it a day or two ahead of time. Enjoy the ice cream squares too!
Boy am I happy you did this post! I had planned on making these and was not in the mood to sift through my recipe collection to find these. One question *no judgment, please!*- think I could make these into Jell-o… shots? Or will the texture (and not just my guests) get sloppy?
We don’t drink so we’re not the girls to ask for that, lol Sorry!
No worries- However, if anyone does drink, I added 1/4 c vodka per layer and it worked like a charm! 🙂 Thanks for the great and lovely recipe!
Kate, stop answering questions and go have that baby!
…or you could cut them into rectangles and pipe some white frosting stars on top!
Maybe a few drops of blue food coloring to make the blue a little darker?
I was just thinking yesterday that I would look around on your blog for one of the cool Jell-O recipes and make a patriotic version for next week… Thanks for saving me the trouble! Looks good!!
how fun! I’m curious what the layer with the sweetened condensed milk tastes like? Is there anything to compare it to?
It’s just sweet and creamy and neutral, kind of like a vanilla cream layer. It’s yummy, and Jello milk creeps me out, lol.
This is such a cool idea! Love it!
could you cut them into stars?
For sure! They’d be adorable! I would probably let the Jell-O sit overnight and then warm up the cookie cutter first, though–that will help you get really pretty cuts.
Approximately how long did this take you to make? I want to make this but I work full time so I want to make sure I have enough time to have each layer set!
Once you get into the swing of things, it doesn’t really take that long–a couple of hours, tops, and that’s with lots of down time. The first 2 layers take the longest because you’re waiting for them to cool, but the rest of the time, the cooling happens while the Jell-O’s setting.
Love this!! And so glad you linked back to the older post. I think I’m going to make the jumble squares with blue and white, and then this layered one with red and white… and then put them on a platter to look like a flag?!! Maybe thats going a little too far…
So pretty! I love it!
Super cute! I love these festive patriotic posts! Hope you’re feeling good and getting close to having that baby…..
cool