 I almost named this post, “How to cook a steak that doesn’t suck.” Vegetarians beware; this one is not for you (just in case you haven’t noticed yet). Go browse our dessert section today while the rest of us stay here and look at slabs of beef. It’s no secret that Kate and I like our meat. I’ve actually noticed at a lot of the business related events we attend where fancy dinners are involved, the women in attendance almost always order fish, or grilled chicken, or a stinking side salad, and then leave 3/4 of it on their plates when they’re finished. If there’s a beef filet on the menu, Kate and I both order it about 98 percent of the time. And you better believe we chow down every last bite too. I want to show you all that you really can cook an awesome restaurant quality steak at home. You can also totally ruin a perfectly good restaurant quality steak at home. So follow our steps to grill a steak that doesn’t suck, okay?
1. Choose the Right Cut
I’d saythis step is the most pivotal. There’s only so much you can do for a steak that’s not that great to begin with. Most (certainly not all) really good steaks are on the expensive side, so let’s just get that out of the way. You’ll need to be willing to spend a bit more for a premium cut and it will be well worth it when you take that first juicy bite. There are some cheaper cuts of steak that can be great too, but in general, you won’t have much luck hitting the bargain basement. Pay attention to thickness as well, for best results buy steaks that are at least one inch thick and preferably more like 1 1/2.
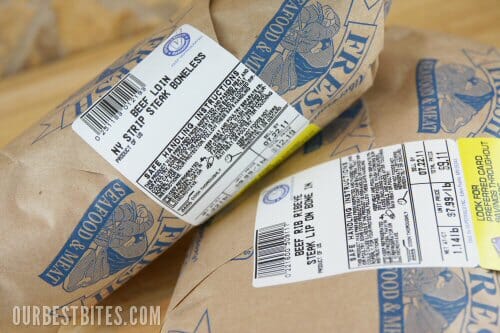 I could write a whole post on different cuts of steak, so just for today we’ll focus on the most traditional backyard bbq steaks. My personal favorites for grilling are Rib Eye and NY Strip, so I’ll show those in my photos. If I had to go for just one, I’d pick a rib eye every time.
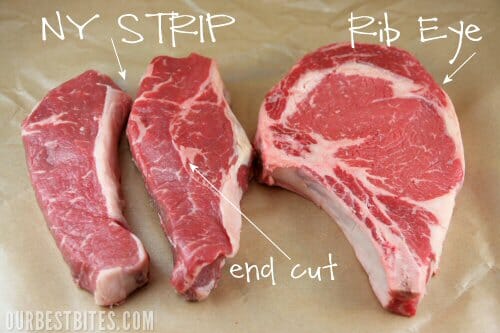 A quick note on the strip steak- my butcher taught me this. See the steak in the middle? How it’s got that line of what appears to be marbling right up the center? Well it’s not marbling, it’s gristle, and it comes along with the “end cuts” on strip steaks. So if you’re looking at steaks, avoid those end cuts. They’re not bad, they’re just not as great as a non-end cut. Notice both cuts of steak have good marbling. That fat adds both flavor and juiciness. Don’t be afraid of the fat! Here’s a run-down on some popular grilling steaks (According to me. As opposed to a professional meat person. But I eat a lot of meat, does that count?)
T-Bone: 2 steaks in one! You get a strip steak on one side of the bone and a tenderloin on the other. It’s usually a very thick cut with excellent marbling and flavor. Generally comes with a price tag.
Porter House: Same as the t-bone, only the tenderloin is larger.
Rib Eye: You can buy rib eye on or off the bone, I think on the bone is more flavorful. One of the most flavorful cuts of steak due to the amount of marbling. You have to cut around quite a bit of fat to get to the meat, but it’s well worth it if you ask me. Incredibly tender. I heart rib eyes.
Strip Steak (NY Strip, among other names): Slightly leaner, but still with good marbling. A little firmer than all of the steaks noted before, and excellent flavor. Generally more affordable; just don’t over cook. I probably buy this one the most.
Top Sirloin: Probably the most affordable cut of those mentioned, but not a lot of marbling. Texture can be quite tough. I don’t buy top sirloin very often because it’s sort of hit or miss for me. Mostly miss.
Tri-Tip: This is my other favorite steak. It’s kind of hard to find, but we always buy it at Costco. It’s fantastic on the grill and tastes similar to a Strip steak. If you see it, give it a shot, we cook this one quite often at my house.
*If you are working with a less-expensive cut of meat, check out this cool method of salting. Jaden of Steamy Kitchen has a fantastic explanation of how to turn “cheap ‘choice’ steak into Gucci ‘prime’ steak”
We’ll cover Filet Mignon in another post because I think it’s better pan seared. Other great cuts of steak for the grill are thin cuts like Flank Steak (one of my faves) and Skirt Steak. These types are best in marinades so we’re not talking about them right now. But if you’re interested, try our Sweet and Savory Flank Steak, Lime-Chili Rub, or this Chimichurri on steak.
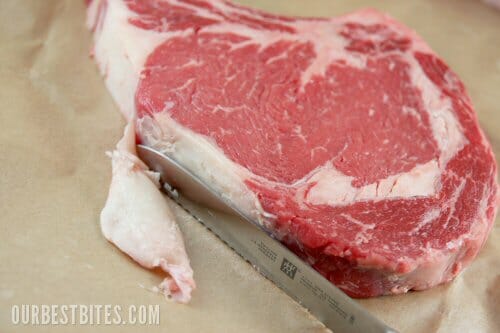
2. Trim Excess Fat
When it comes to steak, fat is not the enemy. Good marbling provides excellent flavor and keeps steaks juicy; it’s one of the things you should look for in a steak. But excess fat around the outside just melts on the grill and can cause flare-ups resulting in burnt steak. So use a sharp knife and trim around the outside edge. There’s no need to remove all fat, just keep a thin layer. Fat is easier to cut when it’s cold, so trim right when you take the meat out of the fridge. Then let the steaks sit at room temperature for about 15 minutes or so.
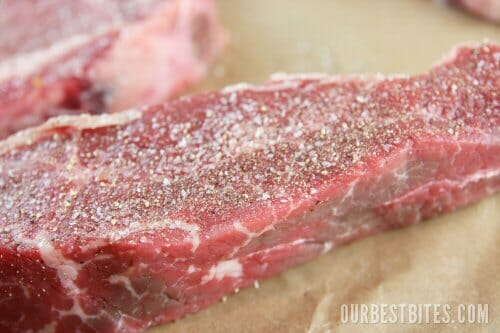
3. Season
I grew up dipping all cuts of meat in A1 Sauce. It was my thing. I also put A1 on rice, pasta, corn and potatoes. I told you, it was a thing. I will never forget the horror my newlywed husband expressed the first time we sat down to a steak dinner and I drown the succulent meat in A1. He told me it was not only offensive to him, the cook, it was offensive to the cow. It was he who first taught me that a good piece of meat only needs two things: salt and pepper. And I’m not talking about those dirty old table salt and ground pepper shakers that have been in your spice cabinet for ten years. Admit it, you have them. Use kosher or sea salt and freshly cracked black pepper. And be very generous. The salt and pepper create a crust and you can use more than you think you need. We’re cooking big hunks of meat; it’s not a time to skimp. Marinades have their place, a place I love, but save them for cheaper/tougher cuts of meat that really need them (like flank steak). You can however use spice rubs. I still wouldn’t recommend anything too strong, but the grill seasoning mixes tend to be pretty good with things like salt, pepper, onion, garlic, etc.
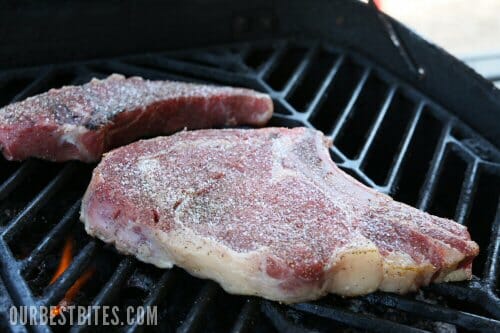
4. Sear
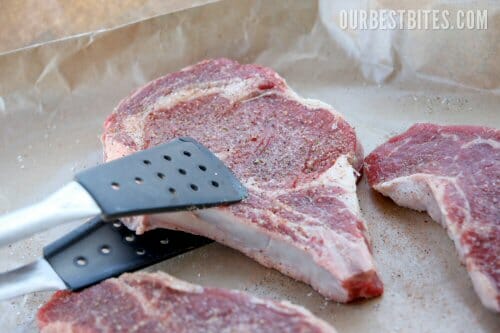
While you’re working on the steps above, like trimming fat and sprinkling salt, have your grill pre-heating. If you’re using charcoal you’ll want very hot coals. Use the 2 second rule to test them; you should be able to hold your hand a few inches over the grill for only about 2 seconds before it’s too hot. Once they are hot, move them to one side of the grill so you can have both direct and indirect heat. If you’re using a gas grill, crank that baby to high. When the grill is preheated (on a gas grill let it heat for at least 10-15 minutes). Use tongs (I love these extra long ones) to move your meat around, not a big fork. Puncturing your steak will only let the juices run out and cause them to be dry and tough. Place the steak on the grill and do not move. Do not get fidgety and move it all over and flip it 400 times. You should flip a steak one time only. And while we’re on this topic, another thing you shouldn’t ever do is take a spatula and smash the steak into the grill. I cannot even tell you the number of times I’ve seen people do that at bbq’s, to both steaks and burgers. I think there’s something about the sound of the juices sizzling on the flames that make people think they have magical steak cooking powers. Really they just have magical steak-ruining-powers.
Place the steaks on the hot grill to sear. Don’t move them for 2-3 minutes. If you want diagonal hatch marks, you can rotate your steak 45 degrees after a couple of minutes and then finish searing. Use the tongs again to flip steaks and sear the other side.
5. Finish Cooking
If you cook the steaks at the super high heat the entire time, the outside will be burnt by the time the center cooks. So after searing, turn gas down to medium heat, or move steaks to the indirect heat side of your charcoal grill to finish cooking.
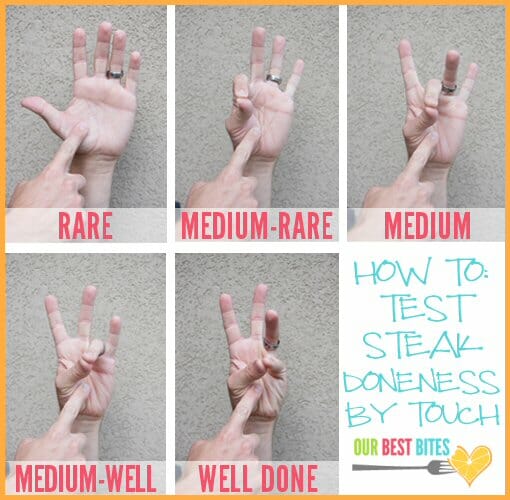
I said earlier that picking the right cut of steak is the most important step, but the second most important step is to cook it perfectly. When it comes to steak, you can’t follow exact times because it will vary with every cut and every grill. Temperature is the most reliable guide (I’ve outlined temps in the printable version of this post). I love these mini steak thermometers; they come in a set of 4 and they’re short so they sit perfectly in a steak. But I’ll be honest, I very rarely use thermometers anymore. I’ve cooked so many steaks that I can tell how done a steak is by how it feels. This is one of the first little tricks I ever posted on OBB, and it’s a great one. Hold your non-dominant hand up with fingers extended and use your other pointer finger to feel the palm where I’ve indicated below. It should feel nice and soft, quite squishy. That’s the feeling of a rare piece of meat. Now put your first two fingers together and feel again; it’s a little firmer, right? That’s similar to the feeling of a medium rare piece of meat. Follow the chart below and you’ll get the hang of it. Go head, do it! You know you want to. I’ll wait for you.
Annnnd we’re back. Cook enough steak and you’ll soon know by a quick touch how done it is.
6. Rest
Once you take your steaks off the grill, don’t cut into them right away. Steaks need to rest so the juices can redistribute. Cover with foil to keep them warm and let them rest for at least 5 minutes.
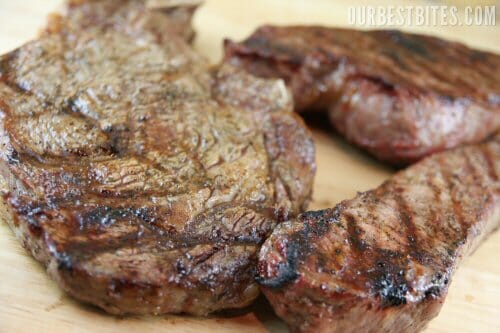 7. Embrace your carnivorous side.
Now, we eat.Steaks can be finished off with an extra sprinkling of kosher or sea salt or a pat of herbed butter.
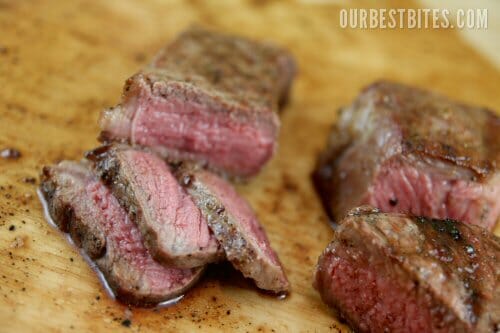 Now you’re all armed the ability to cook a steak-house worthy steak, right at home! Happy grilling, my friends. Invite me over, okay?
How to Grill the Perfect Steak
Tutorial by Our Best Bites
1. Choose a good cut of meat. My personal favorites for grilling are Rib Eye and NY Strip. T-Bone and Porterhouse are both premium cuts. If you can find Tri-Tip, it’s another one of my favorites.
2. Let steaks sit at room temperature for about 10-15 minutes while your grill is pre-heating. Trim fat off around edge of steak and season liberally with kosher salt and fresh cracked pepper on both sides.
3. Heat your grill to a very hot temperature. If you are using charcoal, after they are heated, move them to one side of the grill so you have both direct and indirect heat.
4. Lightly oil grill if needed. Use a pair of tongs to hold a paper towel dipped in oil, or use tongs to hold a piece of the trimmed off fat to to quickly and lightly grease grill grates.
5. Sear. Place steaks on hot grill and do not move for about 2-3 minutes. If diamond grill marks are desired, rotated meat 45 degrees and grill a little longer. Use tongs (not a fork) to flip steaks and cook for 2-3 more minutes.
6. Finish cooking. Turn heat down to medium-high and close grill lid if you have one. If using charcoal, move steaks to the side not directly above it. Continue to cook until internal temperature reaches:
Rare: 120-125°
Med-Rare: 130-135°
Medium: 140-145°
Medium-Well: 150-155°
Well Done: 160°+
7. Rest. Use tongs to remove steaks from grill and cover with foil to keep warm. Let rest for at least 5 minutes before cutting into.
8. Eat up.


Questions & Reviews
Thanks so much for this post. I just bought steaks and wanted to fire up the grill tonight. I said to myself I have to find that hand trick of telling the doneness of the steak.
I love this tutorial. One silly question. What do you press the steak with – your finger? I live in AZ and I can’t get the grill cool enough for med when it is 113 degrees outside. So high it is. I will move to side where I can turn off burners to finish cooking. thanks, kathy
I didn’t see an answer to the question about touching the steaks for doneness…it only makes sense to me you’d have to use a finger but since the steaks should be hot I’m not sure how you test them.
It’s just a general idea to help you visualize. You can just press it with tongs, or whatever you’re using to flip the steaks.
I went and bought some NY Strip the same day this tutorial posted (avoiding the end cut, of course)…and my family said it was the best steak they had ever had. Thank you for making me look like a grilling pro!
I have always left the grilling to my husband…. even though I consider myself to be a pretty good in the kitchen, I am all over cook and burn on the grill. But now with these tips- I feel a bit more confident to try again. I especially love the thumb to figure trick to test for doneness… you better believe I will be using that one!
I plan to feature this post and a picture on my Sunday 8/14 Links to Love post over at http://www.momof6.com.
Warmly,
Sharon
I’m an A1 fan too…but I eat it on potatoes. YUM!!
Thanks, Sara! I love steak but don’t feel that I cook them that well. But all of your tips were really great, esp the trick with the hand. I love that. And I could drink A1, but that’s just me.
I really needed this. I have never dared cook a steak. My hubby is the grill master at our house. I showed him your hand chart for telling how done the steak was. He thought it was awesome! He is quite the fan of OBB. His favorite is your key lime pie.
Love this post!! I never knew how to cook a steak before or what to pick out at the supermarket, so this is great. I feel like I am a pro now 🙂
I follow all these steps pretty much! but when I was looking up how to cook a steak awhile ago it said not to add salt until the very end (something about the salt takes out some of the juices). I leave mine out for 45 minutes before cooking it too since it doesn’t reach the ‘danger zone’ until at least an hour. The number one thing I hate about cooking meat is how the outside seems to start burning well before the inside is cooked (especially with chicken breasts which already dry out pretty quickly) I usually end up finishing steaks in the oven..one day I’ll get a meat thermometer!
I have been waiting on a post like this or a book “Steak Grilling for dummies”. THANKS!!!
Love it…more importantly, my husband will love it.
Oh man, I wish I’d had this yesterday… I grilled up a load of steaks that actually did suck. 🙁
Magical steak ruining powers, hahaha. Sorry, that made me laugh.
The only step that I do that is not in this tutorial is to leave the steak to sit for at least an hour after salting. This was part of the Alton Brown tutorial and it has something to do with the salt pulling the moisture out of the steak, but then as it sits longer and the salt dissolves in the steaks moisture, it then starts breaking down the muscle fibers and the moisture goes right back in, taking the salty/peppery goodness with it and tenderizing the steak.
Ever since I’ve started doing that, I’ve never, ever eaten a bad steak again.
Yes, that’s exactly what I was referring to with the link I posted:
http://steamykitchen.com/163-how-to-turn-cheap-choice-steaks-into-gucci-prime-steaks.html
I’ve found it works really well with cuts of beef that are a bit tougher to begin with, but I didn’t really need it with the prime cuts. But yes, it works!
First, Sara, I must say that if you didn’t know the first thing about cooking I’d still read your instructions, because you are such an excellent. Seasoned with just enough witty, amusing humor in all the right spots.
But you do know the grill, as I followed your instructions precisely and my NY strips, which I just happened to have on hand, were superb. Way too salty, though, but once I scraped all the salt off it was fine. (I took you literally when you said use more than I’d imagine, so I poured it on till you couldn’t see the meat.) Next time I’ll read the links like leaving it out for an hour.
I will be back many more times for your recipes and your great writing style.
I cant even tell you how much I appreciate that. Ive got a gas grill still in the box from 2 years ago that I was given, that I havent even set up because I totally suck at grilling. Now Im motivated to unpack that sucker and give it a try!
Thanks for this post. The timing could not be more perfect. Just went shopping with the hubs and of course, he bought a couple of ribeyes. . .neither one of us has ever been able to make a steak as delicious and tender as a steakhouse could…now I’m armed with some steakums know-how!
I am making my husband read this tonight. He always claims to be the “grill master, ” yet his steaks usually turn out burnt on the outside, raw on the inside. Thank you!!!
Your timing is perfect! My birthday is this coming Sunday and I have already purchased New York steaks for us to enjoy that day! Thanks so much! 🙂
As a vegetarian, I am very happy too see this tutorial, I only wish you had posted it a little sooner to help with my Father’s Day grilling adventure!
This is the world’s most timely post, I swear. My in-laws just slaughtered a cow and brought us half. As of yesterday my freezer is stocked with all manner of steaks. Yum!
Lucky girl! Heat up that grill!
Yes, Thank You. Not flipping over and over and over again is very important. You need to leave it alone long enough to let the heat penetrate through to the middle and if you flip it over and over the middle will never cook right. This applies to more things than just steak. My husband’s Aunt made us french toast once and I wathced her flip each slice about ten times. We’ll just say it wasn’t the best french toast I’ve ever eaten.
I know, right? So glad I’m not the only one who cringes every time she sees obsessive flipping!
That touch doneness chart is so cool! Honestly, my husband is the grill master, but I make the steaks now since he always overcooks them haha. Maybe I should train him using your chart 🙂
That is awesome! Thank you for sharing. That meat looks seriously yummy.
Mmmmm…we just had some fabulous T-bones yesterday and now I want more! We love Spade-L steak seasoning on them. We get it at the butcher counter at Smith’s. It’s fabulous and you can still enjoy all the flavors of the meat. Thanks, I’m going to go teach me hubby the “done-ness” trick right now!
Haha! My grandpa taught me that finger trick to tell when a steak is done about 25 years ago! Good to see someone else uses it. It really does work!
I never really liked restaurant steak probably because I got spoiled on my dad’s steak. He rubs the meat in olive oil and covers in Season All, then lets it sit for a couple hours. When it’s done, it’s sooo juicy and tastes like it was cooked in butter :-9
You don’t have to break the bank for a good cut. Flat iron steaks are a great choice, and I’ve never paid more than $7/lb. for one.
I agree! Flat iron is a great cut. However it doesn’t seem to be as readily available (at least where I live, I can hardly ever find it) as some of the more traditional grilling steaks. It’s becoming much more popular though, so hopefully it will be more common at supermarkets.
Wonderful tips. I will have to grill steaks this week. Do you leave the gas grill open or closed once you have turned the heat down. My dh and I have discussions about this regularly. Thanks for all of your great tips and recipes.
I personally put the lid down, so the cooking process is much like finishing the steak off in the oven. You could do it either way, but I feel like there’s a better distribution of heat with the lid closed.
THANK YOU for such a wonderful tutorial! My husband is the “grill master” around my house, but this tutorial will be a lifesaver. AND, it gives me another reason to buy steak this week. 🙂
You don’t know how much I (and hubby) have needed this tutorial. We have ruined enough steaks that I quit buying them and only order them when we’re eating out. Maybe now we can go back to steaks at home! Thank you for the fantastic tutorial!