Recently on Instagram I asked my followers what types of things they (you) would liked to learn how to do this year. Things in the kitchen you’ve always wanted to try but never had. There were so many great comments and ideas on there and one that popped up quite a bit was artisan bread. I knew that we definitely needed to start with this recipe for Easy No Knead Overnight Artisan bread because, PEOPLE. Listen up. YOU DO NOT HAVE TO BE A BREAD MASTER TO MAKE THIS.

Hands Down the Easiest Bread You Will Ever Make
It is quite simply, the easiest, and possibly the most delicious, bread in the world and it requires zero bread making skills. This takes literally 90 seconds to prepare. It only requires 3 ingredients, 1 bowl and a wooden spoon. There is no kneading. You literally dump 3 ingredients in a bowl and the next day have an insanely gorgeous artisan bread loaf with a crazy crackly crust and tender chewy insides and you will just sit there staring at it telling everyone in a 50-foot radius, “I MADE THAT.”

Equipment needed for No-Knead Bread
The one special thing you will need for this recipe is a heavy enamel coated Dutch oven. If you don’t have one of these, you can try it in any heavy oven-safe pot with a lid you can find, but I’m telling you right now a heavy Dutch oven is a great investment. It’s a workhorse in the kitchen and you’ll get so much use out of it. It’s the perfect pot for braising Pot Roast, making dishes like my Oven Braised Chicken, Honey Balsamic Drumsticks, cooking soups on the stovetop and more.
There’s no need to spend over $300 on a Le Creuset (I mean, unless you want to?) You can order a Lodge brand for $60 and free Prime shipping. Amazon Basics actually makes one as well now for just over $40. I ordered one to compare and I’ve only used mine once but it seems like a great option. I did notice my Amazon pot said oven safe to 400 (whereas the lodge is safe up to 500 and this particular recipe cooks at 450, just FYI) They both come in a rainbow of gorgeous colors. When recipes refer to cooking in a “Dutch Oven” this is what they’re talking about. Click here to grab a Lodge Brand, and Here to check out Amazon’s brand!
How to make No-Knead Dough
So let me show you in just a few steps how we’re making this bread. It starts with all purpose flour, warm water and yeast. Okay and a little salt, so I guess technically 4 ingredients.
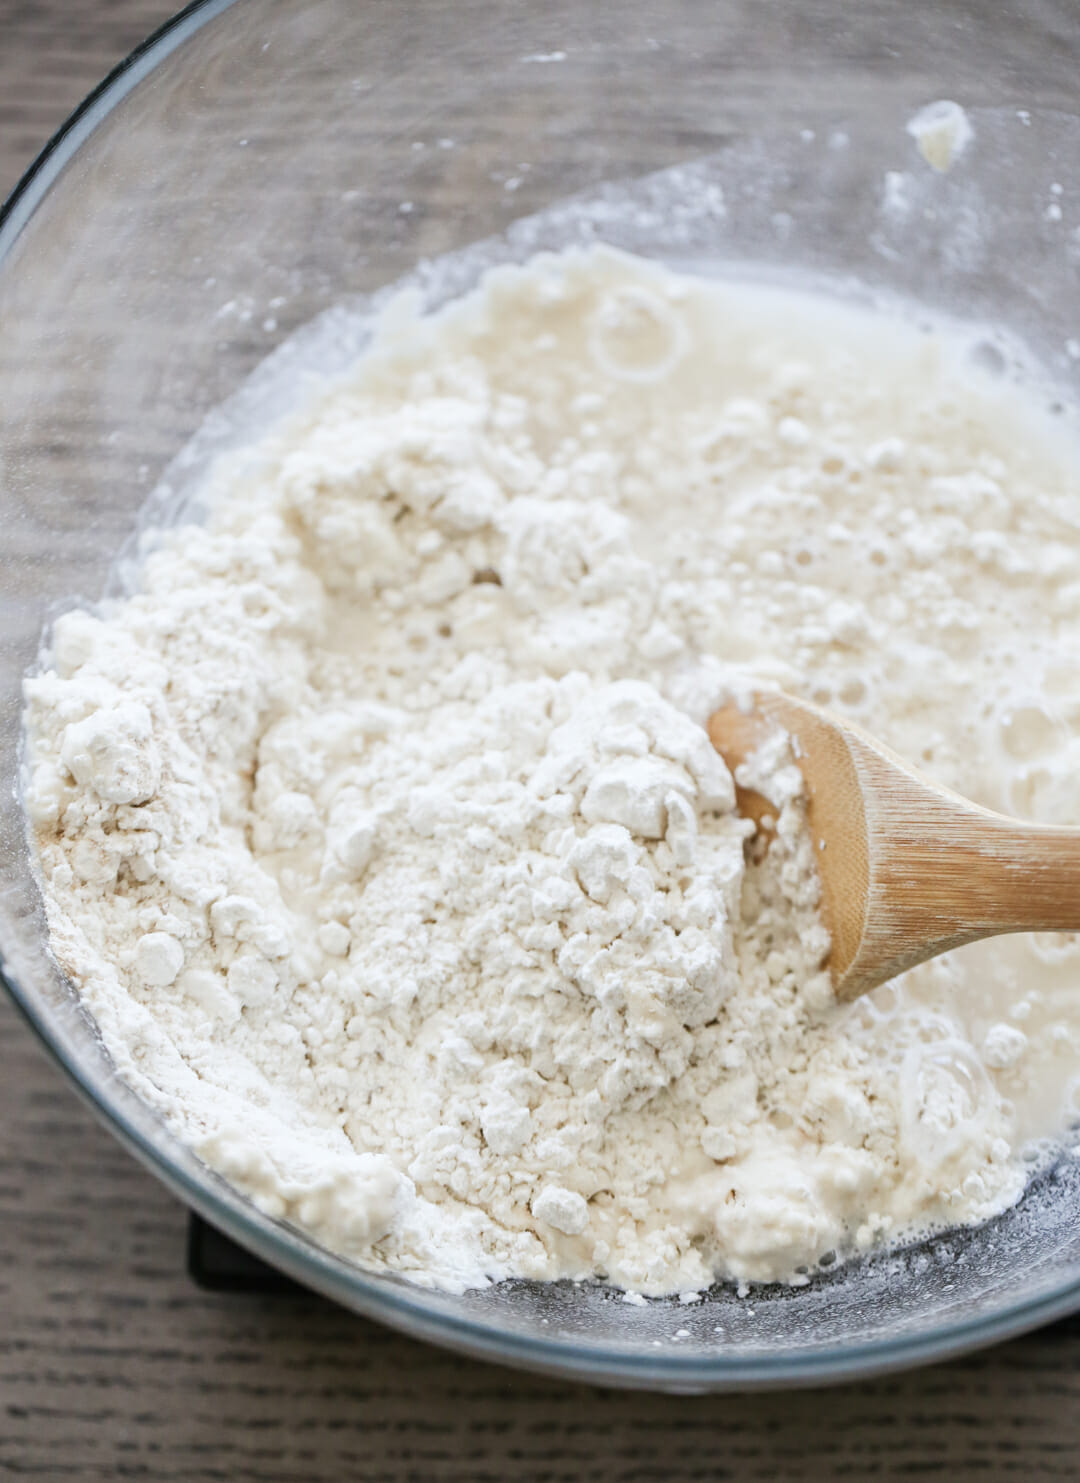
You will stir these ingredients with a spoon to mix them up and that’s it! Done.
I do want to say something about the flour, here. I think this recipe does count on people over measuring their flour. When I actual weigh my flour to get an exact weight for the 3 cups, this dough is extremely wet and loose. Like, I can’t form it into a ball, it’s more of a thick liquid. And the bread turns out amazing and soft and beautiful. When I scoop my flour with the measuring cup (something we are constantly telling you not to do,) the dough is still on the wet-sticky side, but it looks more like most people’s photos of this dough, and you can actually form it into a ball. And it turns out delicious. So what I’m saying is, this dough is extremely flexible. Try it a few times and see what you like, but don’t ever get worried it’s not going to work because it always works! Just don’t add tons more flour because you think it should be the consistency of playdough. Because it shouldn’t. Overall your dough should be quite loose and sticky, but feel free to just dunk your measuring cup in your flour bag and haphazardly scoop. This is one instance where that totally works!
Let the Dough Rest
Once that’s all mixed up, just cover with plastic, leave on your counter, and come back and visit it tomorrow. It needs to sit for anywhere from 8-18 hours. I always just mix up the dough the day before, but technically you could do it early in the morning and have it for dinner as well. Just know the longer it sits, the better the texture will be so I recommend at least 12 hours.
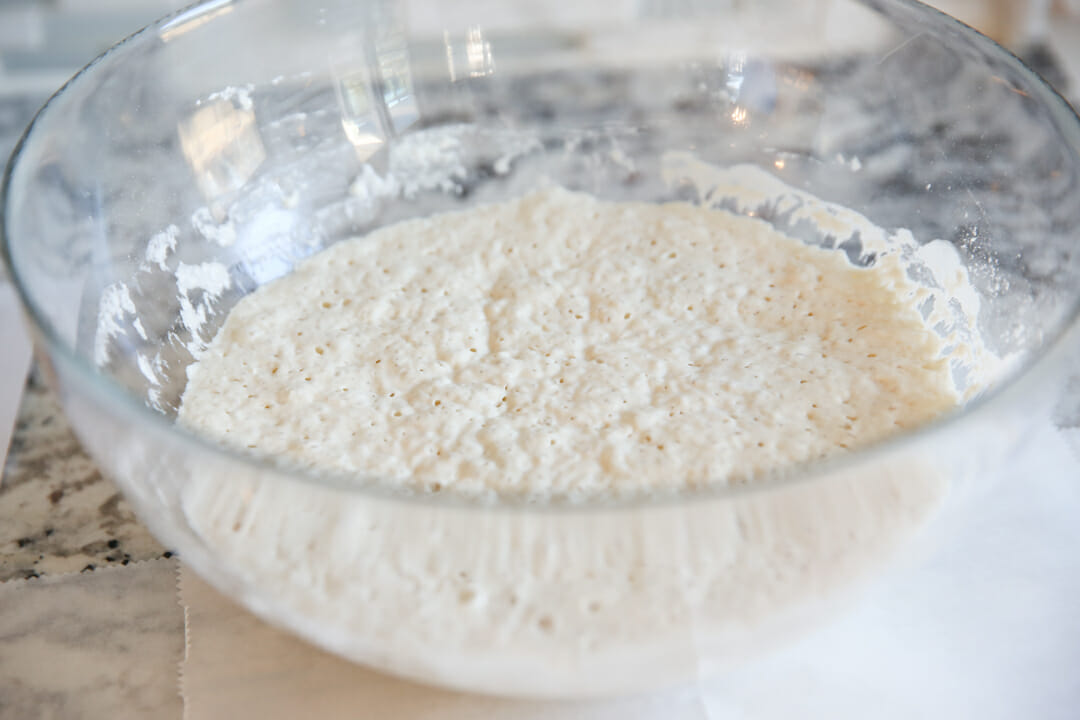
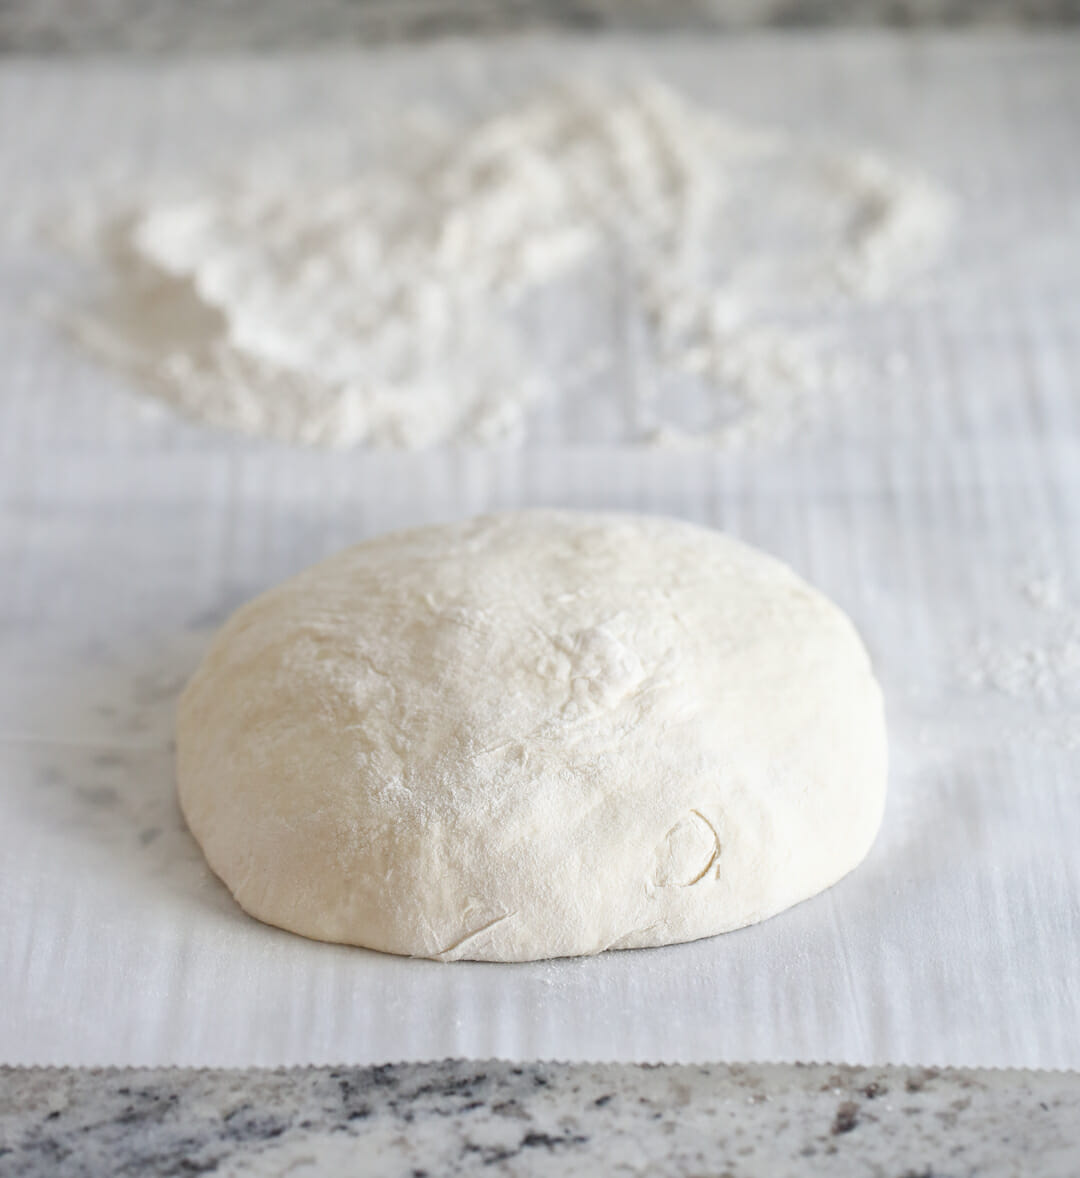
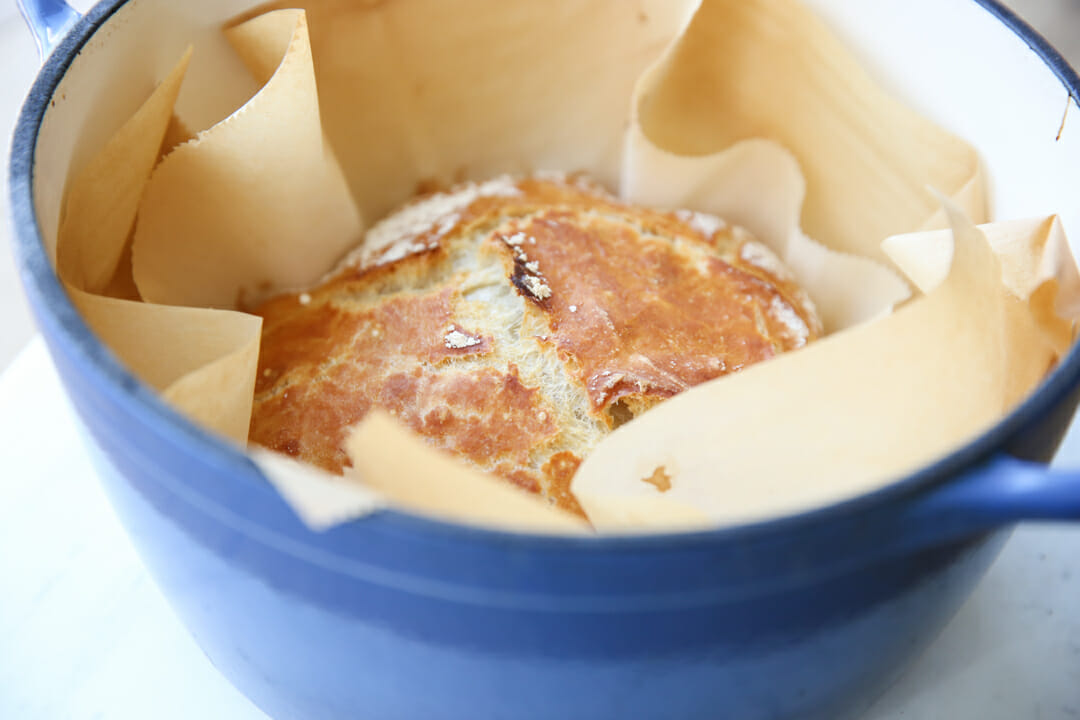
At this point you’ll just scrape it all out onto a generously floured surface- I put it directly onto a piece of parchment paper. Remember your dough will be REALLY sticky so sprinkle flour all over it where you’ll be touching it and handle it gently so it doesn’t get all over you. Fold it on top of itself a couple times (remember no kneading) and form it into a round-ish shape. Let it sit for 30 minutes. During that 30 minutes you will place your empty, covered dutch oven in your oven preheated to a screaming hot 450 degrees. We’re creating our own little bread oven here.
Baking No-Knead Bread
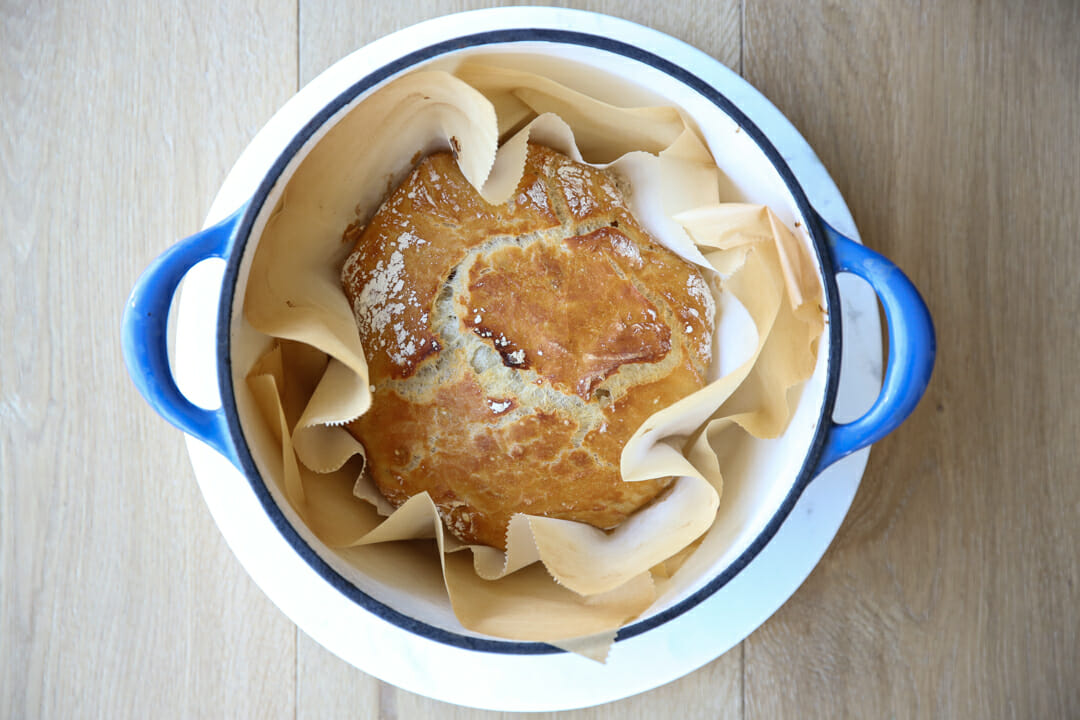
When it’s preheated you will CAREFULLY (can’t stress that enough) remove your crazy hot pan from the oven, transfer your bread into it, and place the lid on. DON’T FORGET YOUR LID IS PIPING HOT. I always keep a towel over the handle while it’s on my counter just to be safe. Pop that pot back into the oven to bake. You can see I just lift my whole parchment paper that my bread was sitting on and put it into the pot.
about 40 minutes later your house will smell like a straight-up European bakery.
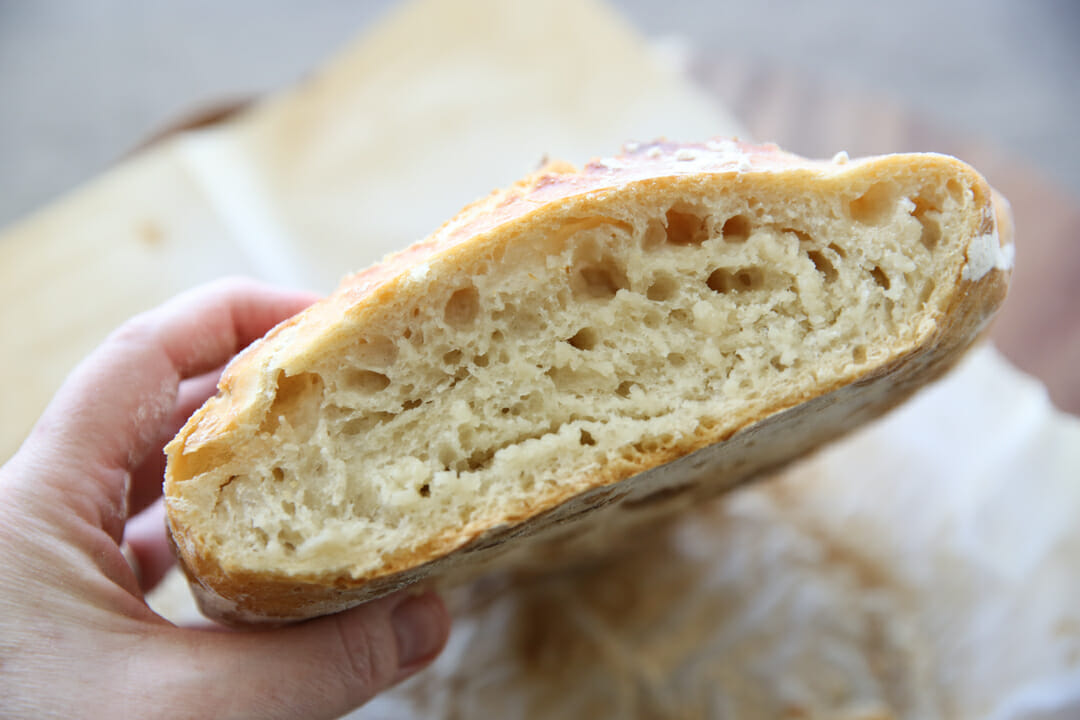
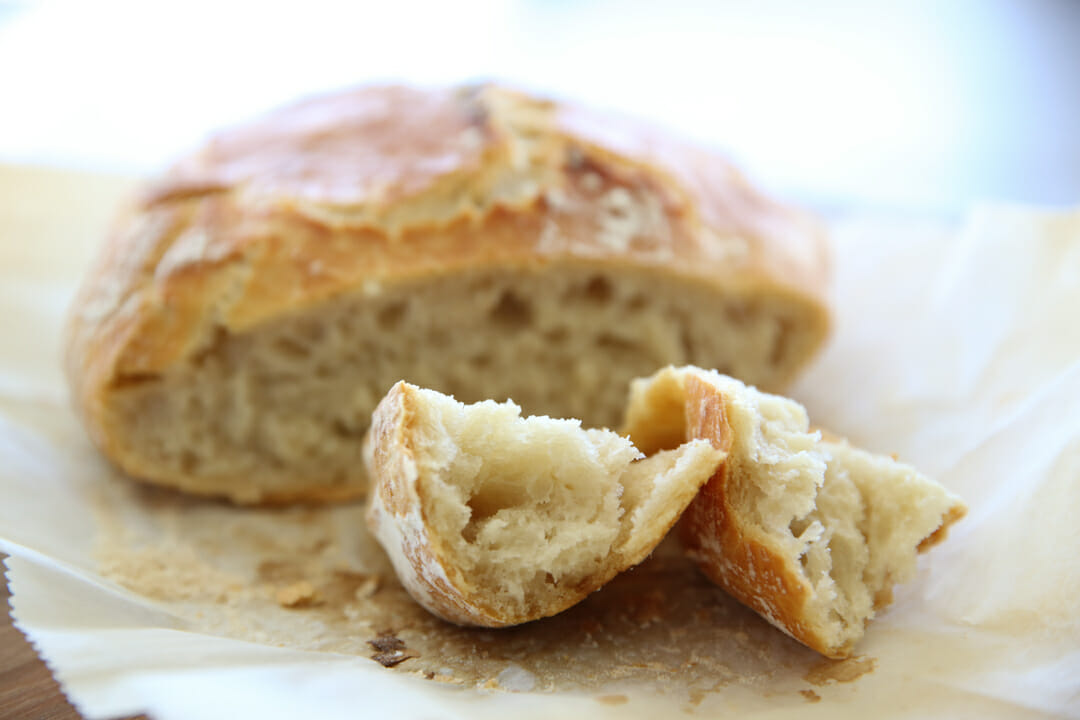
This bread has a super crispy crust and a chewy soft inside. It’s the kind of bread you rip off in chunks and slather with butter while it’s still warm, or dunk in a bowl of soup, or dip in olive oil. It’s amazing.
It’s so crazy easy you can literally make it every day. This fact is both useful and dangerous.
This is one of my favorite things to gift new neighbors or a friend who needs dinner. Pair it with a pot of soup, or a bottle of nice olive oil for a sweet gift!
Print
Easy No Knead Overnight Artisan Bread
Description
Amazingly simple artisan bread that requires no kneading. You can see Jim Lahey’s Original recipe, here.
Ingredients
- 425g (about 3 cups) all-purpose or bread flour, more for dusting
- 1/2 teaspoon instant yeast*
- 1 1/4 teaspoons salt
- 1 1/2 cups (340g) warm water (about 110 degrees, like warm, not hot, bath water)
Instructions
- In a large bowl combine flour, yeast and salt. Add water, and stir until blended; dough will be shaggy, sticky, and quite loose. Cover bowl with plastic wrap. Let dough rest at least 12 hours, preferably about 18, at room temperature.
- Dough will be dotted with bubbles and much looser/wetter than it was the day before. This is normal! Generously flour a work surface- I recommend parchment paper to make this process really simple, but you can also work on a cutting board or silicone mat and then transfer your dough to a piece of parchment before baking- and place dough on it; sprinkle it with a little more flour and very gently fold it over on itself once or twice. If your dough is super loose here, like so loose you can’t even form it into a ball, it’s more of a blob, you can generously flour so it doesn’t stick to your hands. Let rest about 30 minutes.
- While dough is resting, preheat oven to 450 degrees. Put a covered 6- to 8-quart heavy covered pot (cast iron, enamel, ceramic) in oven as it heats. When dough is ready, carefully remove pot from oven. Pick up parchment paper with dough (blow off excess flour sitting on parchment if you need to) and place directly in pot. Cover with lid and bake 35-40 minutes, then remove lid and bake another 10-15 minutes, until loaf is golden and browned.
Notes
*Jim Lahey’s original recipe (featured in the NY Times, here) only uses 1/4 teaspoon yeast, whereas recipes dotting the internet often use up to a full teaspoon . I tested batches at 1/2 teaspoon all the way up to 1 teaspoon and did not find much difference in the finished loaves. So I usually use 1/2 teaspoon.
Jim’s original recipe also involves a second rise of 2 hours . I’ve found, along with the rest of the internet, that the quick 30 minute rest featured here works just fine, and I actually had better results with the 30 min rise than I did with the 2 hour one! But you can certainly make this a few times and play around with it- it’s a very flexible recipe.
You can also try add-ins like a handful of parmesan and some snipped herbs, etc.


Questions & Reviews
No parchment paper so I’m using aluminum foil. How disastrous will this be? Should I just go without either?
You could probably skip it all together, it just makes it a little easier, no biggie.
Made this recipe today for the first time and I’m hooked! Took a loaf and some chicken noodle soup to my sick in-laws and had my teenager bake the other loaf while I ran to their house and back. Easy and delicious!
I’m feeling like a ROCKSTAR! This bread is the easiest thing in the WORLD and my teenage daughter, who is quite reserved with her compliments, said “Mom, it tastes just like a restaurant – so good!” Thanks, Our Best Bites
best compliment ever!!
Have you tried making this into bread bowls? Or two loaves for one recipe instead of the one loaf?
I have not tried that, but you could certainly experiment!
Sara, I don’t have an enamel coated Dutch oven but a cast iron one. Will it still work ok?
Yes absolutely!
yes!
Covid-19 is the push I needed to finally try my hand at bread making. I’ve got Fleischmann’s Active Dry Yeast- Original. Can I put that in with the dry ingredients or do I need to do something to it prior to adding to the recipe??
Nope, that works just fine!
Hi, recipe looks great, just wanted to check if the temperature is correct? 450 degrees and not Fahrenheit? I don’t think I’ve seen an oven that goes up that high!
Yes, 400 degrees F. Most ovens go at least 500!
Can I use my old-fashioned ugly cast-iron Dutch oven?
Yes!
So easy and my family loved it!
Why have I been forming loaves of bread all this time? I had no idea bread-making could be so easy! This artisan bread turned out beautifully – definitely gift-worthy. Thank you!
At what point would you add the parmesan cheese?
Just stir it all into the wet dough when you first mix up the ingredients.
I added parmesan cheese and it seemed to be heavy on the bottom of the loaf. My day-in-law is an excellent cook and said the cheese needs to be tossed in its own flour before adding it to the recipe. What do you think of this? Heard this before? I would sooo appreciate a reply. Thanks
I can’t wait to make this! Is there much of a difference if you score the dough before baking or not? Does it split really weird?
Also let’s just all agree that watching Paul Hollywood knead bread is so incredibly soothing.
Not really, I don’t ever score mine and it always looks beautiful, but score if you like!
I’ve used a similar method: Shape loaf and place on ungreased baking sheet that has been sprinkled with corn meal. Use sharp knife to score the top of the loaf a few times. Then I put an upside-down disposable foil pan over the top of the loaf, removing it with a pair of tongs for the last ten minutes of baking.
Excellent bread! I found this wonderfully easy recipe last night browsing around for an “overnight loaf” because I was feeling far too lazy to take my bread machine down from the top of the fridge. I made the dough last night, and finished the recipe at lunch time. On a whim I added 1 Tbsp of Vital Wheat Gluten for chewiness, then panicked and upped the yeast to 1 tsp (I use SAF Insatant). It turned out beautifully! Perfectly crisp on the outside and super soft on the inside. Next time I’ll try ½ tsp yeast because why use more if you don’t need to. ¯\_(ツ)_/¯
Discovering this recipe is almost as dangerous as the time I found a recipe that makes exactly one giant chocolate chip cookie in the toaster oven. I will definitely be making this bread again. Most likely far too often.
Thanks so much!
I made this today (started the dough late last night) and it’s delicious! I don’t have the pan you used so I put it on a parchment lined sheet. I also put a large metal pan on the shelf below the cookie sheet and let it heat up for the last few minutes before I put the bread in. I boiled 4 cups of water and put that in the pan. So the bread goes in first, then the water into the pan below (stand back as much as you can as it will sputter and steam up) and then shut the door. In 30 min. it was definitely done. I will try it without the steam next time.
Also, speaking from experience, this bread is perfect with your butternut squash soup!
I make a bread similar to this all the time, and I love it! I also love drizzling some honey over a toasted slice (or right out of the oven). I could eat this every day!
I don’t have a dutch oven? but I really want to try this! I have a 2.5 quart Corning Ware dish with a lid, do you think that will work? My other option is a big oval roasting pot with lid.
Sure- I’d try either of those, as long as they have a lid and can be heated that hot.
I have a cast iron Dutch oven but it isn’t ceramic coated. It will work fine, right? Especially if I just put my dough in with the parchment?
yes, you bet!
This bread was incredible. Loved by all in the house. Used an old copper stainless Dutch oven and worked well. Thinking of trying this with wheat flour. Thoughts please. Thanks so much for such an easy recipe for home and of course giveaway.
Try it with half whole wheat flour and see if that works for you. I haven’t tried it so you’ll have to experiment!
Would regular active dry yeast work, or does it need to be instant yeast?
You could use active dry yeast, but I’d probably dissolve it in the water first (you can add a pinch of sugar if you like) and then after it bubbles, add the flour.
I use active dry yeast for this bread and it works wonderfully well each and every time. I always have a big container of it in the freezer so it’s just what I have on hand. ????????
Do i need to soak the active dry yeast first or just add in with the dry ingredients? Thank you
Just add the dry yeast to the rest of the ingredients. No soaking needed. It’s almost foolproof bread baking
I thought the Lodge pot should not be heated empty at all this high temperature? Did you notice any change to your pot?
I’ve never had a problem with mine!
I’ve been making this bread for a few years now, and you are right, it is so easy! I sometimes add kalamata olives and sun dried tomatoes. Also put Italian seasoning in the dough. Have added cranberries and walnuts. The add ins are endless, and the dough always works! I love using a banneton proofing basket for the rise. It truly makes my bread look like it comes from a bakery, with the gorgeous pattern on it.
I have one of those baskets too, love it! And your add-in ideas sound fantastic!
Tips on using whole wheat flour? Will that work instead of all purpose flour?
I would try it with half wheat and half regular and then tweak from there!
If I didn’t want to leave the parchment on to bake, would I generously oil the pot with olive oil and bake away?
If your pan is enamel coated you don’t need any parchment, if it’s not- you could do a little oil, or maybe a piece of foil?
Would adding spices ruin the recipe at all? Like rosemary and garlic? Would you suggest adding it in the night before when you mix it all together? Or the next day when you fold the dough?
Thank you! SO excited to try this!
Nope, it’s great with spices! Just add them right in when you mix up your dough ingredients.
What about adding like sundried tomato or roasted garlic? Still add when mixing the ingredients?
Ya, I would. Or right before baking- either way.
I add a teaspoon or so of “Simon & Garfunkel” herb mix (from amazing ribs.com, google it you’ll thank me) with every loaf, as well as a teaspoon of honey to the warm water. You could do more, probably a tablespoon of herbs? I go light because the bread has more uses that way. But If you wanted a herb forward bread, go nuts
Now I need to go buy a Dutch oven and instant yeast just so I can make this…it sounds and looks amazing!!
I made it with regular yeast and it turned out great.
Do you think this would work with whole wheat flour?
I would try half and half and see how that goes.
Question, I’m trying to print the recipe but it is too light to read. Has anyone mentioned this? I changed from color to b&w but that was only an itsy bitsy bit darker.
No, that’s weird! Maybe a a printer setting that’s kind of whacky??
I’ve made this for years and have simplified the process. After it has set for 12-18 hours, I simply pick it up out of bowl, form into round loaf, put it back in same bowl to rise for 2 hours. Then I pick it up and put it directly into my cast iron pot and bake it. Turns out wonderful.
I found a tip long ago that if you add 1/8 tsp red wine vinegar, you can start the whole dough right after lunch time and it speeds up the process for the yeast! I add it most of the time because I forget to start the dough early enough!
Cool, good to know!
Wondering how the vinegar affects the taste??
I’ve always wanted to try this and now I think I’m brave enough to go for it!! (Side note: why does kneading have to be so intimidating??)
Honestly SO easy- go for it!
Easy lol. Very good , taste good ! Whole lot cheaper than store bought ! Easy to make ! Better than a white bread
I make loaf every other day ! & Gave one to mail girl ?
Awe, so nice to give one to the mail girl!
Hi. You mentioned that you once weighed your dough and that it was wetter, you could not form into a ball, but that it baked out softer. I just got a scale myself. Can you tell me the weight that you used? I’ve made this general recipe twice, with various ingredients and they came out great. I’d be interested in trying your weighted/wetter variation. Thanks so much.
Here’s a great chart with basic ingredient weights. 3 cups of flour is 360g. Hope that helps!
Looks like I’m making a big loaf today guys! I used 8oz per “cup” before reading your comment of 120g per cup. lol. All is good, more bread, more better!
I have a Wolf steam oven that is wonderful for making bread but I’m not sure how to adapt the recipe. There’s a setting for auto steam bake so maybe I don’t need the lid on my Le Crueset Dutch oven? Any ideas?
I have a steam oven as well but I’ve never used it for this recipe, I make it as written. Let me know if you try steam!
I have one as well…one of the reasons I bought it was for artisan bread…if I would have known about these kinds of simple recipes before, maybe I would have spent the money elsewhere, ha! I only have two dutch ovens, so when I am making three loaves of this recipe, I use those two in the convection oven and just put the third on parchment paper and then directly on the pan, and it ends up almost identical to the other two. For the sake of science, maybe I’ll try the steam oven/dutch oven-without-the-lid combo and see if it makes a difference or not. 🙂
Heidi, do you bake three at once? I was thinking I’d prep a few loaves of dough, but bake them one at a time. I have a cast iron Dutch oven and a ceramic lidded round casserole I might try.
Hello – I am a crazy rebel in the kitchen, so I tried dumping the dough onto a steel stone and immediately setting an inverted and heated Calphalon 6-quart heavy duty saucepan over the dough – My bottom crust burned, but the bread was beautiful and brown after I took the pot off at 35 minutes – WHERE do you find 450 degree parchment paper ? Brand name ?
I figured out why my dough was way too wet, gooy and didn’t rise enough. The water I used was not lukewarm warm, it was too warm.
All has been fine since I allowed it to be cooler. All good now! 🙂