French Palmier Cookies

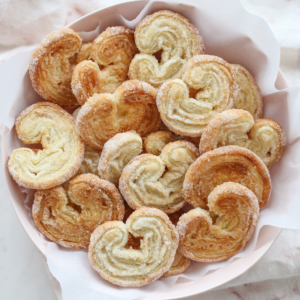
Palmiers are possibly THE easiest treat to make. I’m calling them cookies, but really they’re a sugared, crisp little pastry. With only two ingredients, puff pastry and sugar, these take just minutes to make but look so fancy! Next time you need something quick, easy, and impressive, reach for these simple ingredients to make French Palmier Cookies.

Palmiers in a bowl

Ingredients and Equipment

  • Puff Pastry – you can find puff pastry in the frozen food section. It’s often near the desserts and pie crusts. Since this recipe only has 2 ingredients, if you can find a high-quality all butter puff pastry (Trader Joe’s is a good option) that would be best. But Pepperidge Farm is the most widely available in most major grocery stores, and while it’s not all-butter, it works great as well. (It’s what I’m using in these photos!)
  • Sugar – You’ll need standard granulated sugar here, but it’s fun to experiment with other options as well. I like to have a coarse, raw sugar to put on top for extra crunch and a deeper caramel flavor, but it’s not necessary.
  • Parchment Paper – Since you’ll be working with melted sugar, you’ll definitely want to have parchment paper both for easy clean-up, and also to help prevent over browning the cookies on the bottom.

How to make Palmiers

  1. Spread about 1/2 cup sugar on work surface. You’ll want this sugared space to be about the same size as your sheet of puff pastry.
  2. Place one sheet of puff pastry on top of the sugar and then pour/sprinkle another 1/2 cup of sugar on top of it. You can see from the photos that this is NOT a gentle sprinkle. You’re going for total excess! It’s okay to have extra sugar around the board. You want the whole pastry covered in a nice layer of sugar.

3. (L) Fold each side of the puff pastry into the center. Grab some extra sugar from your work surface and sprinkle it on top. You’ll notice I added a little coarse sugar to the top, which are those brown specks you see.

4. (R) Fold each side into the center one more time.

5. Lastly, fold both sides together, like you’re closing a book. (Below)

folded puff pastry cookie

6. Sprinkle sugar one more time over everything and slice roll into slices about 3/8″ thick (you want them a little larger than 1/4 inch, but not as thick as 1/2 inch!) At this point, you can reshape them a little with your fingers if they got smashed funny during the cutting process.

sliced palmiers cookies

7. They’ll bake up in the oven and as the pastry puffs, the sugar melts and caramelizes and makes a delicate, crisp bite.

To flip or not to flip

Some palmier recipes will tell you to flip the cookies half way through baking, and others won’t. I’ve made them both ways and I’d say it’s personal preference. If you look at this photo, the palmiers on the right were flipped half way through, and the ones on the left were not. The side of the cookies facing down on the baking sheet will be flattened, caramelized, and a little crispier. Some people prefer the puffed lighter look of the cookies if left unflipped. I’d say try it both ways and see what you like! I will say if your oven runs hot and the bottom of the cookies are getting a little too dark, flipping will solve that problem.

flipped palmiers comparison

Frequently Asked Questions

  • Can I make French Palmier Cookies ahead of time? I’d say these are best made fresh and eaten fresh. I wouldn’t purposely make them more than a few hours ahead of time.
  • How do I store leftovers? These are best eaten fresh, but if you do need to store, just keep in an airtight container.
  • Can I add other flavors? Absolutely! It’s fun to experiment with different types of sugar, and you can add cinnamon or other spices for fun flavor variations.
Palmier Cookies in a serving bowl

Here’s a few other recipes you can make with puff pastry:

Palmiers in a serving bowl

French Palmier Cookies

5 from 1 vote
Only TWO ingredients needed for these easy, classy cookies.
Servings0

Ingredients

  • 2 sheets puff pastry 1 standard box2 cups granulated sugar

Instructions

  • Preheat oven to 400 degrees. Line a baking sheet with parchment paper.
  • Thaw puff pastry according to package instructions.  Make sure to keep cool in the fridge until ready to use.
  • Spread 1/2 cup sugar on work surface in a space about the same size as your pastry. Place one puff pastry sheet on top of the sugar and spread an additional 1/2 cup sugar on top. Gently spread around with your hands. Use a rolling pin to gently roll pastry sheet a couple times in all directions. You do not want to roll it thin, just roll to extend about an inch in all directions. You will be pressing sugar into the dough as you roll.
  • Fold the right side of the sheet so the edge meets the center of the dough.  Repeat with left side. Sprinkle more sugar from your board on top. Repeat process again to fold each side to the center again and sprinkle with sugar.  Finally fold the two sides together, like you're closing a book.
  • slice roll into 3/8" slices and place 2 inches apart on the baking sheet.  These will puff up so they need room to grow!
  • Place pan in the center rack OR one notch above center.  Do not place on lower rack or they might burn. Bake for about 15-20 minutes total and keep an eye on them.  If you are flipping, flip about half way through baking. If not, watch until the tops are lightly golden. 
  • Cool completely before eating (remember melted sugar is hot!)
Author: Sara Wells
Did You Make This Recipe?Snap a picture, and hashtag it #ourbestbites. We love to see your creations on our Instagram @ourbestbites!
woman in denim shirt holding a salad bowl
Meet The Author

Sara Wells

Sara Wells co-founded Our Best Bites in 2008. She is the author of three Bestselling Cook Books, Best Bites: 150 Family Favorite RecipesSavoring the Seasons with Our Best Bites, and 400 Calories or Less from Our Best Bites. Sara’s work has been featured in many local and national news outlets and publications such as Parenting MagazineBetter Homes & GardensFine CookingThe Rachel Ray Show and the New York Times.

Read More

Join The Discussion

Your email address will not be published. Required fields are marked *

Recipe Rating


This site uses Akismet to reduce spam. Learn how your comment data is processed.

Questions & Reviews

    1. You can keep making cookies until the pastry is gone! If you don’t want to use your whole package, you can freeze the remainder or use in another recipe.

  1. Where/when does the second pastry sheet come in? Do you layer it on top after you roll sugar into the first one, or do you combine the sheets first?