 I don’t know if the universe has it out for me or what, but I swear to you all, the second I start making a conscious effort to eat healthy, I’m suddenly inspired to make all sorts of naughty treats. And not just inspired, like, “Oh, I really, really, really want to make some caramel corn,” but my brain suddenly starts putting together evil ideas for things I’ve never even made. I guess deprivation is great for inspiration, right?
I’m posting my scandalous little treat on Friday, but for today, I want to share a really cool tutorial. I kind of thought I was a genius until I told Sara what I was posting and she told me that she already has a tutorial all photographed. It’s kind of rough sharing a brain sometimes.
Not only is this super impressive (my 6-year-old told me that he thought the way my cupcakes were “designed” was awesome), but it’s a fun and easy way to implement different colors when you’re decorating cupcakes. Like for these Colorburst Cupcakes that Sara posted this last spring during March Madness.
For this tutorial, I’m just using two colors of icing, but you could easily use three (or even four if you’re feeling wild) different colors for a really cool rainbow effect. You can also play around with flavors, using different types of icing or adding different flavors to a something like our Perfect Cupcake Frosting and Filling. Chocolate and caramel, chocolate and peanut butter, chocolate and orange, orange and lemon, vanilla and almond, vanilla and peppermint, peppermint and chocolate…you’ve pretty much got unlimited options.
You’ll need icing, disposable decorating bags (one for each color and then one more to fit them all into), and a large decorating tip (like this, this, or this) and a large coupler.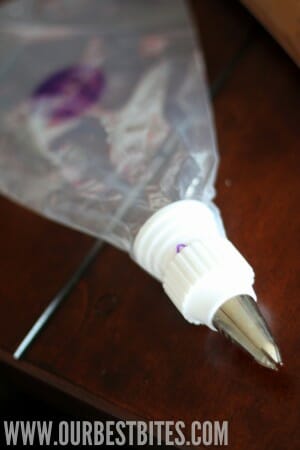
The most basic thing to remember is that no matter how many different colors you’re using, you don’t want the final bag to be too full. So if I’m using two colors, I’ll fill each color bag a little less than 1/2 full with icing. If I were using 3, I’d fill them a little less than 1/3 full, and for 4, a little less than 1/4 full. Make sense?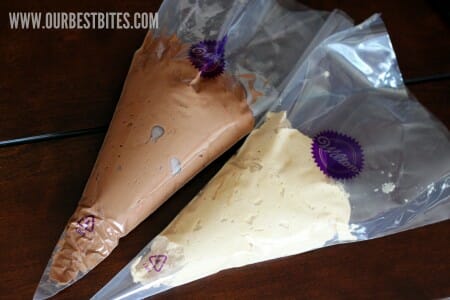
After you’ve filled your bags, flatten them out and stack them on top of each other…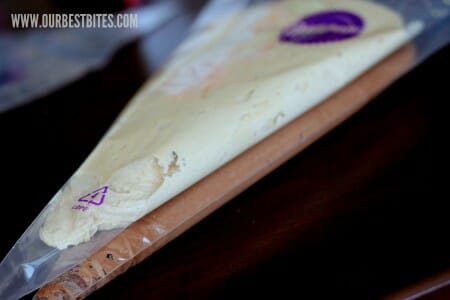
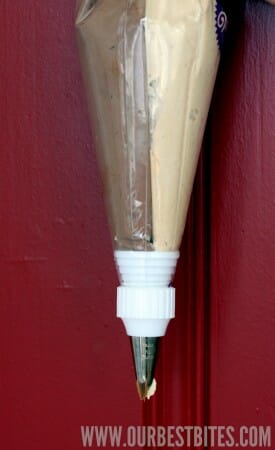
and then trim 1/2 inch or so off the tip of each bag and slip them into the bag fitted with the decorating tip.
Firmly squeeze the bag until you’re getting equal parts of each icing from the tip. I will say that it’s a little trickier if you’re using two different types of icing (like I am here) than if you use different colors of the same icing (like Sara did). If you do use two different types of icing, try to make sure they’re roughly the same consistency before icing your cupcakes, even if it means popping a softer icing into the freezer for a few minutes.
To ice your cupcakes, hold the tip close to the top of the cupcake. Using firm, steady pressure, squeeze the icing bag, starting in the center of the cupcake and moving around the edges of the cupcake and then one more swirl on top, moving back towards the center. I actually had a video tutorial of this at one point, but Dropshots spontaneously deleted all my pictures and videos (yes, Dropshots, I’m totally calling you out, jerks!), so I’ll try and get another one up today because it’s not nearly as complicated as it sounds.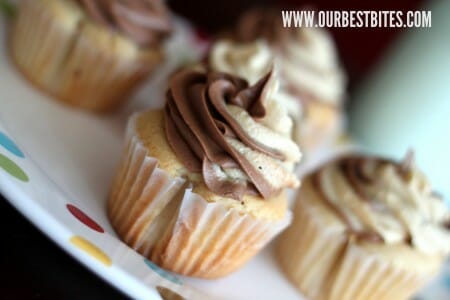
Prepare yourself for oohs and aahs. And perhaps squealing. Also, your kids (and your spouse…and his/her co-workers…) will think you’re a rock star.



Questions & Reviews
Thanks so much! Except now I want to make cupcakes…can I blame you when I gain ten extra pounds? 🙂
The easiest way that I’ve found to fill the piping bags is to place them (with the tip in place) in the inside of a drinking cup or glass (depending on how big the bag is). Then just fold the sides over the top of the glass and simply fill it with frosting using a spatula. Then pull it out of the glass and start twisting/folding the top…the frosting will move down to the tip and you’re ready to go!
Pure genius! 🙂
This is BRILLIANT! [insert head slap here] I am so excited you decided to share this for us less-brilliant people.
I’m doing a baby shower for my sister-in-law coming up and this will be the PERFECT way to make a classy cupcake without a lot of extra work!
Ugh…why didn’t I think of that. I recently made banana cupcakes with PB and chocolate icing swirled but I tried to shove some of each into one decorator bag and it was a mess…it worked but it wasn’t fun. This would have been so much better! Thanks for the idea!
Great tip! I won’t be wrestling around trying to put 2 colors in the same bag ever again!
I have tried to do this, but never thought about it this way! Now I want to make cupcakes – wait, decorate some sugar cookies too!
You totally got the mental vibes I was sending for you to do this tutorial. I’ve been freaking out about how to do this since my almost 3 yr old wants “Jimmer BYU” cupcakes for his birthday. It will be a sad day when he realizes Jimmer isn’t at BYU anymore. However, a super happy day when I whip out the cupcakes for him.Thanks for saving the day…again!
Well, this is certainly a Slap-Forehead moment! What an incredibly simple solution!! Thanks 🙂
Pure genious! Thanks!!
Okay this is AWESOME!! I have seen a few different ways to do this & this seems like the easiest way & the BEST way to make sure you get even good colors!! You girls are amazing & I LOVE everything you do!!!
I’m thinking put the lime in the coconut and shake it all up!!! Yum!
Very cool! Thanks for the tip!! I’m excited to try it out 🙂
A tip to make filling bags less messy AND not overfilling them: Fold a cuff down until the top of the bag touches the top of the coupler. Then fill the bag just to the top of the cuff. Keep the mess on the inside of the bag, and if you only fill to the top of the cuff you can’t overfill. Then unfold the cuff and twist the bag right at the top of the icing. The twist then goes into the v where your thumb meets your hand to keep it closed.
Awesome tip, Blythe, thanks! (And great tutorial, Kate! I’m actually tempted to make cupcakes today, with absolutely no need for them whatsoever. Maybe I’ll just order a new tip and wait for Friday’s recipe….)
OOO I cannot WAIT to try this.. actually it is a little cool out today, I feel a cupcake inspiration coming on! Thanks for this great tip!
I’ve done something similar, but I actually just plop spoonfuls of alternating colors in the same bag. You still get a swirl effect, but also get a third color sometimes where the two mix. You can also achieve a similar effect by taking your food color and literally painting stripes of color on the inside of the bag before loading the frosting!
Ummm what? Thank you auto correct…i meant perfect timing 😀
Talk about prefect time…my oldest little princess turns 3 on Sunday so I will definitely be trying this out. Love you guys, you are the best!
Oooh! I am making cupcakes for my son’s first birthday and this looks fabulous! Thanks!
I too have tried putting the 2 colors in one bag and had issues. I’ve never thought about putting 2 bags inside another one. Will have to try this next time. Possibly for my daughters birthday, which is today but the party won’t be until next weekend and haven’t figured out what we’re doing yet. This looks almost fool proof! Thanks again!
THank you for this tutorial. I was wanting to make some cupcakes with this effect for my daughter’s birthday and was planning on googling how to do it. You made it so much easier for me! Thanks so much! (ps LOVE LOVE LOVE OBB!!!)
Thank you! I tried making cute cupcake swirls last week, but they ended up looking over-worked. Now I know I need a different tip, and I can’t WAIT to try separate icings! Yay!
Oh my gosh! Thank you for posting this! I’ve always wondered how you do this.
How do you get the icing into the icing bags without making a massively large MESS. Mine are always crazy messy and then when I squeeze out the icing, it comes out of the tip but also the messy part comes out of the end of the bag.
It can be tricky. One thing is to just be careful how full the bags are. You can also get ties and clips that clamp the opening of the bag shut so it doesn’t come out the top–just look for them in the cake decorating section of Walmart/Hobby Lobby/Michaels/wherever.
Hope that helps! 🙂
I use bread ties. Not the plastic square ties but the staight ones. Thank you for the tip about flattening and stacking the different colors before putting them in the one bag. I was having problems getting an equal amount of each color coming out all at once. It was either one color or the other
Put the bag on your hand (like a glove), but inside out. Put scoops into your open palm. Make sure the top edges are up enough that you can just flip it back after you’re done filling your palm. Now the frosting is on the inside and you have little to no mess! I do this all the time for frosting and it works fantastic. 🙂 Hope it helps.
I put the bag into a tall glass, spreading the top of the bag down over the edge of the glass. It makes it so easy to just scoop the frosting into the bag.
Something I do is out the bag inside of a glass 🙂 pull the excess plastic down over the glass, and then use a scraper to load the frosting in 🙂 very fast and simple! 🙂
The icing is coming out of the end of the bag because you didn’t twist the end of the bag. If the twist does not stay, you can tie is together with a rubber band. If it comes out of the tip. maybe just put your fingers on the tips and it wont be as messy. Hopefully this helps!
What I have always done is put the bag inside of a cup with the ends king of wrapped around the edges and fill the bag that way
Hold the bag with your left hand and pull the top edges down around your hand till about 1/2 the bag is wrapped down around your hand….fill bag only about 2/3 full, pull it up off your hand twist it shut then put a rubber band or hair tie around the opening down at the level of icing.
So clever! I’ll have to try this!
I love this idea! I’ve decided when I have my book launch party, I want the cupcakes to have swirled frosting! (Well, first I have to sell my book, but my agent is working on that.) I am so thrilled I found this website!!! You are two very talented ladies and I don’t even like to cook!
Looks like chocolate & peanut butter cupcakes are on the way?
Ding ding ding! 🙂
I have never had any luck with trying to do the color stripe down the side of the bag before adding the 2nd color frosting. I can’t wait to try this. It makes so much sense. Thank you.
Wow, what a great idea, very impressive!!
This is so helpful – thank you!