Cinnamon Rolls are a favorite in our house, and I’ll often whip up a batch of our favorite Everyday Cinnamon Rolls after church on Sundays. There have been lots of times where I would have loved to make them for breakfast, but who wants to get up at the crack of dawn so they’ll actually be ready in time for breakfast, or start the day with that many dirty dishes? While my Everyday Cinnamon Rolls do ok if refrigerated overnight, they are definitely best made fresh. So when I saw a recipe for overnight cinnamon rolls in my Family Meals cookbook from Williams Sonoma, it instantly caught my attention. I tweaked the dough just a little and then used my own filling recipe. The cinnamon rolls were were just as I imagined they would be: soft, fluffy, full of flavor, and mouthwateringly delicious. The dough takes a bit longer than my other recipes, but it works out perfectly since you can whip them up after dinner and pop them in the fridge before bed. In the morning, they just need to sit out for about an hour (so you can either go back to sleep for a bit or take a shower and get dressed!) and then pop them in the oven. These are perfect for holidays or special occasions when you want something homemade and delicious without complicating your morning!

Ingredients Needed
This is just a preview of ingredients and method, keep scrolling for full printable recipe.
- Cinnamon Rolls
- Active dry yeast – Just regular yeast, not rapid rise/bread machine yeast.
- Warm water – 105° is perfect. Too cold and the yeast won’t wake up, too hot and you’ll kill the yeast.
- All-purpose flour
- Salt
- Eggs
- Granulated sugar
- Butter – Real, salted butter.
- Filling
- Butter – Real, salted butter.
- Brown sugar – I prefer brown sugar over white sugar in my cinnamon roll filling because it provides a deeper, richer flavor.
- Cinnamon
- Icing
- Powdered sugar
- Butter
- Milk or cream
- Vanilla extract


How to Make Overnight Cinnamon Rolls
- The evening before you plan to make these, you’ll put your dough together. This is pretty straightforward and just involves letting the yeast bloom for a bit and then mixing the dough up in a stand mixer.
- The dough needs to rise for a couple of hours. During that time, you’ll mix up your filling of butter, brown sugar, and cinnamon. It helps if the butter is nice and soft!
- When the dough has doubled, you’ll punch it down and roll it out to a nice rectangle, spread on the filling and roll it up. I like to use dental floss or sewing thread to mark and cut my rolls. It slices through both dough and filling cleanly so nothing gets smashed and your filling stays in place!
- Place those rolls in greased baking dish, cover tightly, and pop in the fridge.
- In the morning, plan for about an hour and 45 minutes before you want to serve these. They will need to rise for about an hour and then bake for 30 minutes. After they cool for a few minutes, you can whisk up and spread on the glaze and serve warm!


Storing and Other Tips
- Store leftover rolls completely cooled, covered tightly, at room temperature and enjoy within a day or two for best results.
- If you like this recipe but don’t need overnight cinnamon rolls, you skip the refrigerator step. Just let the shaped rolls rise in a warm kitchen for about 30 minutes, or until puffed and about half again as tall as when they started, then bake as directed.
Frequently Asked Questions
Yes. After putting the prepared rolls in the greased baking dish, cover tightly and freeze. When ready to use, thaw overnight in the refrigerator and then allow to rise in a warm kitchen until puffy and about 1 1/2 times their original size, then bake and glaze as directed. This may take and extra hour or two because they will be starting out very cold.
Yes. I recommend freezing them unglazed, though. Once your rolls are baked and completely cool, wrap them individually in plastic and then place them in a zip-top freezer bag. When ready to enjoy, thaw at room temperature, then unwrap and heat for 15-30 seconds in the microwave, until just warmed through. If you’d like to make just enough glaze for one roll, you can mix up 1 tablespoon plus 1 teaspoon of powdered sugar with 1/2 teaspoon melted butter, 1/2 teaspoon milk or cream, and a tiny splash of vanilla.
Not dramatically, but 8 large rolls may need a few more minutes than 12 small ones. Look for golden brown tops and puffy centers! If you want to be precise, cinnamon rolls are generally baked through when the center of the roll reaches about 190°F.
This recipe is designed for regular yeast. If you’re in a hurry, I recommend these Everyday Cinnamon Rolls that use rapid rise yeast!


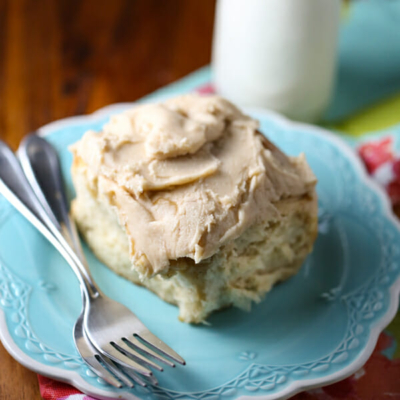

Overnight Cinnamon Rolls
Ingredients
Dough
- 1 tablespoon active dry yeast
- ½ cup warm water 105℉
- 4 ½ cup all-purpose flour 22 ½ oz
- 1 teaspoon kosher salt
- 4 large eggs
- ¼ cup sugar
- ½ cup real butter at room temp
Filling
- ½ cup real butter at room temp, divided
- ¾ cup packed brown sugar
- 1 tablespoon cinnamon
Glaze
- 1 cup powdered sugar
- 2 tablespoons butter melted
- 2 tablespoons milk or cream
- 1 teaspoon vanilla extract
Instructions
- In the bowl of a stand mixer, sprinkle the yeast over the water, allow to bloom for a few minutes, then whisk until smooth. Whisk in ½ cup of the flour. Cover with plastic wrap and let stand in a warm spot for about 30 minutes.
- Add the eggs, sugar, butter, salt, and remaining 4 cups flour to the yeast mixture. Fit the mixer with the dough hook and knead on medium speed until smooth 10-12 minutes. Add a bit more flour to reduce stickiness if needed.
- Cover with plastic wrap, set in a warm spot and let rise until doubled, about 2 hours.
- While dough is rising, prepare filling. Take 2 tablespoons of the stick of butter and set aside. Beat remaining butter, brown sugar, and cinnamon together until combined and slightly fluffy, about 1 minute. It will be rather thick.
- Butter a 9×13 baking dish. Transfer the dough to a floured work surface. Roll out into a rectangle about 15×10 in. Spread filling onto dough. Use a spoon (or your fingers) to spread it out evenly and then roll up length-wise.
- Grab a piece of dental floss or sewing thread, about 12 inches long. First score the rolls with the thread so you know you’re going to cut evenly. Then slide the thread underneath the rolls, cross over the top and pull. You’ll get razor sharp cuts without smashing your pretty dough.
- You can cut the rolls to your liking. This will make 12 small rolls, 10 medium ones, or 8 large rolls.
- Place cut side up in baking dish. Melt the reserved 2 tablespoons butter and brush on top of rolls. Cover tightly with plastic wrap and place in the fridge overnight.
- The next morning, remove from refrigerator and let rise until half again as high, about 1 hour.
- While rising mix glaze ingredients until combined.
- Preheat the oven to 350℉. Bake until golden brown, about 30 minutes.
- Let cool in the pan for 15 minutes. Then spread the glaze over them and serve.








Questions & Reviews
I have a question, instead of putting them in the fridge, could I put it in the freezer? I’m thinking of doing the whole recipe and then putting half in the freezer and when I need it, putting it in the fridge the night before to drefost it
ok…. I reply to myself, haha, after reading another post! I would definetly make the whole recipe and freeze half. (The only problem is that if I know that they are in the freezer, ready to be baked they will only last a day or two!!!)
Yeah, I’ve never done that- you’d have to experiment 🙂
These are very easy and good, I did use some whole wheat flour about 2 cups as I try to use half and half, they turned out very good, I think I would double the glaze recipe next time, we love sugar.
These turned out so good! I don’t have an electric stand mixer so I kneaded the dough by hand and it worked out just fine. I also only made 7 medium rolls and froze the rest to make sometime later this week. Will definitely be using this recipe again! Thanks!
Wanted to let you know we just ate these for Christmas morning! They were wonderful. Thanks for the great recipe. I love that they were made ahead and just needed to rise and bake this morning. Couldn’t have been easier.
Mine are in the oven right now! I can’t handle it, I want them noooow!
Just so you know, these have become our standard holiday breakfast. Thanks so much for the recipe!
I made your overnight cinnamon rolls and they were by far the best I have ever tasted. Wowsers! My husband (who thinks cinnamon rolls are a “girl dessert” even gobbled them up!) Anyway, I’ve been volunteered to make them for a church Christmas breakfast… problem is I will be out of town. I was wondering if they could stay in the fridge for more than just overnight… like maybe 2 or 3 nights???
Thanks!
I just wanted to thank you for sharing this amazing recipe. I craved cinnamon rolls when I was pregnant and I searched everywhere for some soft, homemade ones like grandma used to make and couldn’t find any….so I decided to make them myself! They totally satisfied my craving and for that I am eternally grateful! I am no longer pregnant, but still crave these rolls all the time (as does the rest of my family who was lucky enough to try them).
I think someone asked you what would happen if you baked these right away? Well, since I love these so much, I usually cut two big rolls from the batch to bake right away for me and my hubby. We just can’t wait until morning sometimes! I brush them with butter like the rest of the batch, but then instead of putting the two jumbo rolls in the fridge, I just let them rise for about half an hour while the oven is heating up and while I make cream cheese frosting and then bake them as usual and they turn out perfect!
Looking forward to making these for Christmas morning and to finally sharing some with my family.
Just curious….why wait 30 min for the yeast/water/flour mixture?
Because that’s what the recipe says? lol I’m not sure of the technical side of it all, I just did what it says in the book 🙂
I just finished making these, they are currently in the fridge and will be baked for our Sunday breakfast tomorrow (woot for afternoon church!)I just wanted to say thanks for this awesome recipe! I made the dough in my bread machine and it came our perfect, not sticky in the least. I also loved using a softened butter spread, which I have NEVER thought to do before, you girls are genius! I have tried recipes from other food blogs and the filling they all used was out. of. control. Every time I would go to roll up the dough, the melted butter/sugar/cinnamon concoction would be oozing out all over my counter and dripping off on to the floor. Clean-up was awesome to say the least…anyway I am happy to say that I had my batch rolled out, filled, cut, in the pans, into the fridge, and everything cleaned up in about a half an hour, because of your easy to work with dough, and your awesome idea to use softened and not melted butter made it a breeze! Thanks again!