
My Mom is a really creative woman. I didn’t realize it until I grew up and became a mother myself. Now that I look back on the birthday parties she threw and the incredible cakes she created, I’m really amazed at the things she came up with back in the day when you couldn’t run to Target or Walmart and basically buy a party in a bag. Halloween costumes were no exception. We never, ever had store-bought costumes growing up. My Mom was a great seamstress and her creativity had no boundaries. I look at old family pictures and I love how she took simple ideas and turned them into something fun. Take me for example, around age 5:

That my friends, is a rainbow. And I thought it was the coolest costume ever. I was obsessed with this chick, and if you look at every picture I ever created out of any sort of art media between the ages of 3 and 9, it undoubtedly included 3 things: hearts, flowers, and rainbows. To this day, I still get a little bit giddy inside when I see all of those colors together. Something about rainbows just makes me happy.
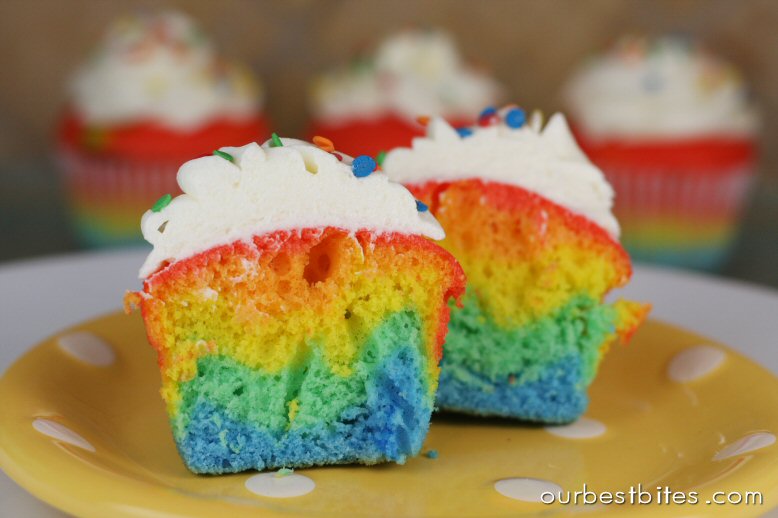
So it’s no wonder these cupcakes make me smile. Every time 🙂
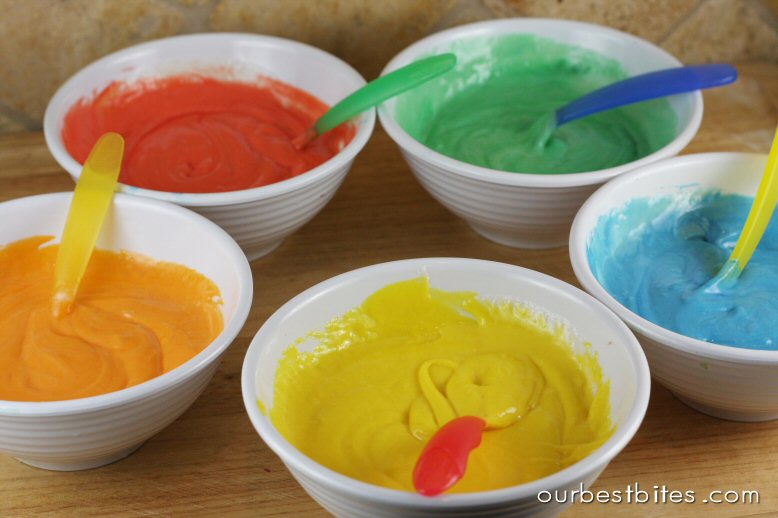
Gel food colors work especially well for this. Gel color adds a ton of color with a small amount of dye. You can find gel colors at craft stores like Michaels and Roberts, and in the cake decorating isle of Walmart. If using red, make sure to get the one that says “No Taste”

Divide your batter and tint each one
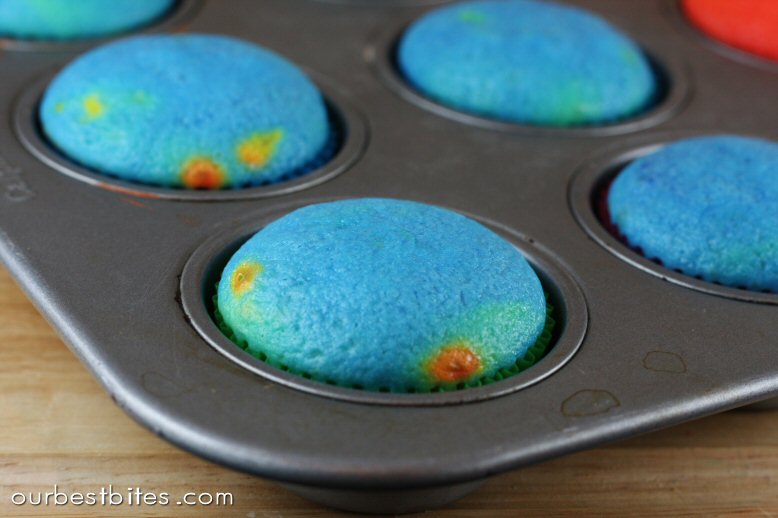
Then layer it by color into the cupcake papers. (See my tips in the recipe for easy layering). Sometimes I do red on top and sometimes I do the reverse so blue is on top.

Bake them up
And cool them on a rack before frosting.


Then you can frost and decorate to your heart’s desire!

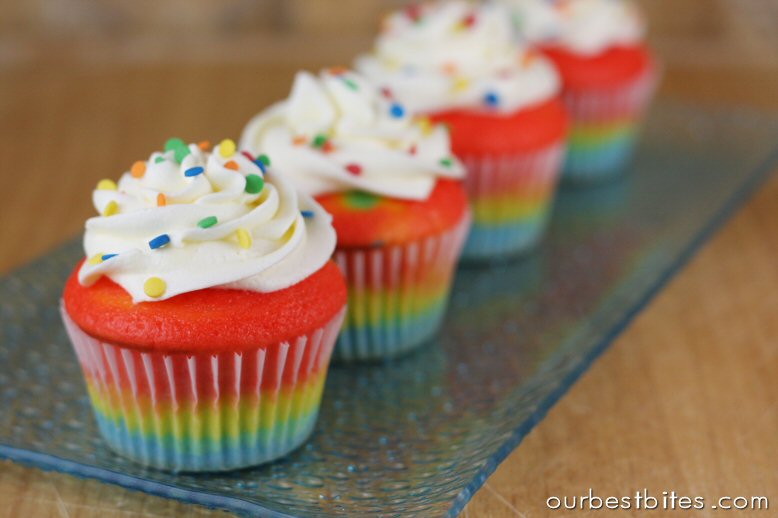
The best part comes when you peel off that paper. Use white liners to show off the colors, or foil or dark liners to make it a surprise!
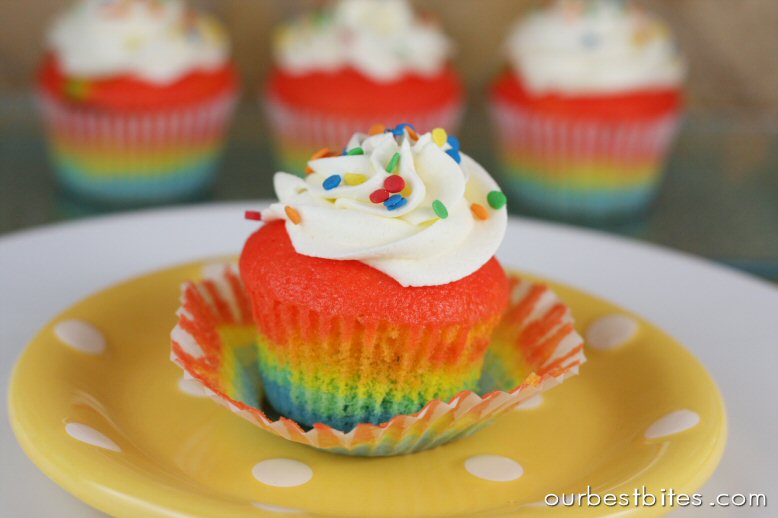
Even better is taking the first bite and seeing the inside:
Try them with the color of your favorite sports team, or your kids’ school colors. They’re sure to be a hit!
Colorburst Cupcakes
1 white cake mix
2 eggs
1 C yogurt (any smooth textured fruit flavor is fine!) or sour cream
1/2 C milk
1/3 C vegetable oil
Combine all ingredients until incorporated (about 30 seconds). Scrape sides of bowl and then beat on med-high speed for 2 minutes.
Divide batter according to how many colors you are using. I used 5 colors and it worked out to a little over 1 cup for each color, but each cake brand will be slightly different.
Use food coloring to color batter to desired intensity.
To get a layered stripe like I used, you’ll want to put a spoonful of each color in the cupcake one at a time. The batter is thick, so it won’t spread on it’s own. A great tip is to set out a little bowl of water where you’re working. Dip your finger in the water and then gently spread the batter out. The water will make it so the batter doesn’t stick to your fingers.
Another tip is to use a measuring spoon and some water to measure out how many teaspoons/tablespoons are going to fit in your cupcake. Then divide that by how many colors you have so you know how much of each color to use for each cupcake. For my 5 colors, it worked out perfectly with 2 t of each color in each cupcake. So I put in 2 t of blue in the bottom of each cupcake and spread it out with my finger. Then I put in 2 t of green on top of that, then yellow, etc.
Bake them according to the package directions, until a toothpick comes out dry.
I topped mine with this frosting.


Questions & Reviews
I know this is an old post, but I was looking for some fun cupcakes and came across this. Does it matter what kind of sour cream you use…like full fat, rduced fat, light, etc.?
I always recommend full fat or light (but not fat free) for baking. And they will freeze great! You can frost them frozen or thawed, doesn’t matter. Enjoy!
This recipe was a hit for my birthday! The only thing I would change would be less baking time.
i can’t wait to try these cupcakes i’m going to make them right now i wil tell you how i liked them after
you may want to know someone is using your pictures, personally I don’t like that
https://www.facebook.com/GallecookiesJulie/photos/a.10151882705117169.1073741831.265835937168/10152089261462169/?type=3&src=https%3A%2F%2Ffbcdn-sphotos-b-a.akamaihd.net%2Fhphotos-ak-xfa1%2Ft1.0-9%2F10176028_10152089261462169_8785724673180514828_n.jpg&size=400%2C266&fbid=10152089261462169
Regards
ooooooh my GOD they are sweeet and i have not tested them i looooove baking but wat i have seen av never seen before they are ouwesome
Love all the ideas and how-to tips and tricks – THANK YOU!
Oops – my mistake – glad to see comments even 6 days ago :$
You are soooo awesome! The last comment was posted 2012, and now it is 2014, but the info you have given us is just fantastic. Thank you so much.
Amazing! I made these tonight and I can’t wait to share them at work tomorrow! If they last… my hubby can’t stay away from them. The colors are amazing! They made me feel like a kid again, I was dancing in the kitchen with delight. Thanks for the excellent directions and hints. 🙂
These are awesome! I can’t wait to try making them, thank you for sharing. Also where did you get those sprinkles? They would be perfect for my daughter’s bday party.