Fall baking usually begs for pumpkin and apple, but do you know what the most overlooked flavor of fall is? The pear. Make something with apple and it’s homey, casual, and nostalgic. Make that same thing with pears and it’s fancy, decadent, and refined. Enter the Chocolate and Custard Pear Tart. In terms of dessert, pies seem to get all the glory during the holiday season, but I love a great tart because not only are they a little more elegant for a holiday table, they’re not quite as heavy, either, and I feel like it’s the perfect ending to a special-occasion meal, or any meal, really!
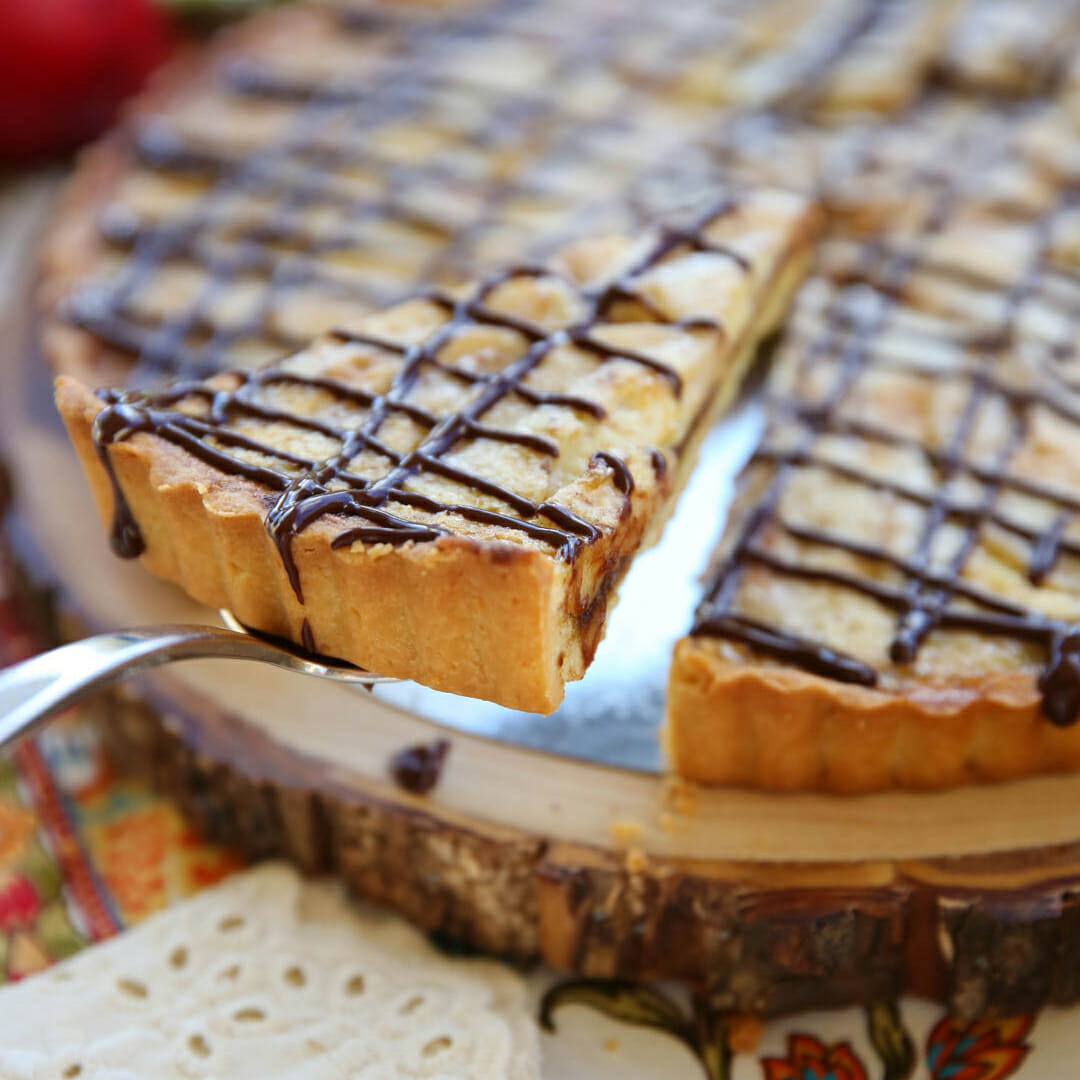
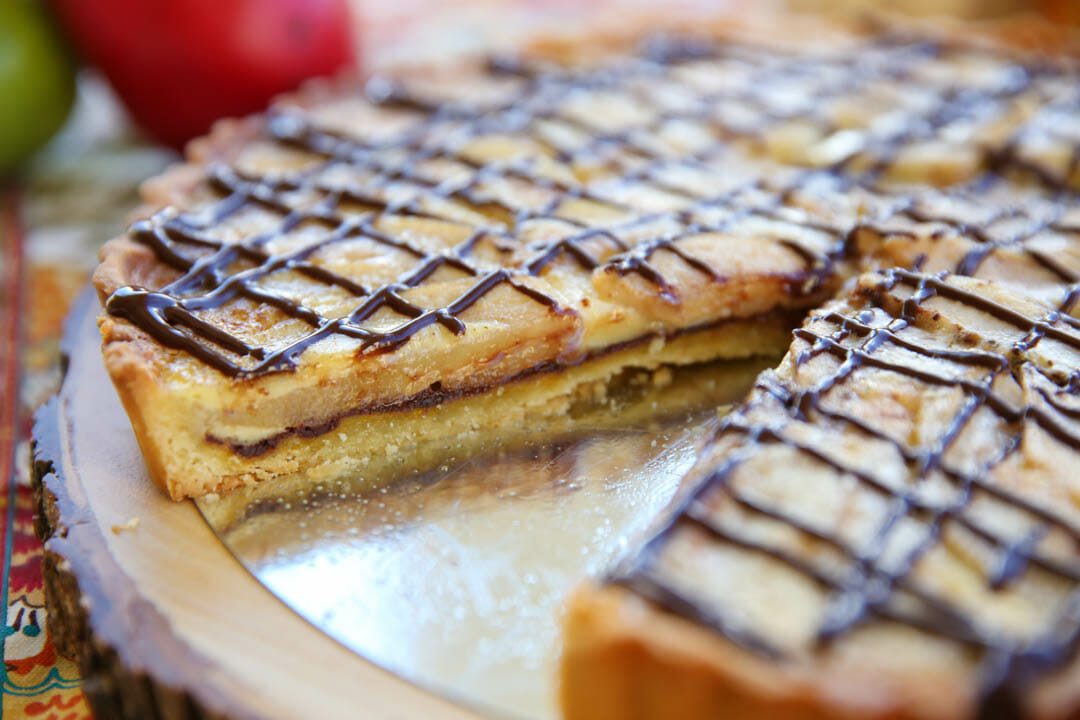
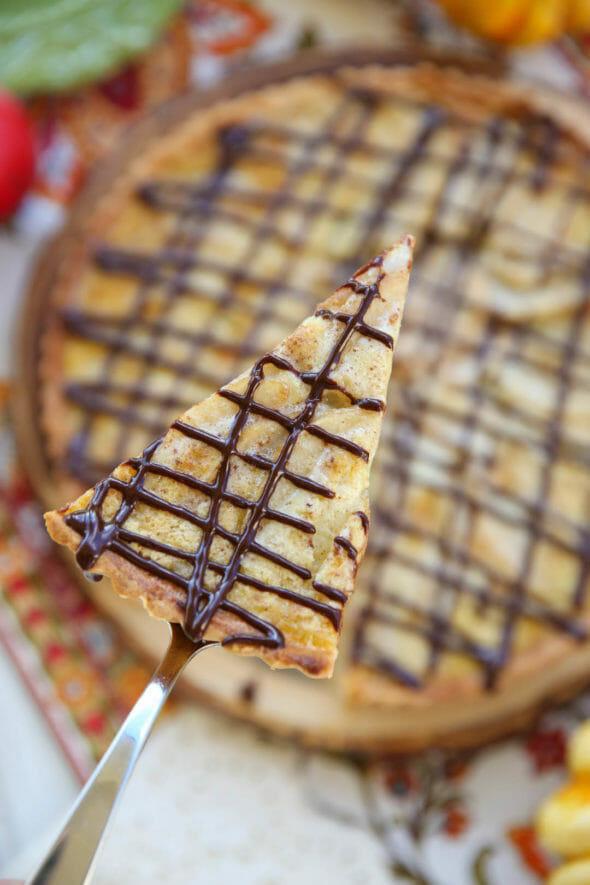
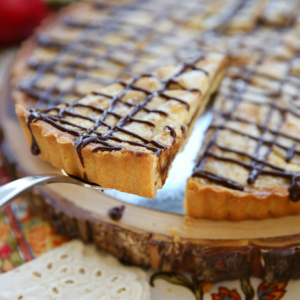
I ate a pear tart like this at a restaurant once, and I’ve wanted to recreate it ever since. It has a sweet cookie-like crust, a layer of chocolate on the bottom, a beautiful layer of fresh pears over that, and then a sweet custard fills in the spaces. I love drizzling mine with more chocolate, because well, drizzling with chocolate is always a good idea. If you want something different, and so amazingly delicious people will be talking about it long after dinner, this is it.
Ingredients And Equipment Needed
This is just a preview of ingredients and method, keep scrolling for full printable recipe.
Equipment
- 12-inch tart pan – In a pinch you could probably get away with using a springform pan, but I definitely recommend grabbing a tart pan like these ones from Amazon if you don’t already have one!
Crust
- Butter – Use real butter.
- Granulated sugar
- Egg and egg yolk
- All-purpose flour
- Heavy cream
Filling
- Quality dark chocolate – You can use whatever you like here, but I recommend sticking to semi-sweet or dark chocolate.
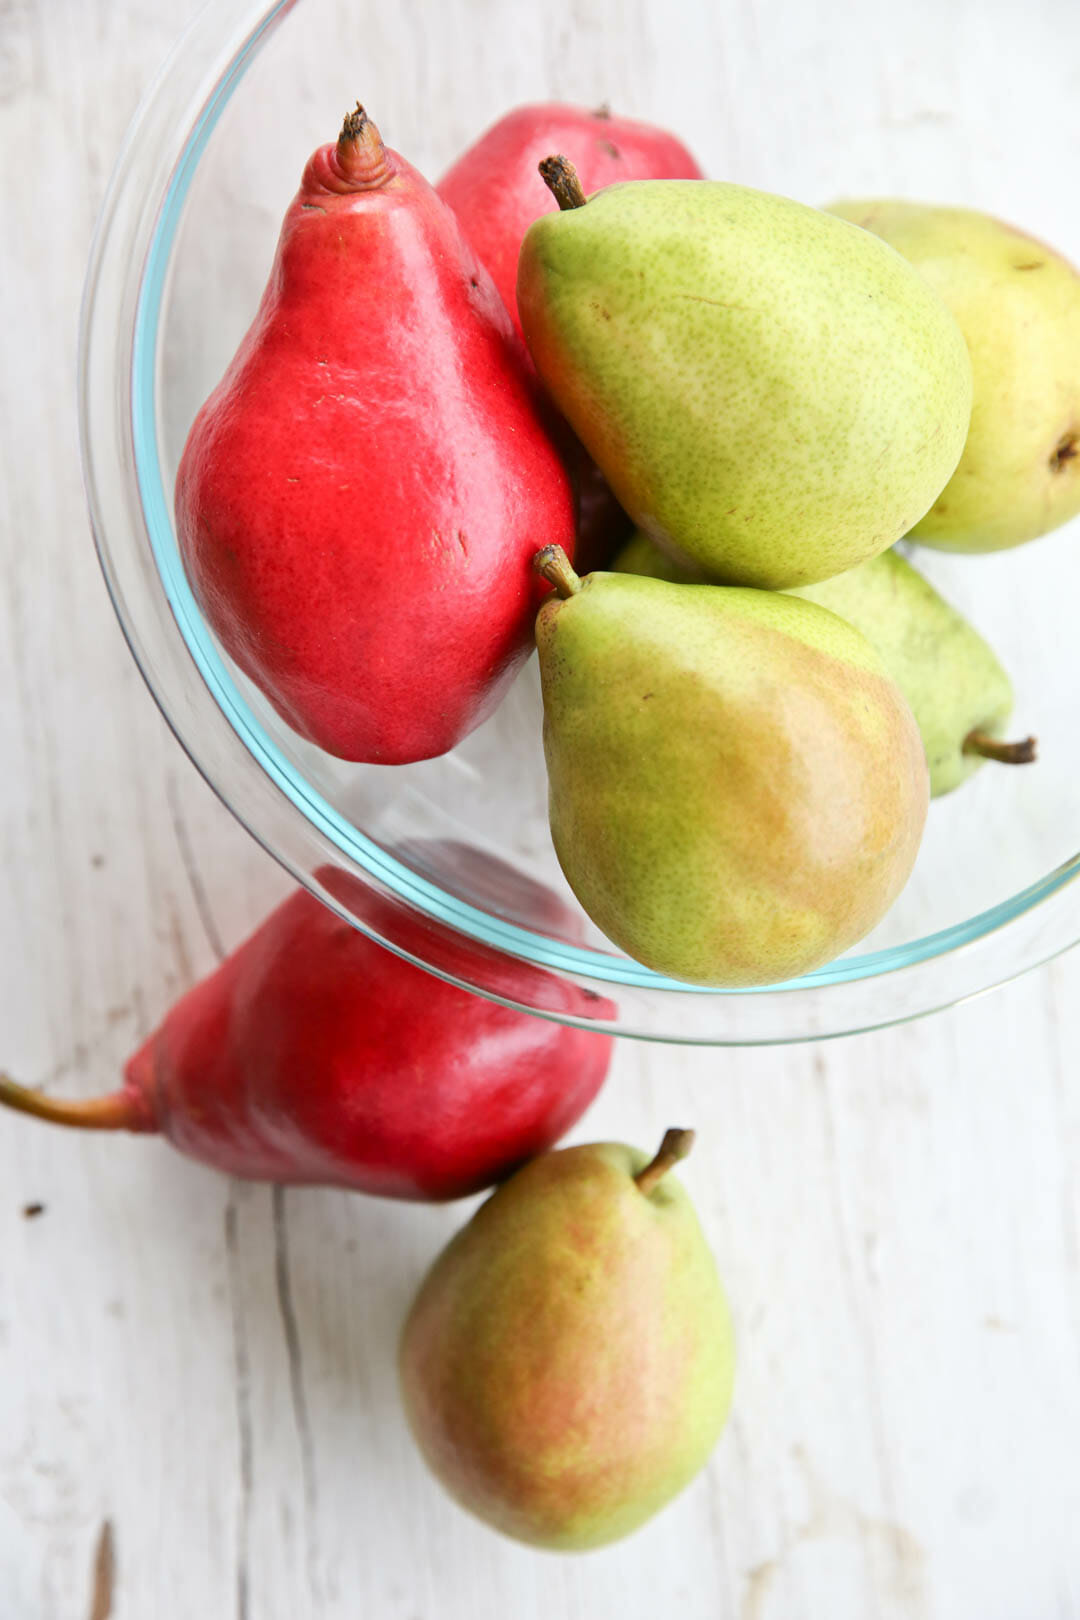
- Ripe, firm pears
- Eggs and egg yolks
- Granulated sugar
- Vanilla extract
- Cinnamon
- Heavy cream
Topping
- Quality chocolate – Semi-sweet or dark.
- Heavy cream
How to Make a Chocolate Custard Pear Tart
Step 1: Make the Crust
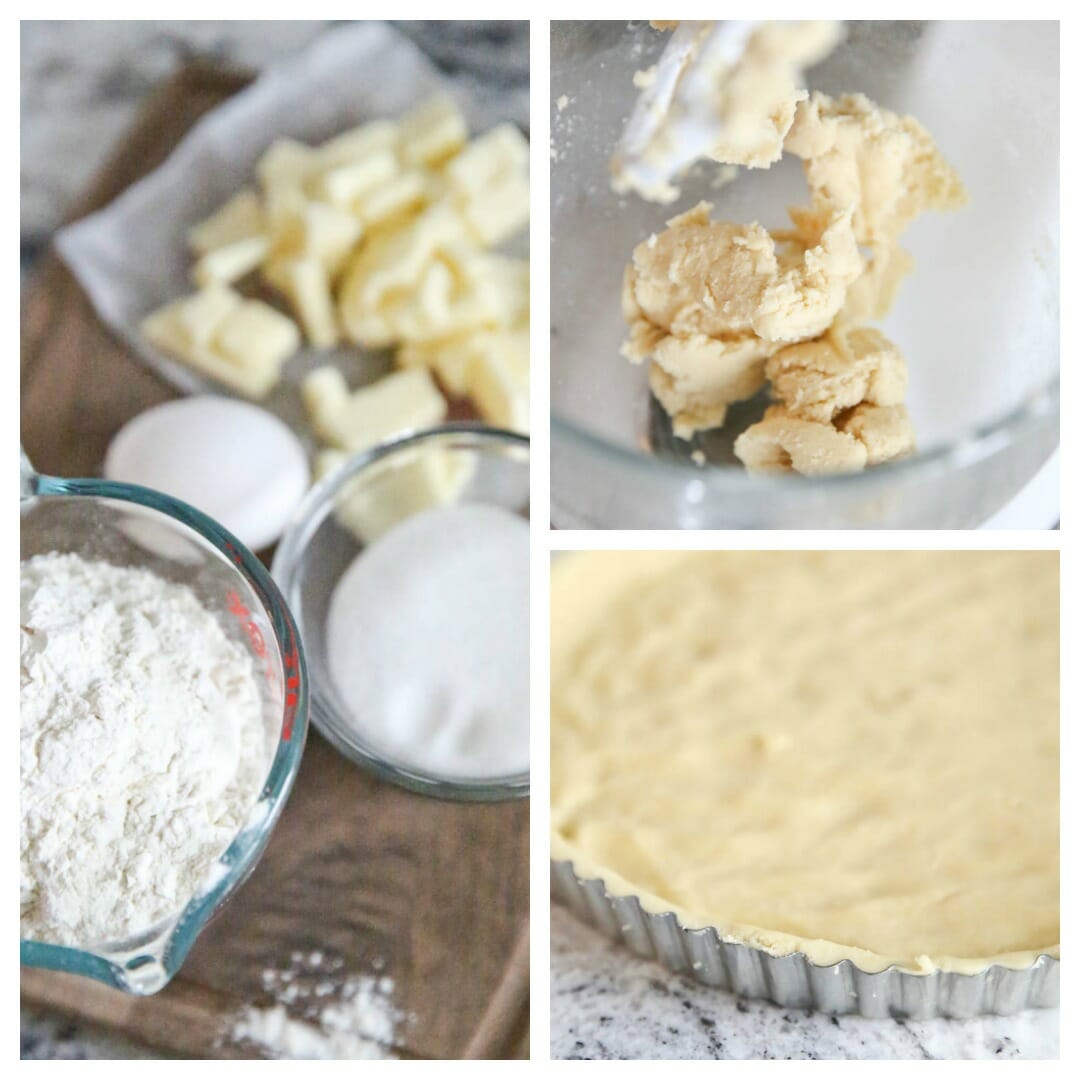
- The crust I’m using is a French pastry dough called “pâte sucrée.” Don’t let the fancy name fool you- this is actually easier than pie crust! The flavor and texture is similar to a sugar cookie and it’s the perfect base for the delicate pears and rich chocolate. Instead of using cold butter, like a pie crust, you actually beat softened butter, with egg, sugar, and flour, into a quick sweet dough.
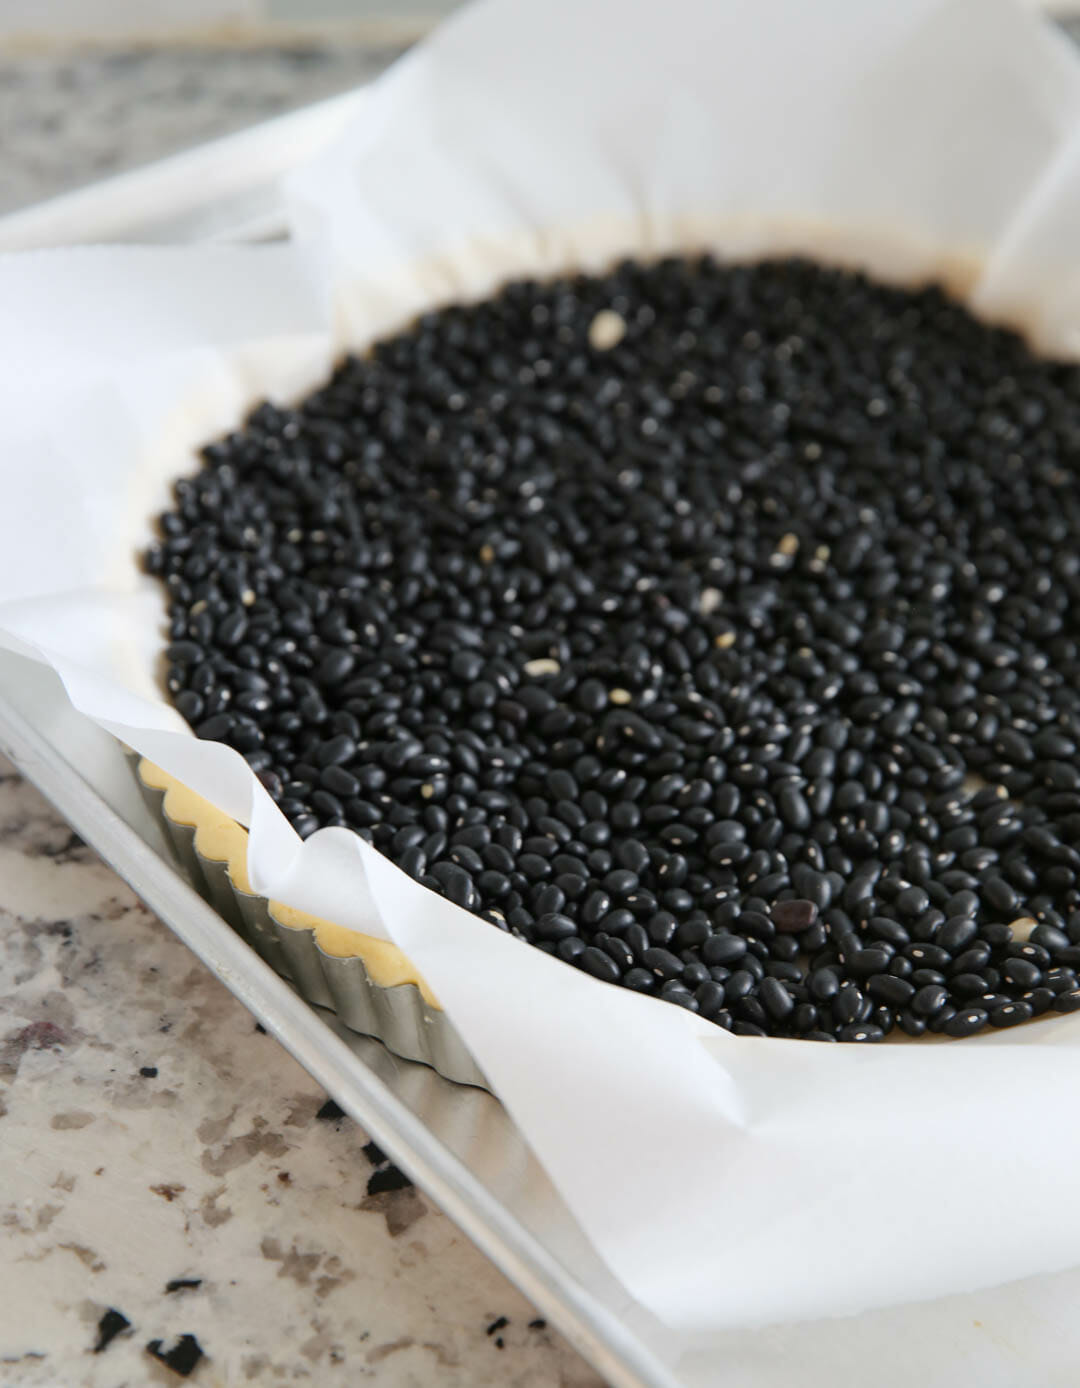
- Most tart recipes that use this type of dough call for 2 chilling periods, and rolling out the dough like a pie to drape over the pan. I skip all of that and just press the soft dough with my fingers into the tart pan and up the sides. Once your pan is filled and ready, place parchment over the dough and top with pie weights or dry beans. (This is to hold the crust down and keep it from puffing up while baking.)
- You’ll pre-bake it part way and then it will finish baking once filled.
Step 2: Prepare the Filling
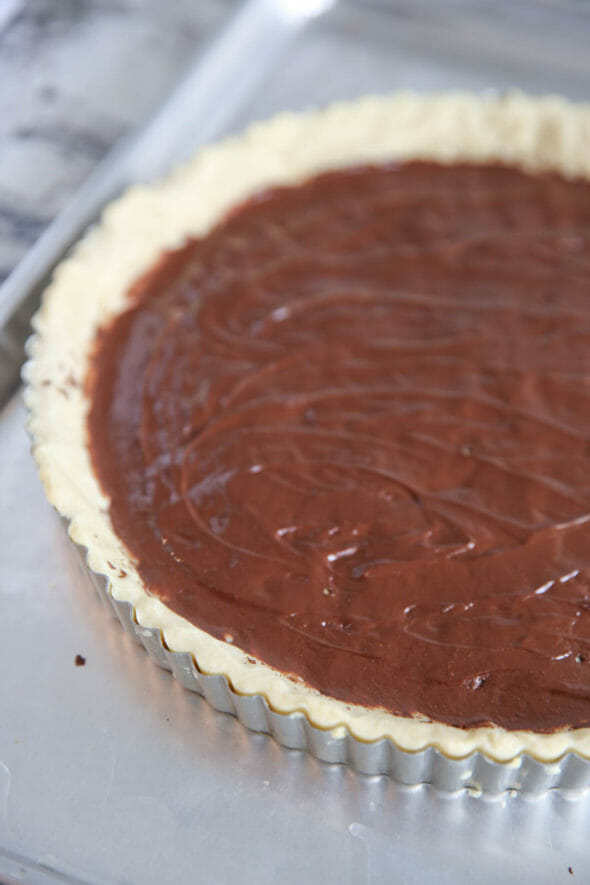
- While the crust is baking, prep your filling, starting with a good quality grated or finely chopped chocolate. When the tart comes out of the oven, you’ll sprinkle a layer of chocolate over it. The small pieces of chocolate will melt quickly and you can then spread them around in an even layer across the bottom of the tart.
- Then arrange sliced pears over the top of the chocolate.
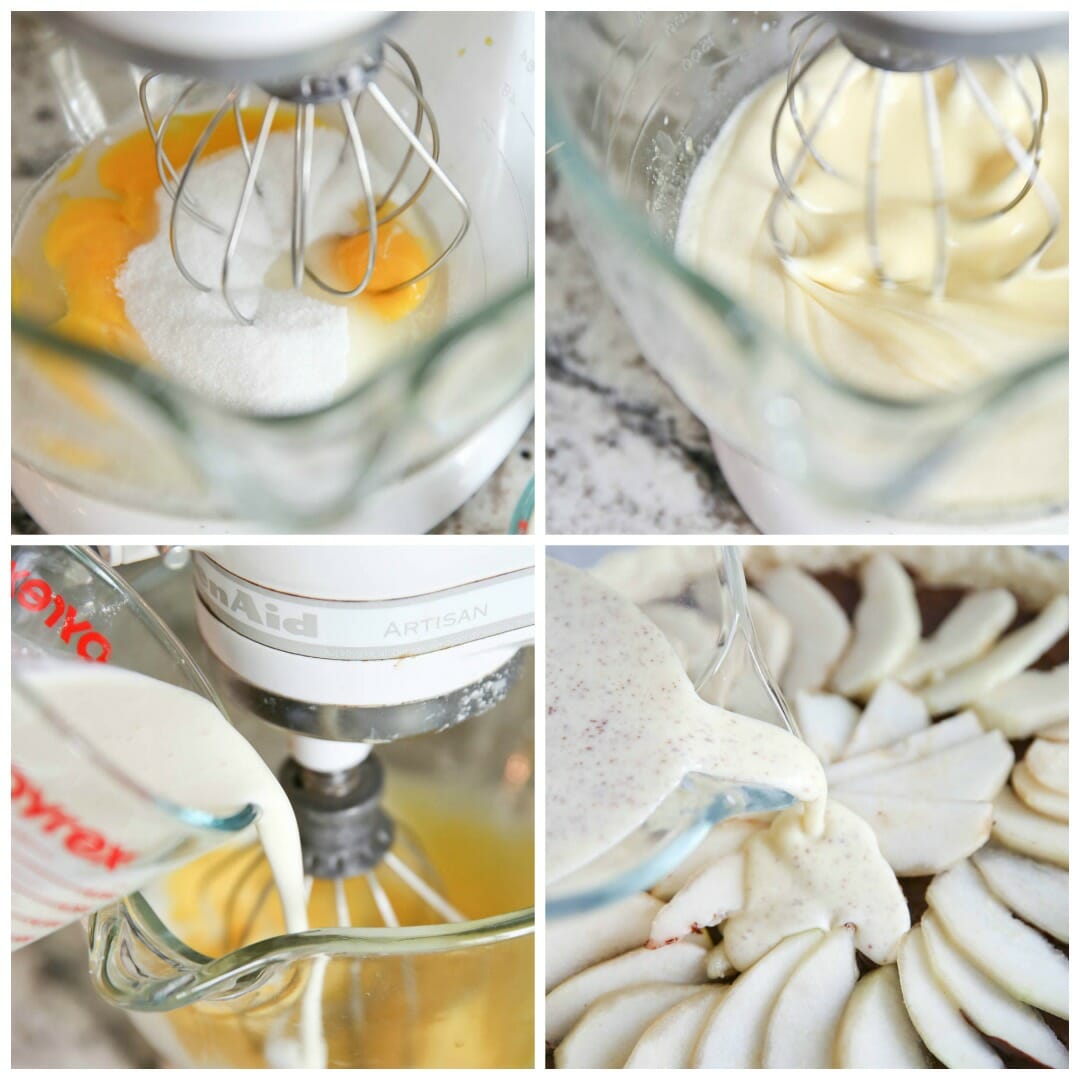
- Lastly, you’ll pour a creamy cinnamon-spiked custard over the top. You’ll want the custard to reach pretty close to the top of the pan. Keep in mind that it won’t rise, so you can fill it up fairly full. As the tart bakes, the custard cooks, the pears soften, and it kind of caramelizes on top.

Step 3: Top It!
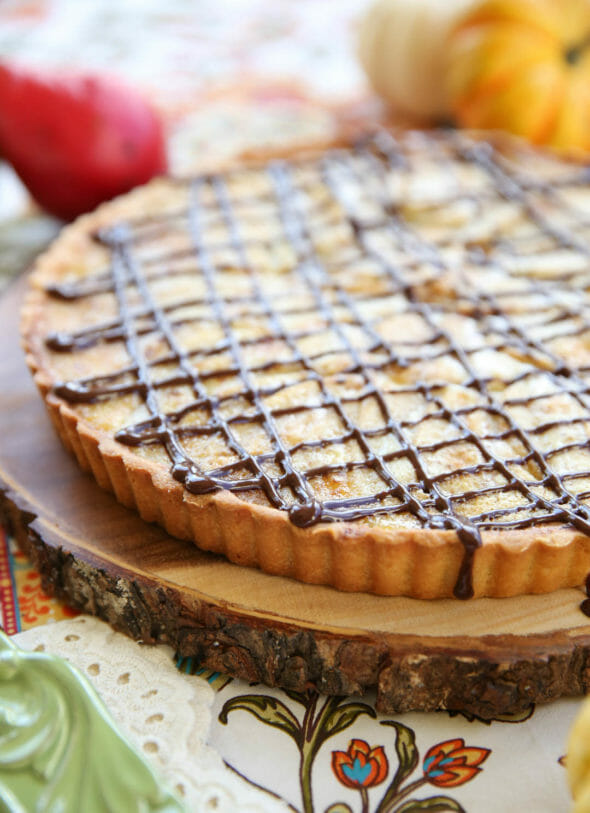
- I take a little extra chocolate and heat it with some cream for a quick ganache to drizzle on top. I love the presentation of a chocolate topping, and it adds that perfect extra touch of decadence.

Storing and Other Tips
- Store leftovers, tightly covered, in the refrigerator and enjoy within 2-3 days for best results.
- I place my tart pans on a baking sheet while baking because it makes them much easier to handle, prevents you from accidentally popping out the bottom, and catches any spills or drips.
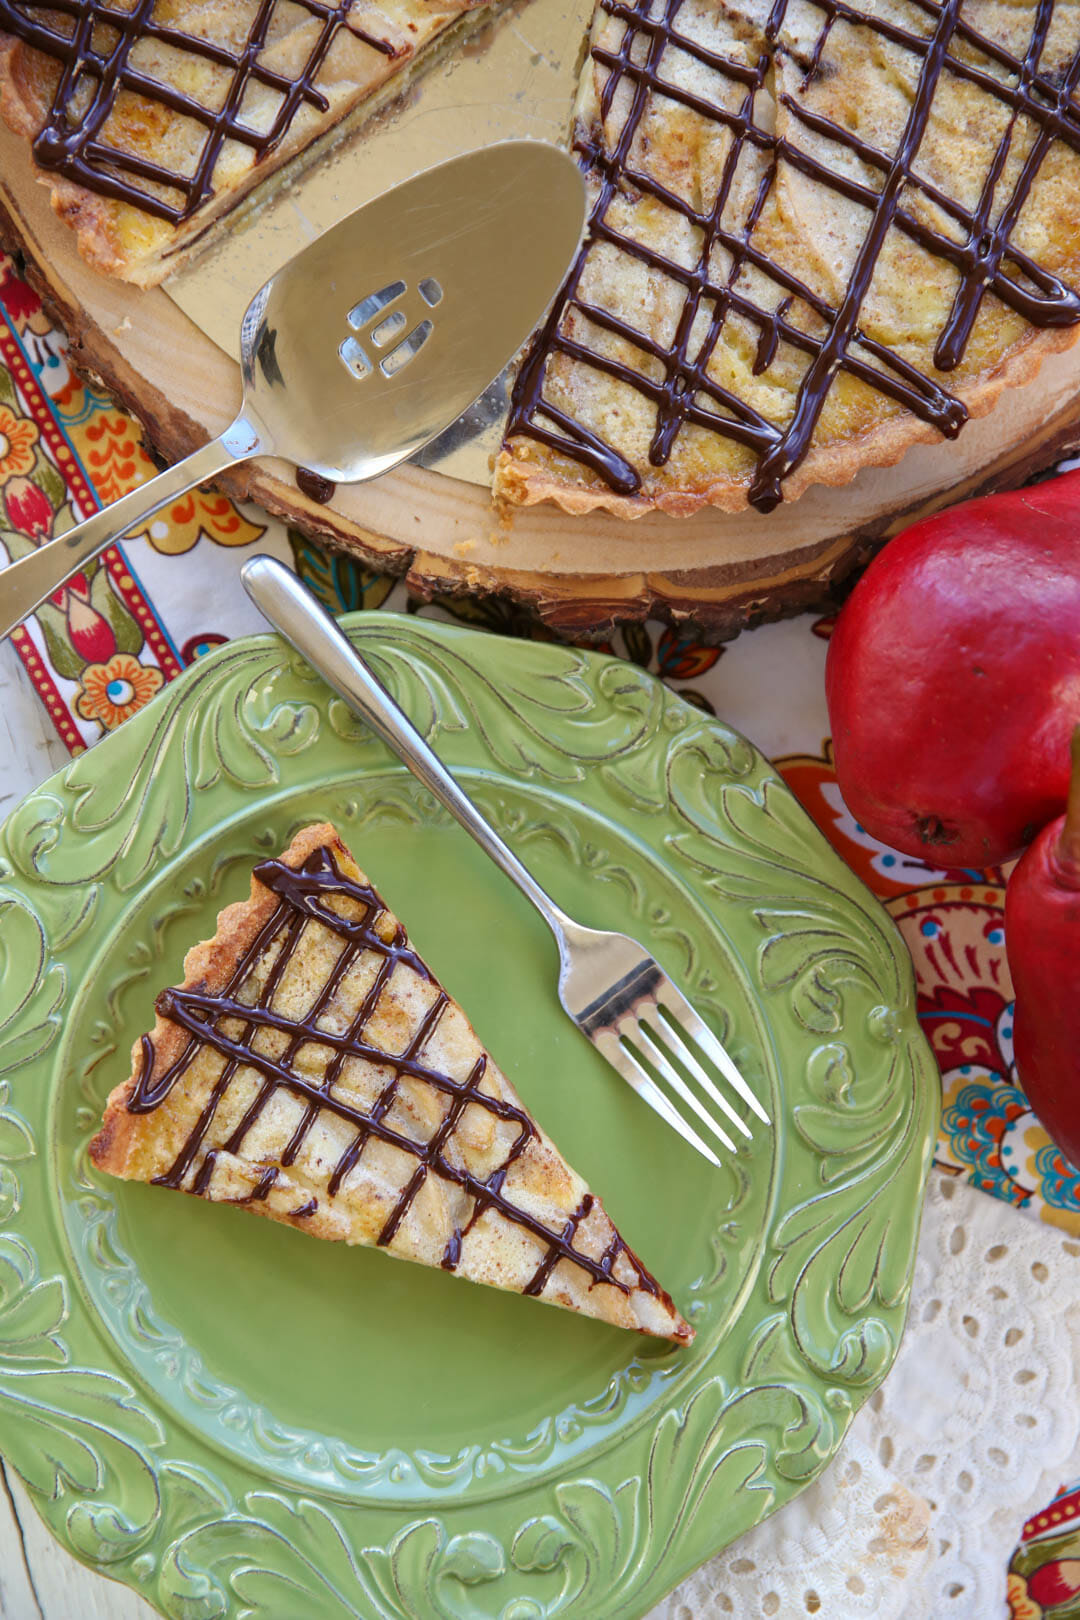
- You’ll want to serve this at room temperature, when it will slice beautifully. You get 4 layers of flavor and texture: a cookie crust, melted chocolate, tender pears, and sweet creamy custard.
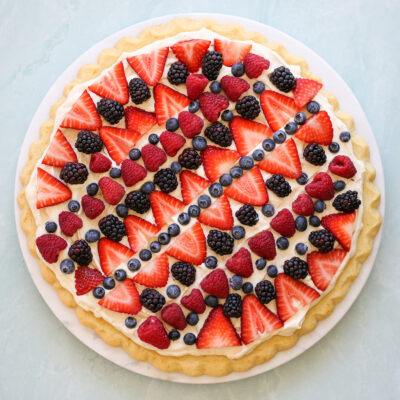
- I love that it’s super indulgent, but light enough that it’s easy to have room for even after a big holiday dinner. I’ve also made this with other fruit, like raspberries, and it’s pretty much amazing any way you do it!
Frequently Asked Questions
Yes! This recipe works with a 12″ pan or multiple smaller pans, just divide the ingredients as needed between two pans.
Yep. You can bake your tart ahead of time. After cooling, refrigerate for up to a day.
Sure! You’ll have to adjust baking times, so keep an eye on how the crust and filled tarts look as they cook.
Absolutely. Honestly pretty much anything would be good here– berries, peaches, apples, you name it!


Chocolate Pear Tart
Equipment
Ingredients
Crust
- 1 cup 2 sticks butter, at room temperature
- ½ cup sugar
- 1 egg
- 1 egg yolk
- 2 ⅔ cups all purpose flour
- 1-2 tablespoons heavy cream
Filling
- 3 ounces quality semi-sweet or dark chocolate grated or finely chopped
- 4 ripe but firm pears
- 2 eggs
- 2 egg yolks
- ¾ cup sugar
- 1 teaspoon vanilla extract
- ¼ teaspoon cinnamon
- 1 ½ cups heavy cream
Topping
- 1 ounce quality semi-sweet or dark chocolate grated or finely chopped
- 2 tablespoons heavy cream
Instructions
Crust
- Preheat oven to 375℉.
- To make crust, combine butter and sugar in a stand mixer and beat until well mixed. Add egg and egg yolk and stir until combined. Add flour and as the mixer is running on low, add cream. Beat until everything is incorporated. Press dough into a tart pan (see note about sizes) and up sides. Keep dough to about ¼ inch thick or just a little less. Remove any excess dough hanging over edge. Place tart pan on a baking sheet and place in freezer for 10-15 minutes. Place a sheet of parchment paper over crust surface and fill with pie weights or dry beans. Bake for 15 minutes. Remove parchment and pie weights, prick several times on the bottom of crust, and cook for 10 minutes longer. If crust puffs up, simply prick with fork, to release steam.
Filling
- Prepare filling. Peel and halve pears, remove cores, and thinly slice. Beat together eggs, egg yolks, sugar, vanilla, cinnamon, and cream until combined.
- When crust comes out of oven, sprinkle chocolate over the bottom and let it sit to melt. Spread evenly across crust. Place pears in a fan shape around the entire tart. Gently pour filling over pears until it reaches near the top of the tart pan. Bake for about 45 minutes or until custard is set and slightly golden brown on top.
- Place tart on a rack to cool and prepare topping when it is luke warm or room temperature. Heat cream until steaming and then pour over the 1 ounce chocolate. Whisk until smooth and then drizzle over tart. (Tip: Place chocolate in a zip-top bag and cut off the tip for clean looking drizzles). Let tart cool completely and serve at room temperature.
Notes
- This recipe is large enough to yield up to a 12-inch tart pan, or 2 tarts if you use a smaller 6-8″ pan (Adjust the amount of pears and chocolate accordingly. It’s okay to eyeball those). My 11-in pan left enough extra to make a few little individual desserts in ramekins as well, which is fun for the cook to eat before the grand dessert is ready!
- Store leftovers, tightly covered, in the refrigerator and enjoy within 2-3 days for best results.
- I place my tart pans on a baking sheet while baking because it makes them much easier to handle, prevents you from accidentally popping out the bottom, and catches any spills or drips.
- You’ll want to serve this at room temperature, when it will slice beautifully. You get 4 layers of flavor and texture: a cookie crust, melted chocolate, tender pears, and sweet creamy custard.
- I’ve also made this with other fruit, like raspberries, and it’s pretty much amazing any way you do it!


Questions & Reviews
Delicious!
This may be a stupid question, but when do you remove the tart from the pan?
Not stupid! After it’s completely cooled, right before serving.
Oh boy ! Another work of art and another great plate 🙂
Thank you and have a pleasant day !
Hi Sara!
This looks like an amazing dessert! I haven’t done a lot of baking with pears, though I am excited to experiment! I think for sure I’ll add it to my list of dishes to take to Thanksgiving dinner! Thanks for posting! Cheers!
Any chance you could use bottled pears? Would they be too mushy in the custard?
I think they’d probably be fine, actually!
I don’t have a tart pan and not in a position to buy one anytime soon. Do you think a pie plate would work?
Sure you could definitely try that.
Which pears do you prefer for baking?
In the latest Cook’s Illustrated magazine they show that you can use a flat pot lid instead of pie weights or beans to weigh down a crust. Just put some foil down on the crust and place the pot lid down on the crust. I plan to try this because I hate to waste beans, even once, plus it seems so much easier.
Great tip!
Did you use one 8″ tart pan? I’m not sure what a large tart pan size would be! Thank you
Mine is 11-12″ 🙂
I would have loved this info in the recipe! I used an 8″ and assumed it was standard (never made a tart before, though), and it was way too much dough, pears and filling. We ate the pears but the rest went to waste. I thought about making a smaller one with the leftovers but it was too crazy in my kitchen and I didn’t have a good dish. Also, I felt like 4 pears delivered a lot more slices than the pictures in this post. I hope for more specific instructions in the future. Thank you!
Hey Bonnie! This info is explained in detail in the recipe notes, but I’m not sure if they’re displaying correctly?? I’m copying and pasting from the recipe on my end: “**This recipe is large enough to yield up to a 12-inch tart pan, or 2 tarts if you use a smaller 6-8″ pan (Adjust the amount of pears and chocolate accordingly. It’s okay to eyeball those). My 11-in pan left enough extra to make a few little individual desserts in ramekins as well, which is fun for the cook to eat before the grand dessert is ready!
**This recipe features AMERICAN HERITAGE CHOCOLATE but feel free to substitute any dark or semi-sweet chocolate in its place.
**I adapted the custard part of this recipe from a similar dessert on the Messy Baker, which she found in the book In the Sweet Kitchen: The Definitive Baker’s Companion by Regan Daley.”
I’m sorry if you didn’t see that part!
Ummm, how do you make it with raspberries? I assume you just sub raspberries for the pears, right? This looks so delicious but I am allergic to pears so when you mentioned raspberries I got excited. And do the raspberries work with the cinnamon custard too?
Yep, just swap out raspberries for the pears. Or any other fruit you like 🙂 Custard remains the same (with or without cinnamon)
Thanks!
This looks so good. It’s going on my Thanksgiving list.