 I’ve mentioned a time or two those moments of inspiration in the kitchen, like the Cheesy Garlic Bread Swirls where this idea just popped into my brain and it ended up being just as tasty as I imagined it would be. Well, one day, I was just sitting there, minding my own business, and I thought, “PENGUIN CUPCAKES! I must make some!” I poked around on the internet a little for ideas and I checked out the penguins in Hello, Cupcake, (which, by the way, are completely adorable in the book, but I saw some truly sad re-creations online). Discouraged by what I was unable to find, I set out to make something of my own that met the following criteria:
–Everything tasted good. No fondant and no weird candy that no one likes. I wanted the whole thing to be completely edible and completely yummy.
–No weird or ridiculously expensive ingredients. I wasn’t about to send you out to find marzipan or something.
–I wanted to be something that, if they were patient enough, pretty much anyone could make. I didn’t want any painting, dripping issues, or drawing, and I wanted minimal sculpting. All you need is to be able to follow the directions, give the penguins plenty of time, and have a steady hand. And another set of steady hands doesn’t hurt, either! 🙂
One great thing about these is that they can be done in steps. Make the cupcakes one day and freeze them in an airtight container. Make the frosting another day. Build the penguin bodies and then finish them off a few days later. It’s really pretty flexible. Also, you can use unfrosted store-bought cupcakes as well as store-bought frosting if you’re not up to doing this 100% from scratch. No matter how you do it, though, this is such a fun way to spend an afternoon with your kids (although probably your older kids) or a friend or even for a date if your husband/boyfriend/potential suitor can stand the sheer cuteness of it all.
Candy Penguin Cupcakes
By Our Best Bites
Ingredients:
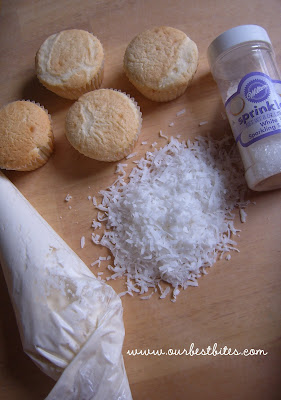
Unfrosted cupcakes, any flavor (I use the recipe from this tutorial, but you could easily use unfrosted cupcakes purchased from a bakery)
White frosting (I use this recipe)
Coconut
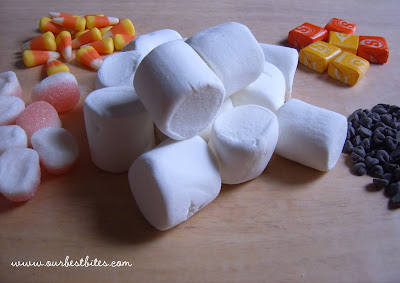
1 bag of large marshmallows
Sanding sugar, white sparkly sugar, or white sprinkles
1 bag of semi-sweet chocolate chips
2 Tbsp. shortening
Candy corn
Trolli Gummi Strawberry Puffs (I just found these in the candy section at Wal-Mart)
1 cube almond bark
Yellow and orange Starbursts
Supplies:
–1 pair kitchen shears
–Some kind of foam, preferably floral foam
–Bamboo skewers
–1 large Ziploc bag
–2 small Ziploc bags (snack size is perfect)
In a large, heat-safe cereal bowl or a small mixing bowl, combine chocolate chips and shortening. Heat in the microwave, stirring about every 30 seconds, until the chocolate is completely melted and flows easily.
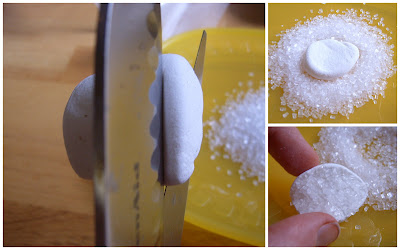
While chocolate is melting, insert a bamboo skewer about halfway into a flat end of each marshmallow. You can stick these into the craft foam while you wait for the chocolate to continue melting.
Now…you’re going to want to work on about 6 penguins at a time. If you do any more than that, the chocolate will start to solidify and then you’ll have to whip out your blow dryer to melt the chocolate and then what was once a fun, snowy afternoon food crafty project will leave you wondering what in the world you’ve gotten yourself into.
Working quickly (and holding the end of the bamboo skewer), dip each marshmallow into the chocolate and tap the skewer onto the side of the bowl a few times to remove excess chocolate (you may wonder if there is such a thing. Sadly, in this case, there is). Place the skewer holding the dipped marshmallow into the craft foam so the chocolate can dry without touching anything.
When you’ve dipped about 6 marshmallows, wash your hands thoroughly to remove any traces of chocolate from your hands. Pour a small amount of sanding sugar/sparkly sugar/sprinkles onto a plate. Using your kitchen shears, carefully cut a thin slice (about 1/8″) of marshmallow. Dip the sticky side (or just one side if both sides are sticky) into the sanding sugar and then carefully place the non-sugared side onto the dipped marshmallow. The melted chocolate will hold the marshmallow slice in place and the sanding sugar will keep yucky stuff from sticking to his tummy. Repeat with remaining dipped marshmallows.
Next, take two candy corns per penguin and place them directly “above” (they’ll end up on bottom, though) the penguin’s tummy with the fat, yellow end poking out (these are his feet). You want to form a little “V” with the white ends so the feet stick out at an angle.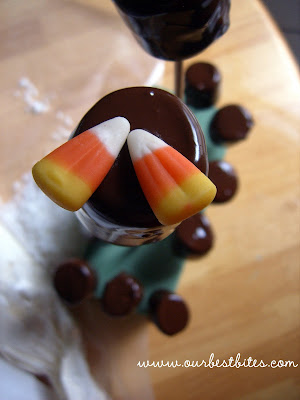
This is a great stopping point–in fact, you can do this step a day or even two days ahead of time so you’re not completely overwhelmed.
When the half-penguins are dry and you’re ready to continue working, go ahead and ice your cupcakes. The easiest and fastest way I’ve found to do this is to fill a large Ziploc bag with icing and then cut about 1/2″ off the corner and then just squeeze the icing onto the cupcakes. 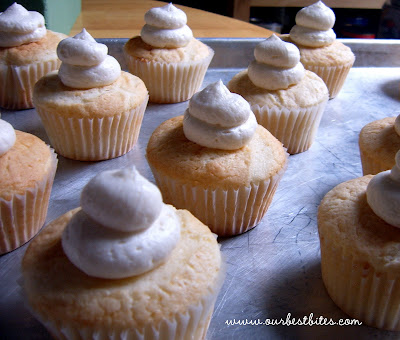 The recipe I use perfectly (for this recipe, anyway) ices 24 cupcakes. After you’ve squeezed all the icing from the bag, spread it across the surface of the cupcake with a butter knife.
Place a semi-penguin on each iced cupcake and gently press some coconut around each penguin body (for snow). If you’re allergic to or don’t like coconut, you could also use some more sanding sugar instead of the coconut.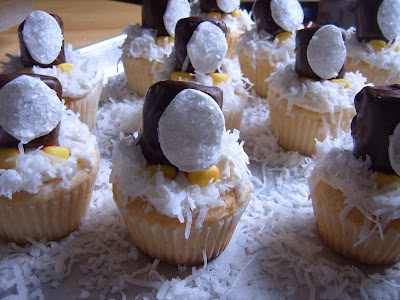
You’ll probably need to reheat your chocolate at this point. Heat it until it’s liquid and then give it a good stir. Dip each Trolli Strawberry candy into the chocolate and then twirl it a little to remove the excess chocolate. Carefully place the dipped candy onto the penguin’s body, the oblong side directly above the penguin’s tummy (this will be his face).
Next, wash your hands really well again and then open the yellow and/or orange Starbursts. Now…a little Starburst will go a long way here; in fact, I only used two Starbursts for 24 cupcakes, so keep that in mind. Carefully cut off a small piece of the Starburst (maybe a 1/8″ corner) and then form it into a beak between your fingers. Carefully place it in the middle of the penguin’s face (the chocolate on the head will still have to be warm for this to work).
Next, place the cube of almond bark into one of the small Ziploc bags and seal it. Heat it in the microwave for about 1 minute, checking it every 20-30 seconds (and mashing it around with your hands a little each time), until the bark has melted.
While the almond bark is melting, scrape the excess chocolate from the dipping into the other small Ziploc bag. Reheat it a little if you need to.
Now…the easiest way to place eyes on your penguin is to grab a box to place on your counter so that when you put a cupcake on the box, it will be about elbow-height. Their eyes turn out a little less crazy when you do this… 🙂
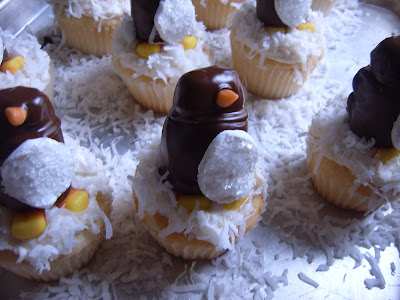
Cut a TINY hole in the corner of each bag and then carefully dot each penguin head with two bloops of melted almond bark.
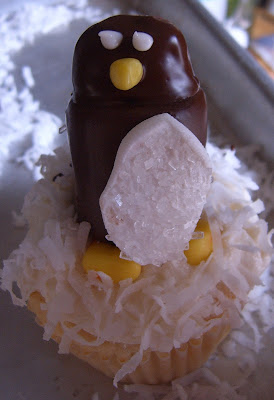
Finally, take the baggie of melted chocolate and make an even tinier dot on the white chocolate for the irises. This is when their little personalities come out and I LOVE it! 🙂 I think this one looks like he’s sitting for his Senior Portrait–serious, pensive, looking toward the future:

And that’s it!! Like I said, these are a lot of work, but if you’re patient and careful, they’re pretty darn difficult to mess up. And really, if you go straight through from baking your own cupcakes to decorating 24 penguins all in one day, it’s about a 3-4-hour project, which isn’t REALLY the end of the world and would be shorter if you had someone helping you. Also, I think 12 penguins is a perfectly acceptable alternative… 🙂 You’ll cut down on that time considerably if you buy the cupcakes (or make them in advance) and if you take a break after you’ve made the base for the penguins. However you do them, they’re definitely going to impress whoever you take them to, whether it’s a classroom full of kids or if it’s a holiday party for adults!


Questions & Reviews
These are super cute!
BTW- (in case you didn't know this already)Pioneer Woman had a giveaway and to enter you had to link to one of your favorite recipes on the web. She posted the statistics today and listed the top twenty sites that were linked to. Guess what…you gals made the top twenty! I was happy to see you there b/c I just love ya over here:0)
Those penguins are super cute! Don't know if I am that ambitious. I was just on the Pioneer Woman's site and you guys were in her list of top 20 food blogs that people read I thought that was pretty great, congratulations.
These are wonderful!!! I'm going to (attempt) make them for my daughter's "lucky day" for her birthday at school next week. She is so excited! Thanks for sharing these and wish me luck 🙂
Very Cute! you are so Clever!
What a great tutorial!
Ooooh! What a fantastic idea!
Totally adorable!
🙂
ButterYum
I love your blog site, it is so fun. We tried our first recipe last night and it turned out great! Thanks!
These are really cute and would be great to take to our ward Christmas party on Friday!
Those are absolutely darling!