 Can I just tell you how much I’m loving our Halloween Party?! I loved all of the nice comments on my post about Halloween Party Food, and I’m getting a kick out of all of the creative names you guys have come up with for Kate’s Goblin Grub! Keep ’em comin’!
Now it’s time to get our craft on. Woo hoo! I remember making these shrunken heads when I was a kid and it was so cool to watch our creations turn into creepy little guys! My husband and 2 boys thought this was a riot, so follow along with our shrunken head tutorial with your family and see what you come up with!

Shrunken Apple Heads
supplies and ingredients:
apples*
lemon juice
salt
paring knife
vegetable peeler
*You can use any variety of apple. I like to use a variety because they all dry differently so you’ll get some different results. Granny Smith’s are probably my favorite though.
Fill a large mixing bowl with cold water and give it a couple douses of lemon juice and a spoonful of salt. You’re gonna ask me how much, aren’t you? C’mon, live on the wild side and just douse!
Use a vegetable peeler to peel your apples. Get as much from around the stem as you can, or leave some to make a little hat 🙂 As each apple gets peeled, plop it in the lemon juice/water/salt bowl.
When you’re ready to carve, use a small paring knife to cut into your apple. The vegetable peeler works great for eye holes. Remember that the apple is going to wither and shrink, so you want to exaggerate features. You also don’t need to get too detailed. General shapes are great and details get totally lost anyway. Here’s my little guys, charming aren’t they?

If you want, you can use cloves for eyes and grains of rice for little spooky teeth.

Now it’s time to be patient. They need to dry out and it can take anywhere from 1-2 weeks. They need to be in a dry place. If they are left somewhere humid, you risk them turning into little moldy heads. Moldy heads would be pretty freaky looking, so you may want to just go with it if that’s what your after, but I wouldn’t advise it 🙂
I kept mine on a baking sheet in my oven. I opened the door a few times a day just to let some air circulate in there. You can even turn the oven on to help them along. After a few days I worried that they wouldn’t be done in time for this post so I started to turn the oven on periodically. Every day I’d turn it on to the lowest possible heat (170 degrees for me) for an hour or so and then just turn the oven off and leave the door closed. That helped shrink them much faster. If you live in a humid area, you may just want to leave them in the oven with the oven turned on to the lowest temp for a couple of days.
My boys loved checking on their “freaky little apple mans” each morning and watching them transform! When they’re done, they’re quite bizarre; I think this guy (and the one behind it) are my favorite:

So what do you do with creepy little apple heads? Make a centerpiece of course! Everyone will want to know what the crap you have on your table and they’ll think you’re awesome when you tell them they’re little gnomes you found in your basement and then performed an ancient ritual on. I think this is actually pretty classy for a shrunken head centerpiece!
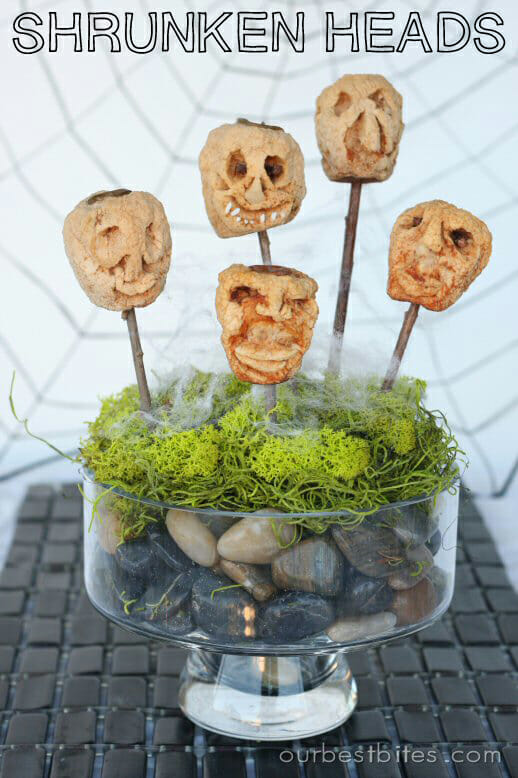
That’s just a decorative glass bowl (a trifle bowl would work great). I placed floral foam in the middle and then surrounded it with rocks. I put some moss from the craft store on top and then stuck those little creepsters on twigs and popped them in. A little touch of spiderweb was the final addition. You could also make them into dolls like people mentioned in the comments.
Try these out at home with your honey or your kiddos- everyone is guaranteed to love it!


Questions & Reviews
And for the party, you need a chunk of dry ice underneath that bowl!
Awesome! Dry ice who’d have thought? Thanks! This will look great @ my girls’ party – one question once they’re done – how long do you use them as decor? In other words – if they take a week or two to make? About how long after that til they’re done-done?
Whoa! Those are so creepy! I've never seen anything like it. Very creative.
I am in love with these! What a perfect halloween craft.
Loving halloween week, ladies! keep up the good work! thanks for all the great ideas!
Oh my word!!! That is so neat!!
This has got to be my favorite week ever! I love Halloween and all these great ideas are just in time to let me plan them out with my nephews. Thanks!!!
Hey, those are so neat, I showed them to my son and he loved them, so I guess we will be making some
I know that my 13 year old is going to dig this!!
How unique are these?! What a great idea and project to do with the kids 🙂
AHHH…so THIS is why my little brother was soaking an apple in lemon juice about a week ago. I could not figure out what he was trying to do. I figured, he's 8, he's weird, whatever. LOL.
HAHA! These are great! I think we'll do that for a craft, today! I remember these as a kids, but I don't think I ever made one, so I think we'll all have fun doing this.