
First you’ll need to gather some household supplies. Some people will tell you that you have to have special egg-blowing tools with special egg-blowing names. This is a sham. You really just need a baby snot sucker (seriously, isn’t that the real name?), a pin, and a paper clip.
You can also try a plastic medicine syringe (instead of the snot-sucker), the type you’d use to give medicine to an infant. The one in my picture is much too narrow but I thought I’d include it anyway to show you the type. You’d just want a much wider one (but really I think the blue squishy blower thingy works better) You also need a paper clip, and in a minute I’ll show you how some drill bits come in handy as well.
If you’re going to save the inside of the egg for cooking, then make sure to wash the outside of your egg and make sure that all of the tools you are using are clean and sanitized.
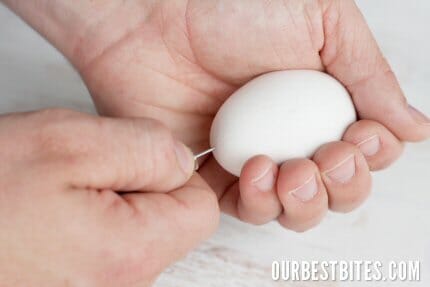
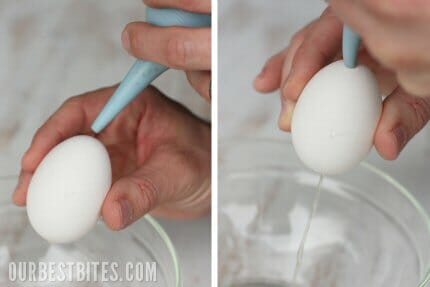
Place your eggs in a bowl of warm water for about 10 minutes before starting. This will make the entire process much easier. Hold an egg firmly (you know, as firmly as you can hold an egg) and use your pin to gently pierce a hole in one end. It helps to gently twist the pin back and forth first to sort of screw it in before you actually push it through. (These are my husbands man-hands by the way. Nice job honey, you’re a natural.) Repeat on the other end of the egg.
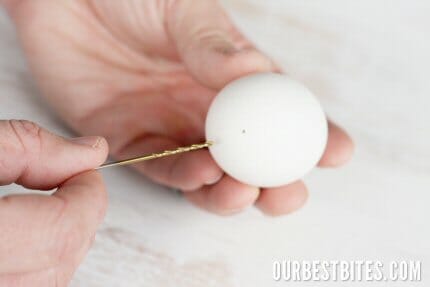
Once you have a teeny tiny pin hole, it helps to have a teeny tiny drill bit (seriously, the smallest one in the set). Gently “drill” through your pin hole to enlarge it.
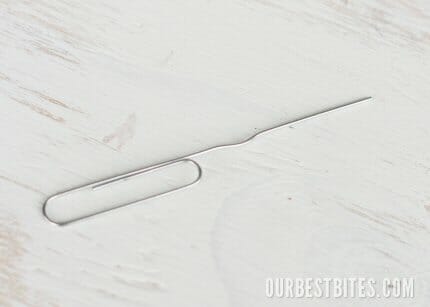
Now grab that paper clip and unfold it. Stick the paper clip inside the egg and swirl it all over the place. The object here is to scramble that yolk up which will help it all come out easily.
Now grab the infant bulb syringe (I had to google that. True story.) If you don’t have an infant or former infant in your home and therefore don’t have 17 of these laying around your house, you can get one at the drug store for a very inexpensive price. Like, cheaper than 9 months of pregnancy and then child-birth in order to get 5 free from the hospital.
Place it directly over one of the holes and squeeze over a bowl. The egg will come right out of the other end. If you meet any resistance, don’t keep blowing air or your egg might explode. Give it a shake, or stick the paper clip in again, or increase the size of your hole.
Once everything is blown out, you might want to fill your syringe with warm water and blow it into the egg. Shake it up and then blow it out to get the inside clean.
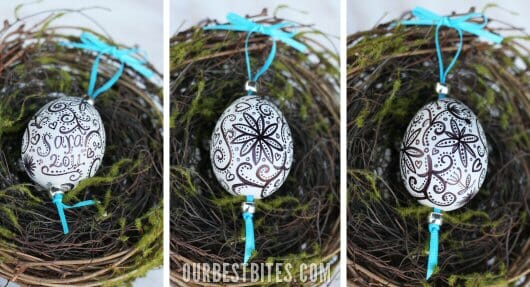
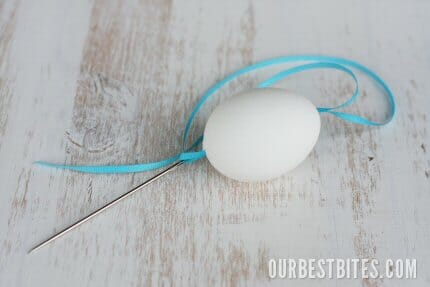
Once you’ve got your hollowed out egg you can do all sorts of crafty things with it. To make an ornament, thread ribbon, string, or twine through the holes. Using a extra long crafting needle really helps. If you need to enlarge your holes to fit the ribbon, use your pin to gently pick away at it.
Just tie a knot at the bottom end and a loop at the top end.
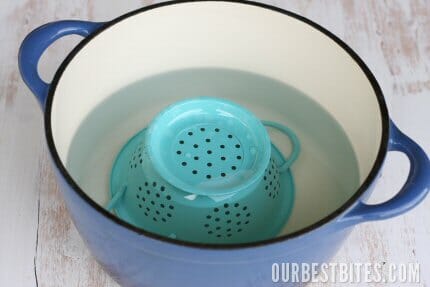
To make Silk Dyed eggs,follow the instructions in this tutorial. When it comes to the step where you boil the eggs in the pot, use a strainer turned upside-down to keep the eggs under the water. OR, if you can fill your eggs with water it will weigh them down as well.
After they come out they will be filled with boiling water. Make sure to let them cool first, and then blow out the water. After they’re dry, thread ribbons through so you can display them!
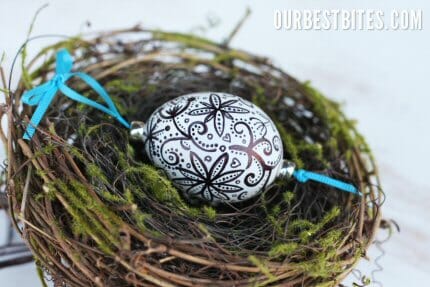
If you want to dye your eggs with normal colored dye, then dye uncooked eggs before you blow them out. Try adding beads to your string. It not only looks pretty, but it covers up messy holes!


Turns out all of those years of mindless doodling in school was actually useful. Way more useful than algebra at least.
Lastly, you know how much we love seeing your projects- so post them on our Facebook page so we can all oooh and ahhhh!




Questions & Reviews
Anyone wanting quail eggs, text me 973-796-six, eight,0 three.
Should have added that you can be “in progress” on several eggs at a time. Start one, set it to dry, and start painting rubber cement on the next. I usually did about 3 at a time, and there was always one dry enough to move on to the next step. Didn’t take as long as I thought it would, and they turned out neat.
If you want to try something similar to the Ukranian wax eggs, but without the open flame and hot wax, you can get the same effect with rubber cement. With a very tiny brush or even a toothpick, paint on rubber cement in a design that you want to stay white. Set on a bottle cap or something to keep it upright and let dry. Dye a light color, then paint on rubber cement to cover the part you want to stay that color. Dry again (with a fan, only takes a few minutes), then dye a darker color. Keep going till you’re happy with the finished egg. When all is dry, you can lightly rub off the rubber cement. Look great!
I believe it is “baby booger sucker” 🙂 Great post.
I loved the explanatory comment about the snot suckers!
I wonder if there is some bit we can put on the drill motor to insert inside the egg and make wee raw omelettes that will come out easier.
I am going to try this tomorrow! FYI, our local dollar store has the “snot sucker-outers” as I have always called them! Thanks for a great tutorial.
Your tutorials are brilliant but you are so entertaining to read too! Keep up the good work x
Since I volunteer over 1000 hours a year helping junior high kids learn MATH – algebra to be exact – I’ll just point out that it’d be tough to work with things like quarter cups if one had no math knowledge. That said, GREAT EGGS! I used to make an egg tree with my mom at Easter every year with blown eggs. We’d dye them and use tissue for transfer designs, paint them, use markers, etc. It was always great fun. My dad always managed at least one army green monster egg – too many dye baths – that inevitably took pride of place (on the BACK!) of a spray painted maple branch that was particularly gracefully shaped, which we used as our “tree”.
It’s really a v Gud n v v stylish way of decorating eggs.
Well…..I wanted to add some suggestions.
U can hollow the egg by just making a tiny hole from one side of egg only and then sucking the liquid out of it by a syringe……next you can put weight in eggs by pouring in it plaster of Paris (it will also prevent egg cracking during further processing and decorating) !!!!!
Hope these suggestions will add up more to the happy reading of your fabulous page 🙂
We are essentially a homeless shelter. I’m always looking for things to do with my ladies that will give them a sense of accomplishment. This is a wonderful project and your wit and humor made it a joy to read. Thank you so much
Is there a spray-on protectant that I can buy at a craft shop or hardware store that would reinforce the blown-out eggs, without discoloring them, that would strengthen them so they’d last longer? I have eggs I decorated for Christmas when I got married (40 years ago) that have miraculously survived, although every year or so we seem to lose another ornament when it gets knocked to the floor.
What a fab site! Useful, practical and really easy to follow AND funny! I’ll be back here for sure! 🙂
wow!
I’ve been blowing out eggs for years to craft with, but I never used the baby thing; Just my mouth. I’ve gotten it down to a science – with just a tiny hole on each side. My husband thinks I’m insane how I have to blow out the eggs every morning for breakfast and set them to dry on the sil (next to all the avocado pits I dry and then carve). lol. But seriously… No need for some random tool, just use what you’ve already got naturally. 🙂
how do you keep the shells from breaking
I use to make blown eggs too as a child this year my mom did this with my oldest daughter…I would have never thought using a “boogie getter” to blow out the egg..we always went blue blowning them out with our mouths lol
I am visiting my sister in Albuquerque, and she cannot believe your website; we will be using the silk ties, she is providing the silk ties, which is making it a lot easier for me. We are keeping it a secret from her the ladies in our family and can hardly wait to show them off AND share your website.
I pinned my husband to the kitchen table one night and made him help me with this. They are sitting on the fridge uncolored but he and my boys thought it was pretty cool to watch all the “egg snot ” run out of a tiny hole in the egg. Ah the joys of boys. I think mama is gonna handle the coloring by myself though.
Love it! Thanks so much for posting!
On a different website I read where you can make a mixture of water and modge podge and pour inside(then drain) and paint on outside to make them stronger. Also if you are doing the blown out eggs and want to silk dye them instead of using the strainer to weight them down, you can add a washer or a stone or a fishing weight to the packet to hold down each egg as you boil/dye them.
Thanks great idea.
I ended up using a plate a a Pyrex measuring cup. After the boil for the sitting covered time.
Curious – “fragile as an eggshell”. How can I make these ornaments less fragile for storage? I don’t want them to break after working on them – same goes for the pysanki egg idea. I thought about making the hole slightly bigger to allow for the tiny nozzle on a “Great Stuff” expanding foam can, but as the description says, it’s -expanding- foam. I’m not sure if the internal pressure would be too much. Would shellac, polyurethane, or something like them make the shell stronger?
Anna, I just nestle them in tissue and store them in a hard-sided box. As long as your box can’t collapse on and smash them, they should be just fine.
Couldn’t you shellac the eggs after finishing them? Shellac comes in matte and glossy, and would make the shells a bit sturdier, I should think. Perhaps the shellac would make the dye run? Has anyone tried this?
I’m not a “crafty” person but I’m heading out to the drugstore tomorrow to buy a snot sucker! EUWWW what a revolting picture in my mind’s eye! Yes, single with spoiled puddytat here – haven’t had to use one of those things.
After that, I have to head for the thrift store to buy some ugly ties. Blowing out the eggs is a great idea – you can keep them and not have an . . . odour . . . in your home in a few weeks. ROFL
Thank you very much for the great idea.
Love this. Thank you for sharing. The link for the tutorial on silk dying blown eggs doesn’t work. Can you repost information. Thanks
Sorry Lisa, they should work now!
Pysanky is a spring ritual in our craft group. The designs typically include Christian symbols of crosses, crosshatch representing Fishers of Men nets, barbed lines representing the crown of thorns, waves representing baptismal water, etc. Wonderful hobby that you can do with your children.
I wanted to add that if you don’t have the snot-sucker, we used to just make one of the holes a little bigger and blow the egg gew out of the hole. I think I may try the snot sucker, but for those that didn’t have one handy I thought it might be helpful to know you can do it without one. Love these ideas with the silk dying can’t wait to work on it this year. And the fact that I can keep them makes me VERY happy. :o) Never thought of that.
Loved your idea of the snot sucker for blowing out the eggs. If you want to go one step further and spend $9.95, there is a FANTASTIC little tool called “Blas-Fix”, it is Gereman and known as an Egg Vac — works absolutely fantastically, and you only have one little tiny hole in the egg!
wonderful will have to try this out
Great tutorial. love it, thanks for sharing