I first saw these layered patriotic drinks years ago, in an alcoholic version. Since I don’t drink alcohol, I started googling to figure out if that was an integral part of the chemistry involved. Lucky for me, it’s not! The principle here is that liquids with lower sugar contents will layer on top of those with higher ones. So basically you can layer most colored drinks as long as they have different sugar contents. If you pour them in very slowly, the liquids will stay separated.

Ingredient Notes
You can really use any drink products, you just have to take note of the sugar content on the nutrition label. I recommend choosing a sugar free liquid for the top.
- Red Beverage – Reds are pretty easy to find. There’s cranberry juice, cranberry/strawberry/cherry flavored sodas, Hawaiian punch, etc. It’s easiest to use red as your bottom layer because the juices will likely have the highest sugar content of everything you are using.
- Blue Beverage – For blue I did Gatorade; it’s important you look at the labels, it just has to have a little sugar in it. G2 Gatorade had just a few grams which made it perfect for layering between a juice with a higher sugar content and a diet soda with none. You may be able to find blue Hawaiian punch which could work as well, just make sure you have one each of a high, medium, and low sugar content beverage.
- White/Clear Beverage – I used a diet lemon-lime soda. Any sugar-free clear-ish soda would work!
- Ice – You’ll want to fill your cups with ice before adding your drinks. I used cute star shaped ice cube trays. Plan ahead if you want all star shaped ice. You’ll have to freeze several trays to have enough!

How to Assemble Layered Patriotic Punch
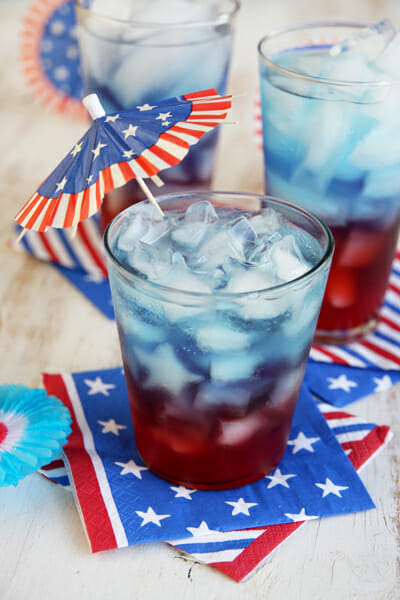
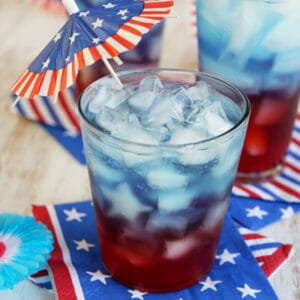
- To make the drinks, fill your glass up all the way to the top with ice. If you’re making these for a party, you’ll probably want to stick with short glasses.
- Start with your red (or whichever has the highest sugar content) and fill up the glass 1/3 of the way.
- Next pour your blue or medium sugar-content beverage. When you pour, pour slowly, right over an ice cube, down the side of the glass. This will help keep the layers separated.
- Finish off with your top layer, again pouring slowly, over and ice cube, right down the side of the glass. That’s it. They’re ready to serve!


Fun Serving Ideas
- I like to serve these with straws, because they taste best (I think) once they’re mixed up.
- If you can find them, these cute little patriotic umbrellas make a great addition, too!

Frequently Asked Questions
Unfortunately, no. This drink needs to be made immediately before serving. Luckily it’s quick to assemble!
Since the dramatic layering comes from the different levels of sugar content, it’s best to use a nice sugary base, and then use lighter options for the next layers. The important thing is that you have different levels of sugar content, so you may be able to get away with just a slightly sugary red drink, topped with a diet blue drink, then you can let the ice cubes add your white.
Feeling patriotic? You may also like:


Layered Patriotic Punch
Equipment
Ingredients
- 1 bottle red juice or soda Hawaiian Punch or cranberry juice
- 1 bottle clear colored diet (sugar free) soda Diet 7Up, Sierra Mist
- 1 bottle blue punch or juice with minimal sugar G2 Gatorade, Hawaiian Punch
Instructions
- Fill your glass all the way to the top with ice.
- Start with your red (or whichever has the highest sugar content) and fill up the glass 1/3 of the way.
- Pour your blue layer very slowly, right over an ice cube, down the side of the glass. This will help keep the layers separated.
- Lastly, pour your white or clear layer on top, very slowly, right over an ice cube. Serve immediately.
Notes
- If you’re making these for a party, you’ll probably want to stick with short glasses.
- These taste best served with straws.


Questions & Reviews
Thanks, my nieces and nephews will love this, and I LOVE the fact that there is someone else out there who doesn’t drink alcohol !
Use cranberry juice its better for you then soda and tastes better then red soda too!
Do you remember where you found the version with the alcohol? I’ve been searching but can’t find it! Or maybe you’ll know, if I wanted to do these with alcohol, would I just make it in the bottom layer since it would have a lot of sugar?
Thanks!
Michelle, if you just google, “Red white and blue cocktail” you’ll find a bunch! I know one recipe is ½ ounce Grenadine, ½ ounce Peach Schnapps or Vodka, and ½ ounce Blue Curacao (poured in that order). But really, just do a quick google search and you’ll see lots!
Cute photos!! I have actually made these (in other colors) as part of a science day at a local school when they wanted to learn about the science of cooking (and then featured them as part of my kids cooking series).
Hey, if anyone can’t find the star ice trays at Target cause their “sold out”, check out Walmart. They have them also, under $1. I’ve also seen them at Dollar General. Cute idea. Love these drinks. I’ll definitely have to try it. Thanks!
Have you ever tried making this in a punch bowl? We’ll have a lot of guests and making individual cups might take a long time!
I made these last year and they were a hit! SO fun! A tip for the pop rocks if you still want to try them is to take a little carmel/butterscotch ice cream topping and dip the rims of the glasses/cups in that and then the pop rocks! They don’t seem to pop as much! Anyway it worked for us! (Just make sure you dip “lightly”) 🙂
These are such a neat idea for the 4th! Will be getting to Target tomorrow for the ice trays and different drinks!
I must admit it ranks up there among one of the most unique blog ideas I have ever seen.
My uncle actually did a version of this for my wedding 25 years ago. He used a lemon-lime soda base, a full strength red fruit punch flavored syrup at the bottom, then a little green syrup mixed at half strength. The entire drink was topped with a scoop of rainbow sherbet. It looked amazing and was pretty tasty.