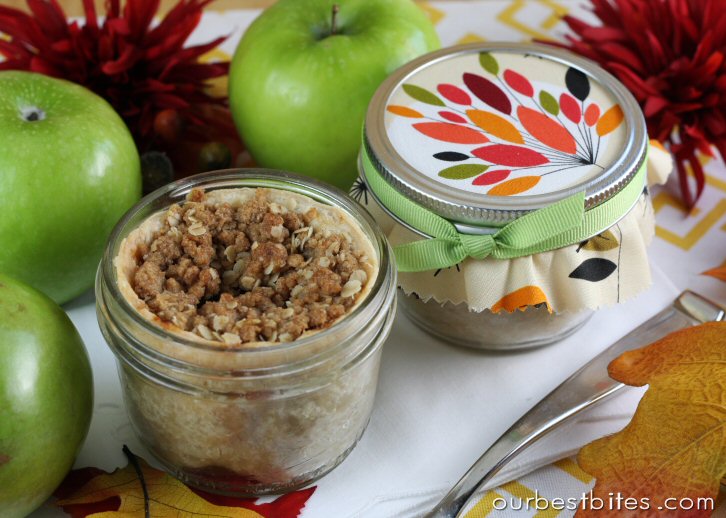
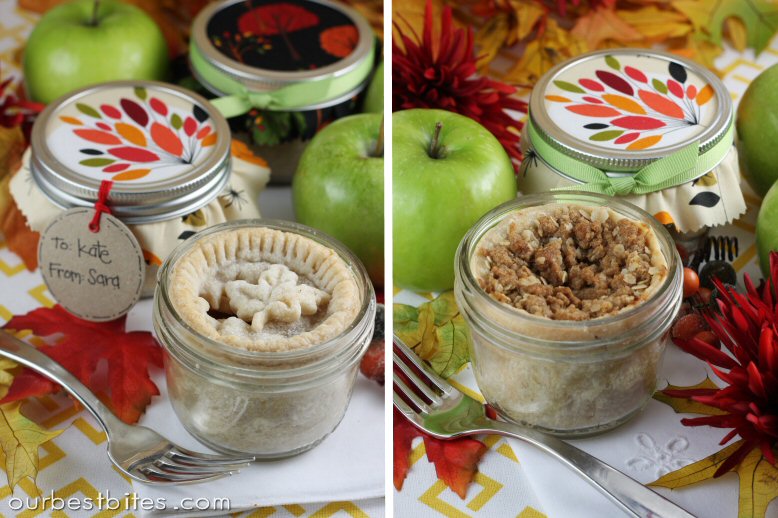
These are individual-sized pies made in little glass jars that can go straight from your freezer to your oven to your mouth. SO cute. You can make these with store-bought crust and canned filling or jazz it up with homemade like we do. And just for added cuteness we teamed up with crafting expert Lolly for some personalized tags. These are just about the best little gift from the kitchen you could share with someone!
Pie in Jar
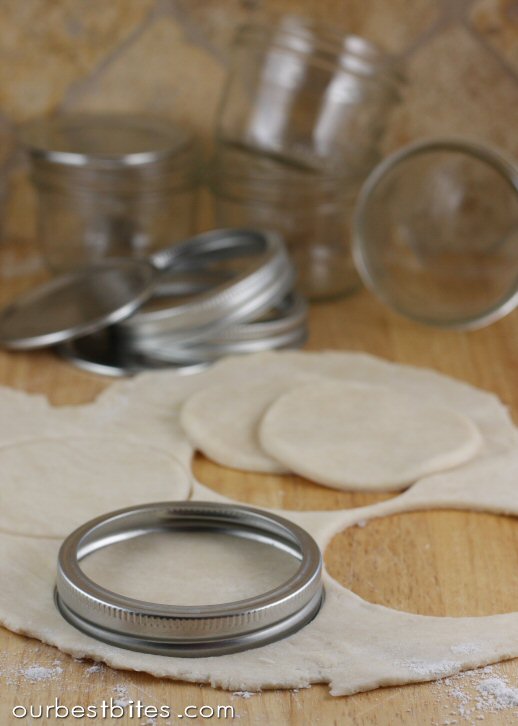
This is the type of jar you’ll need.

They’re half-pint jars, but short and squatty instead of tall and skinny (Ya know, like me as opposed to my mother. Why oh why did I have to get the other parent’s genes??!) Mine are made by Kerr (Here’s the link to buy them from Amazon). They’re stinking cute as is, don’t you think? Something about a short squatty jar makes me giddy with the thoughts of fun things I could put inside. Ya know, like PIE. (And also cupcakes.)
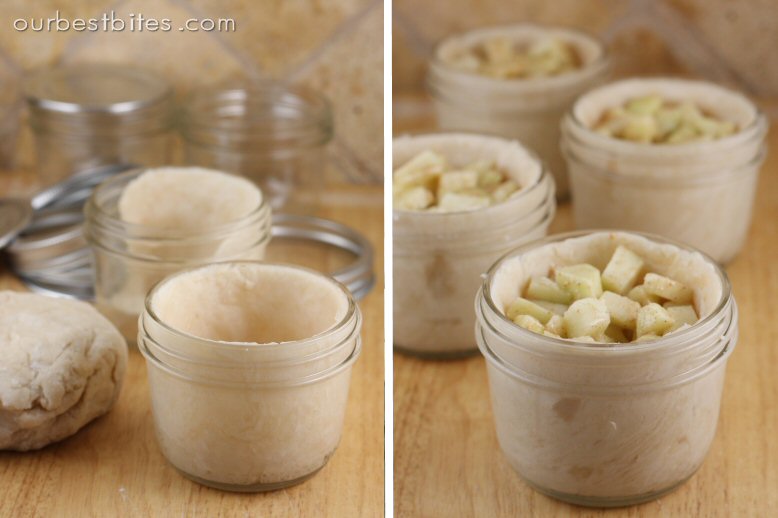
Step 1: Pie Dough
The first thing you’ll need is dough. You can use any pie dough you like. Here’s a great tutorial on making a basic crust. That particular recipe will make 4 jars. You can also use the all-butter crust from this post. Or if you’re really in a pinch, even a store bought crust will do.
Step 2: Make a topper and line the jar
Roll out a small handful of dough. This is just for the tops of your pies, so eyeball about that much. Grab the ring part of your jar and use that as your cookie cutter. Brilliant, right? Cut out the tops and set aside.
Use the rest of the dough to line the jars. (No, you do not need to grease them) The great part is that there’s no rolling required! Just take little pieces and press them in. Make sure it’s pressed all the way up to the top of the jar, or pretty close to it.

Step 3: Fill ‘er up
You’ll need about 1/2 C filling for each jar. You can use any filling your little pie-craving heart desires, even (gasp) canned! You can also use the same method shown in the galette post to use any fruit you happen to have around.
Here’s the basic recipe (for 4 pies)
2 C prepared fruit (pitted, diced, peeled, etc.)
2 T sugar- brown or white (use more or less depending on sweetness of fruit)
2 T flour- (again, more if your fruit is super juicy like cherries, less if it’s pretty dry)
1 T butter (divided between the pies)
Seasonings/flavorings- cinnamon, nutmeg, vanilla and almond extract, citrus zest etc)
Play around with it and come up with something yummy! I made 2 different pies in my pictures: one, a cut-down version of Kate’s Apple Pie and one with fresh cherries and almond extract.
When your filling is all combined, divide it between the jars and dot a pat of butter on top (about 1/4 T)
Step 4: Top it off
Make sure your “lid” has a vent so steam can escape. You can use a knive to make a couple of slits or a tiny cookie cutter to make it decorative. I am in LOVE with these little Autumn Leaf Pie Crust Cutters that my sister gave to me last fall. Oooh, I just saw this year’s set has an acorn in it! I might have to get that one too–how cute is that little acorn??! My little maple leaf is pretty darn cute, too.
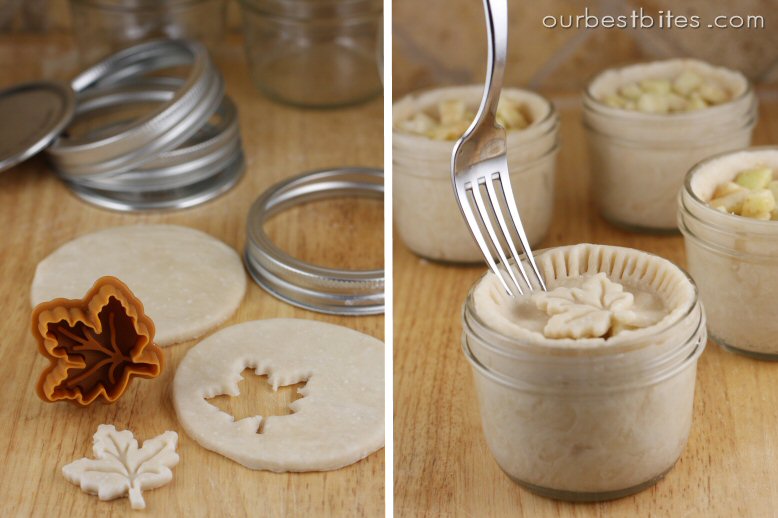

When your topper is ready, slip it onto the top of the pie. It will be large enough that the outside edge goes up the side of the dough-covered jar a bit, as show in the picture below. Then use your finger, or a fork (as seen above), to press the 2 pieces of dough together to seal. And nobody even think about mentioning the state of my fingernails.

Another option is to do a crumb topping. I put a basic crumb topping on my cherry pies and they were sooo yummy.

Crumb Topping (for 4-6 pies)
1/4C brown sugar
1/4 C flour
2 Tbs oats
1/4 tsp cinnamon
3 Tbs cold butter
Combine sugar, flour and cinnamon. Cut in butter. Add oats and stir to combine.
And I couldn’t help but try a mini lattice on one. Eeek! Dying of cuteness overload. (Click here for a how-to on a lattice pattern)

** Optional step here that I HIGHLY reccomend: Brush pie tops with butter and sprinkle with sugar at this point. Yumminess highly instensified!

Step 5: Freeze ’em!
Ready for this? When your pies are all done and topped, place metal lids back on and seal them tight.

Then pop these little cuties in the freezer. There they will stay until you find yourself having an insatiable craving for home-baked goodness. You’ll be reaching for the crumbs at the bottom of the keebler box when suddenly your eyes will light up because you remember you have THESE sitting in your freezer.

Or when you have unexpected guests in need of impressing, or a friend needing to be cheered up, or it’s Thursday…I can think of a million reasons why one should have a constant supply of fresh pie in the freezer.
Step 6: Bake ’em
Now first let me say that one of the biggest concerns from everyone is about the jars breaking in the oven. All I can say it that I’ve baked hundreds of these and never once has a jar broken. These are canning jars- they are designed to be boiled, pressure cooked, etc. So it’s different than putting any ol’ piece of glass in the oven. They bake just fine!But if you’re freaking out then my advice would be this: remove lids from jars and place jars on a baking sheet. Place baking sheet in a COLD oven. Then turn the oven to 375. That will give the jars a chance to warm up slowly as the oven preheats. If you’re really worried you can always let them sit at room temp for a bit first before putting them in a cold oven. Bake for about 50-60 minutes, or until the tops are golden brown and the middles are bubbly. If you’re baking them fresh and not frozen they take about 45 minutes.

Depending on your filling you can pop them right out of the jar and onto a plate like so:

Or just eat them right out of the jar. There’s something way more fun about eating it right out of the jar…

And if you have oozing cherry filling, that might be the only option!

Change out your cookie cutters on top for cute holiday versions


Lolly is the brain behind Lollychops. Some of you may remember last year when she designed these cute cute Christmas tags for us to put on our goodies. So of course, I instantly thought of her when I realized that I could not sleep at night knowing these mini-pies could be better dressed. They needed just a touch of Lolly. And she delivered like always with these adorable tags!

All of the directions are right on the tag and you can write a little To/From on it. Plus in true Lolly fashion there’s like, a million different versions to go with any flavor you could possibly imagine.

These little pies are perrrrrrfect for giving. So once you have these cuties made up, download Lolly’s tag set, and get your cute on. People will think you are amazing because not only did you come up with the brilliant idea to make a mini pie in a jar, you also made an adorable personalized tag. Talk about moving up a notch on the popularity ladder.
–> CLICK HERE <– to head over to the Lollychops blog and get all of the instructions and details on downloading and using the tag sets. And here is a direct link to the tags.
All of the rest of you- get baking and have a great week!
If you’d like to subscribe via email and get new posts and recipes in your inbox,


Questions & Reviews
Is there any reason you couldn’t line the jar with tinfoil before putting in the crust for easy removal?
Ingenious.
Love this idea! So fun, and something the kids can help with! Sharing this!
where did you get the jars?
There is a link at the start of the post, you can buy them on Amazon for $16 for 12!
What a great idea! I’ll be sending some to my grandson in college. He & his room-mates will love them!
I just ran across these somehow. I LOVE this idea. I am going to test it out this weekend. Has anyone else done these? How did it go? Also, I hope you don’t mind, but I pinned your site to Pinterest. If you DO mind, I’m in a lot of trouble. Lol.
Oh my goodness!!!! this is the most incredible idea ever!!! It is just so darn cute and so inovative and just right when you have that random craving ahd i just have to have something sweet!!! thanks a whole lot for the idea <3
I wonder if it would work to seal these in the jars, then process them like canning jam or something like that. Maybe after baking, so the inside is still warm, just like you’re supposed to can jams and things while they’re still warm from cooking. Dunno if the crust would interfere with having the correct acid balance – I know you can can pie fillings (in the end, they’re awfully similar to jams), but that crust is a question. Hm.
Having that option would be helpful for giving them as gifts, and allow for them to be mailed as well.
I made lemon “meringue” pie in a jar and canned it with good results. No regular crust in there though. The bottom was a layer of crushed graham cracker crust, then lemon curd, more graham cracker toward the middle (it was a tall jar), more lemon curd, then a layer of marshmallow. Worked beautifully.
these would be great for thanksgiving! can you put in pumpkin pie filling as well?
what a wonderful ideal,i make a sweet potato pie like no other how would i make that, it has only one crust on the bottom,please give me an answer.
I just want to thank you for the note at the end. My husband is overseas and I’m always sending the same things to him. I had heard of the cake in a jar but have never tried it. But with Thanksgiving and the holidays coming I thought I might send him a pumpkin pie in a jar. As I was reading through your page, I kept wondering what about mailing……then at the bottom you answered my question! Thank you!
Amanda
I know this is an old post but I just had to comment. These little pies are awesome! We made them at our church lady activity and your idea made 32 women very happy! They all took a little pie home and LOVED it. Then I told my parents about them and they loved it too. My dad is the only lover of mince meat. Now he’s got a freezer full of itty bitty pies just for him instead of one whole big pie to deal with all by himself. Thanks so much for sharing this creative idea!
Oh good. I left a comment at the bottom asking if anyone had tried these. Glad to know they worked out for you. Now I feel a little more confident about trying them myself!
I love the new creative gifts and especially with goodies it is twice as nice. I have a question though. My husband is a soldier and is currently deployed overseas, and shipping usually takes about two weeks sometimes a bit less. How long after baked with lid secure are pies good for? I would love to send him his fav of pecan pie 🙂
I LOVVVVEEE these. I think every one will be getting these for every occasion from now on. Especially for my uncle who always asks me to bake him a pie as a gift. It is just too perfect!
great pie pop and pie in a jar ideas! I am soooooooooo excited! Thank you!
I just wanted to let you know I included this in my 2011 Ultimate DIY Gift Guide (101 Tutorials/Recipes) 🙂 http://danimariedesigns.blogspot.com/2011/10/2011-ultimate-diy-gift-guide.html
What a wonderful recipe! I just wrote an article about little pies in a jar to make with kids, and i have featured your blog, this is the link: http://www.piccolocuoco.com/2011/10/19-tortine-di-mele-per-bambini-in_14.html, hope you’ll like it ( it’s in Italian ). Thank you for sharing, Best, Ivy
Has anybody tried doing this for pot pies? I’m a college student that loves to cook, and this would be perfect. Thanks for sharing!
I’m looking forward to trying PUMPKIN for this holiday coming up! YUMMM!!!! Thank you!!
I just stumbled on this and it’s adorable,can’t wait to make them
Can you give a recipe for doing Chicken pot pie in them-I really am a beginning cook? I love this idea. I just started making pie crust. My daughter’s friend taught me how-crazy huh? I love your site.
Wow! These are SO cute! I am going to make them for all of my friends as a Christmas present this year. I can’t wait to start ‘practicing’ ;D
I’m actually opening a pie shop in California soon featuring pies in jars and was so excited to find this post! These are very pretty and the pictures and step-by-step instructions are great. I have a couple of questions/comments based on my experience doing these and wonder if you would mind weighing in. Do you find that pressing the dough into the the jar makes it tough at all? The biggest issue I have when making these is trying not to over-handle the dough. I roll mine out, then cut a large circle with a round cutter (small plate works fine too), cut a couple of triangle shaped pieces out of two opposite sides of the circle (looks like an hourglass shape when I’m done), and then put the circle of dough in the jar, wetting the edges slightly with water so that I can gently press and seal them together. This works nicely if you want to use a store bought dough too since it’s already rolled-out.
As for freezing, we had planned to offer our unbaked frozen pies in the jars initially but had so much trouble with cracking that we had to shift away from it until we could find a solution. Not every jar cracks, so if you’re just doing a few of them at home your results will probably be just fine, but taking them from freezer straight to hot oven has not worked for us. To solve the freezing problem, you can line the jar with plastic wrap before putting the dough in, freeze the pie in the jar and then lift the whole thing out once it’s frozen, wrap tightly and store frozen pie without the jar. Just pop them back into a room temp jar before baking. This also frees up your jar to make more pies!!
Thanks!
I am trying these out for the first time right now! I found this page a little over a year ago now and hadn’t been able to make them until now. So excited!!
I loved these. We made some adjustments is our second and third batches.
My favorite recipe for pie crust is from my mother. Since you are so willing to share your recipes. I’ll share hers with you.
3 c flour
1/2 tsp baking powder
1/2 tsp sugar
1 c crisco
Cut into each other.
Mix: 1 egg
1/3 c ice cold water
1 Tbsp vinegar
Add to other mixtures. Make into ball.
We also put craisins in with our apples, and added almond extract.
Each Thanksgiving and Christmas we make about 20+ pies. We use a food processor for the dough and it’s fantastic.
Anyway. Thanks for all your recipes. My four daughters and I share our favorites back and forth.
I’ve never even made a “real” pie before, but these were so fun and looked great when I put them in the freezer. I have a question about the tags, though. I figured they would be the same size as the jar lid and fit under the ring, but they’re smaller than that. They’re the perfect size for the next smaller jar. Have people been gluing them on?
I use a Linzer cookie cutter for the top crust–perfect size and comes with about 6 center tiny cutouts for venting–heart, circle, star, etc. I’ve done apple, cherry, pecan, and Tollhouse cookie pie. Would like to hear more details about pumpkin successes with these jars.
Can’t wait to try this!! Just came across you Facebook page today thanks to Tidymom!! I just LOVE IT!! I’m hosting our Bunco Club’s October Bunco and I think I just found my dessert!!
I am excited to share that mine are in the oven right now! My daughter (Audrey, 20 months old) and I are meeting our Mom’s group tomorrow and I cannot wait to surprise the ladies with these cute little pies. I am really enjoying so much of what you share… dressing them pretty seems to be where I get stumbled. There is never enough time in the day to do it all. Giggling… I’d love to share a photo of what I did tonight… how do I add to a photo to a “post comment” or is that not an option?
Thanks so much!
~Amy
Have you tried this with cheesecake? Would it work? Maybe with a nut crust just on the bottom? Or would you have to bake it first then cool them then put a topping on then freeze? What about a chocolate cream pie filling? Would you just bake the pie crust then fill the jar and put the lid on and freeze? Could that work?
I’d be interested to know if you think this would work.
Thanks,
Debbie