I consider myself to be a pretty good artist. My education and former profession is in the design field and I’m pretty good at craft stuff. I also think I’m a decent cook, so I figured with those two things going for me, decorating fancy sugar cookies would be right up my alley. Imagine my surprise (not to mention shattered ego and broken self-confidence) when I attempted to play around with royal icing for the first time and my little masterpieces looked more like something in a 1st grader’s art pile. So I gave up on ever decorating fancy-schmancy cookies again.
That was until I met THIS style of icing. Now my confidence is back in tact because even my very first batch turned out beautifully! It’s super forgiving, easy to use, and it actually tastes good!
The benefit of using an icing like this is that it dries to a solid sheen, making the cookies stackable and packable- perfect for giving or displaying on a platter. With a soft, fluffy buttercream, there’s just no easy way to give them away so you have to eat them all yourself (which may be the plan, right??)

Ingredient Notes
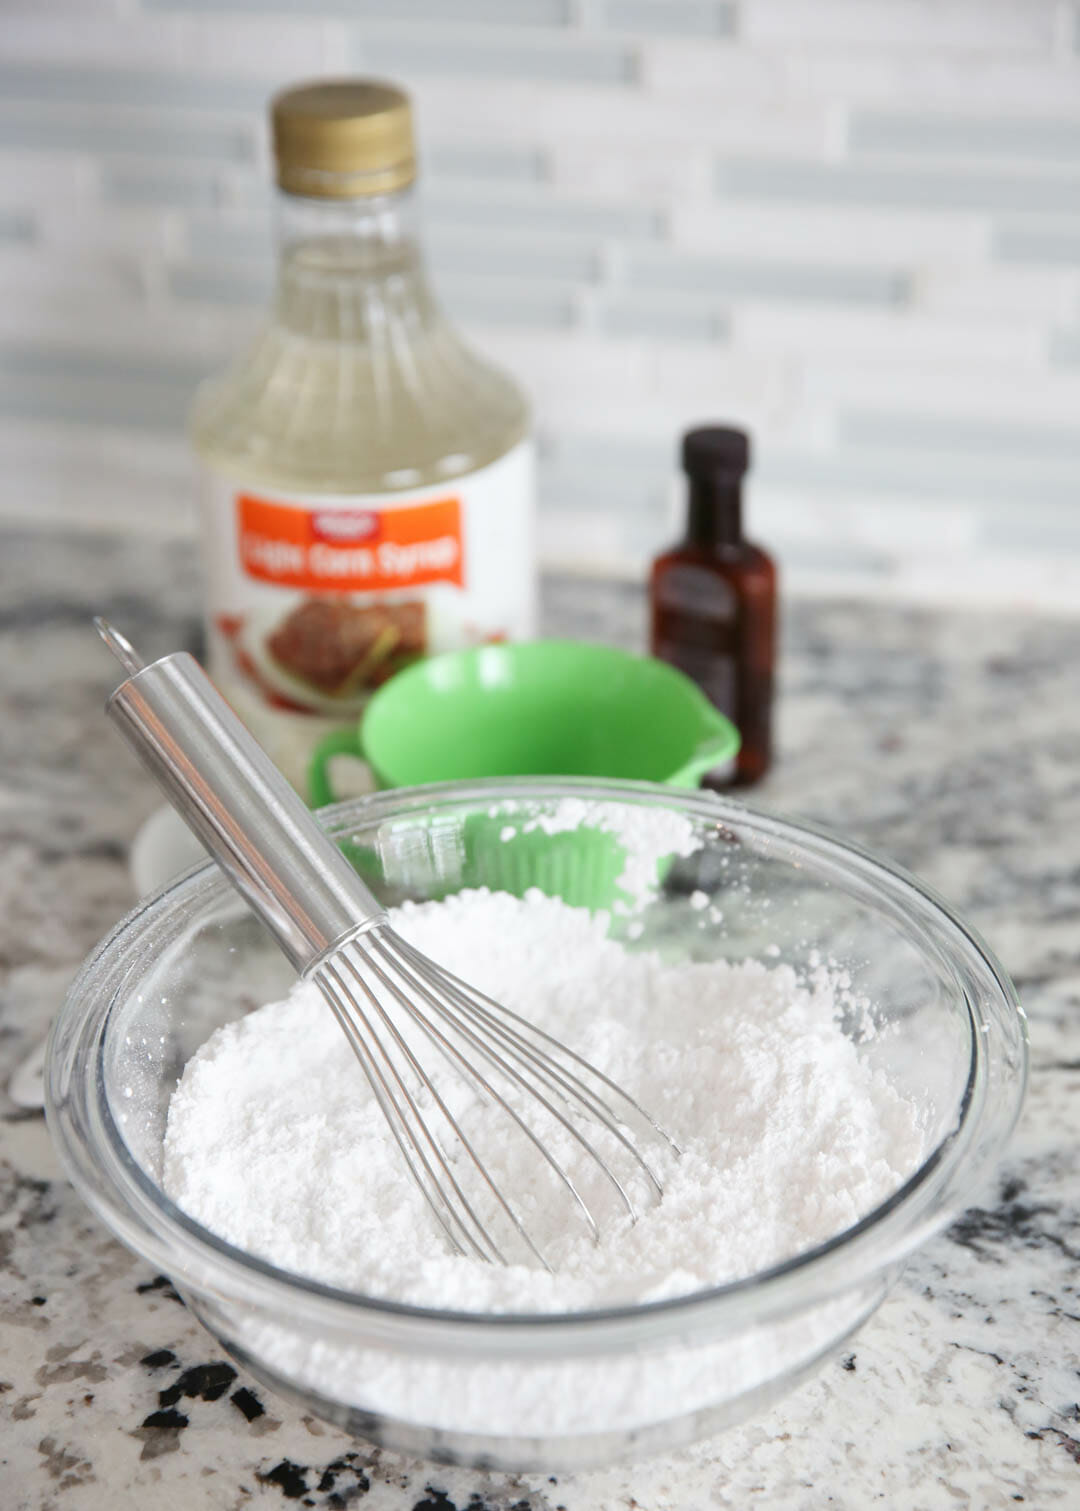
- Simple Ingredients – All you need for this icing is powdered sugar, milk, corn syrup, and extract of your choice (I use almond, but vanilla is great, too.) And we all know that corn syrup is not the same thing as high-fructose corn syrup, right?? Like, we don’t have to have this conversation again? Okie-dokie then.
- Cookies – You’ll need cookies to decorate! I use The Best Sugar Cookies.
How to Decorate Using Glace Icing
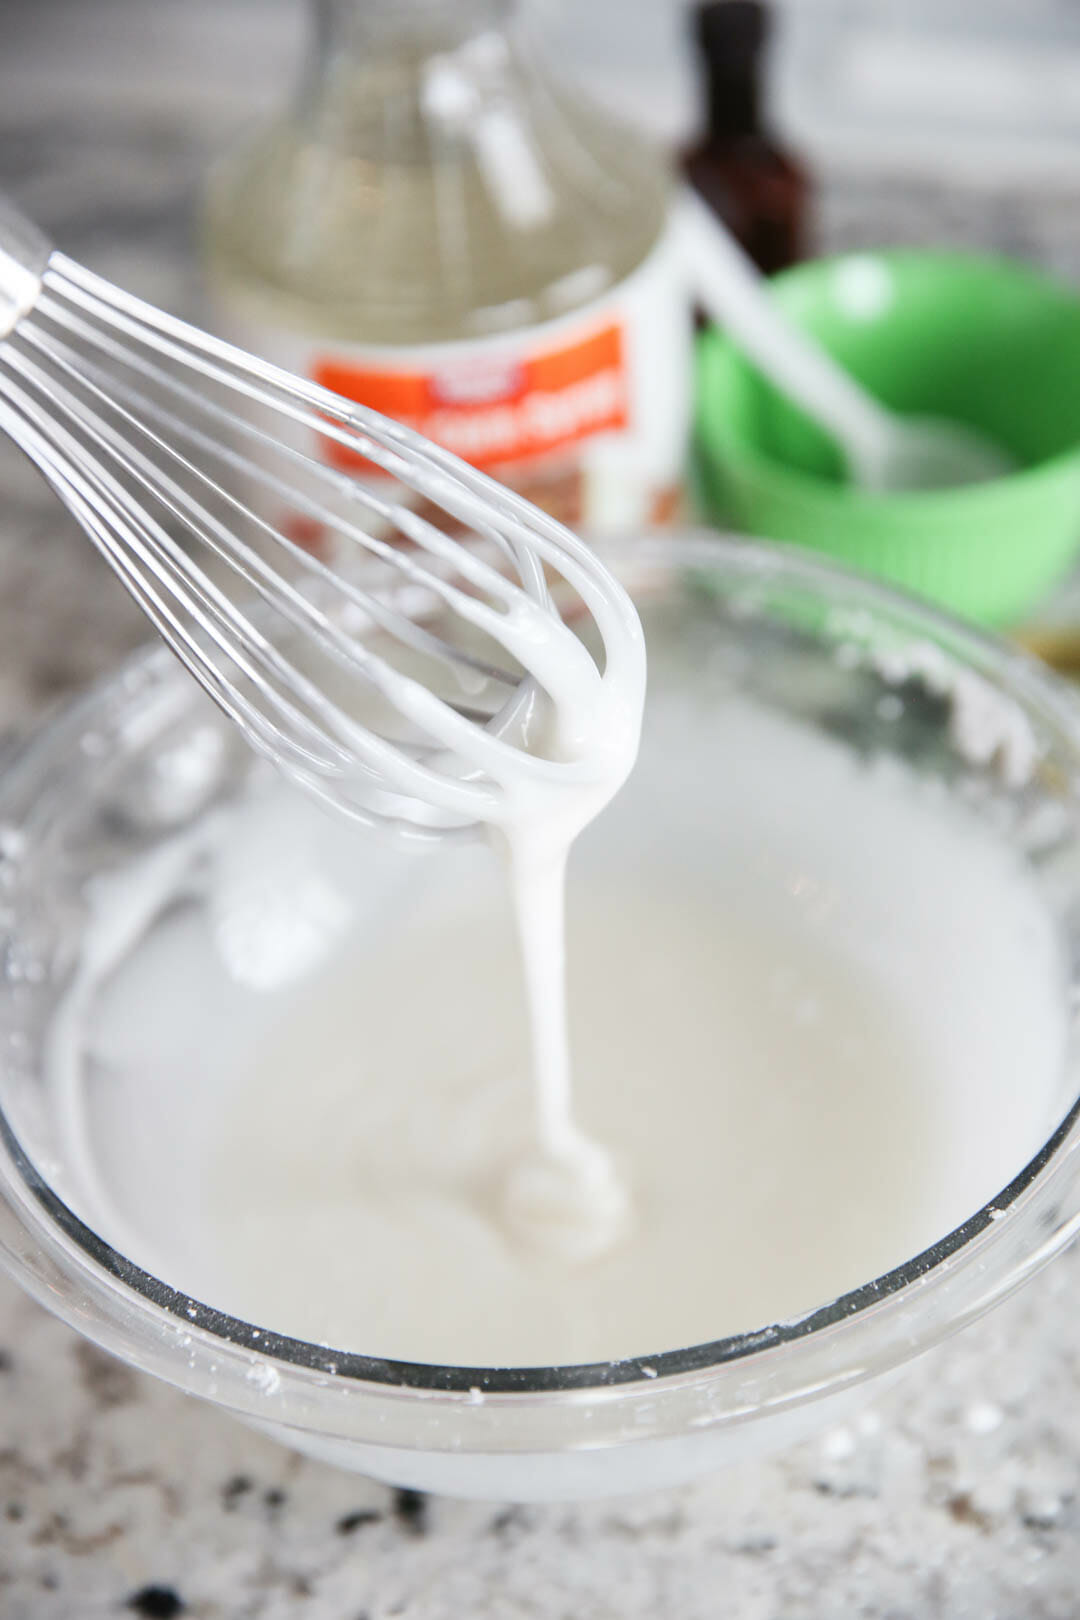
Whisk up some powdered sugar, milk, corn syrup, and extract of your choice and you’ll have a nice glaze-y consistency. You’re going to use the same recipe for both glazing and piping. The way it is right now is the consistency you want for glazing. It’s smooth and thin and it easily runs off the whisk in a pretty thin drizzle.
Now, you have some options of where to go from here. You can simply spoon this icing onto your cookies and gently spread out with a spoon and be done! In fact, one of the easiest ways is to just quickly spread and let it go completely off the edges like this:

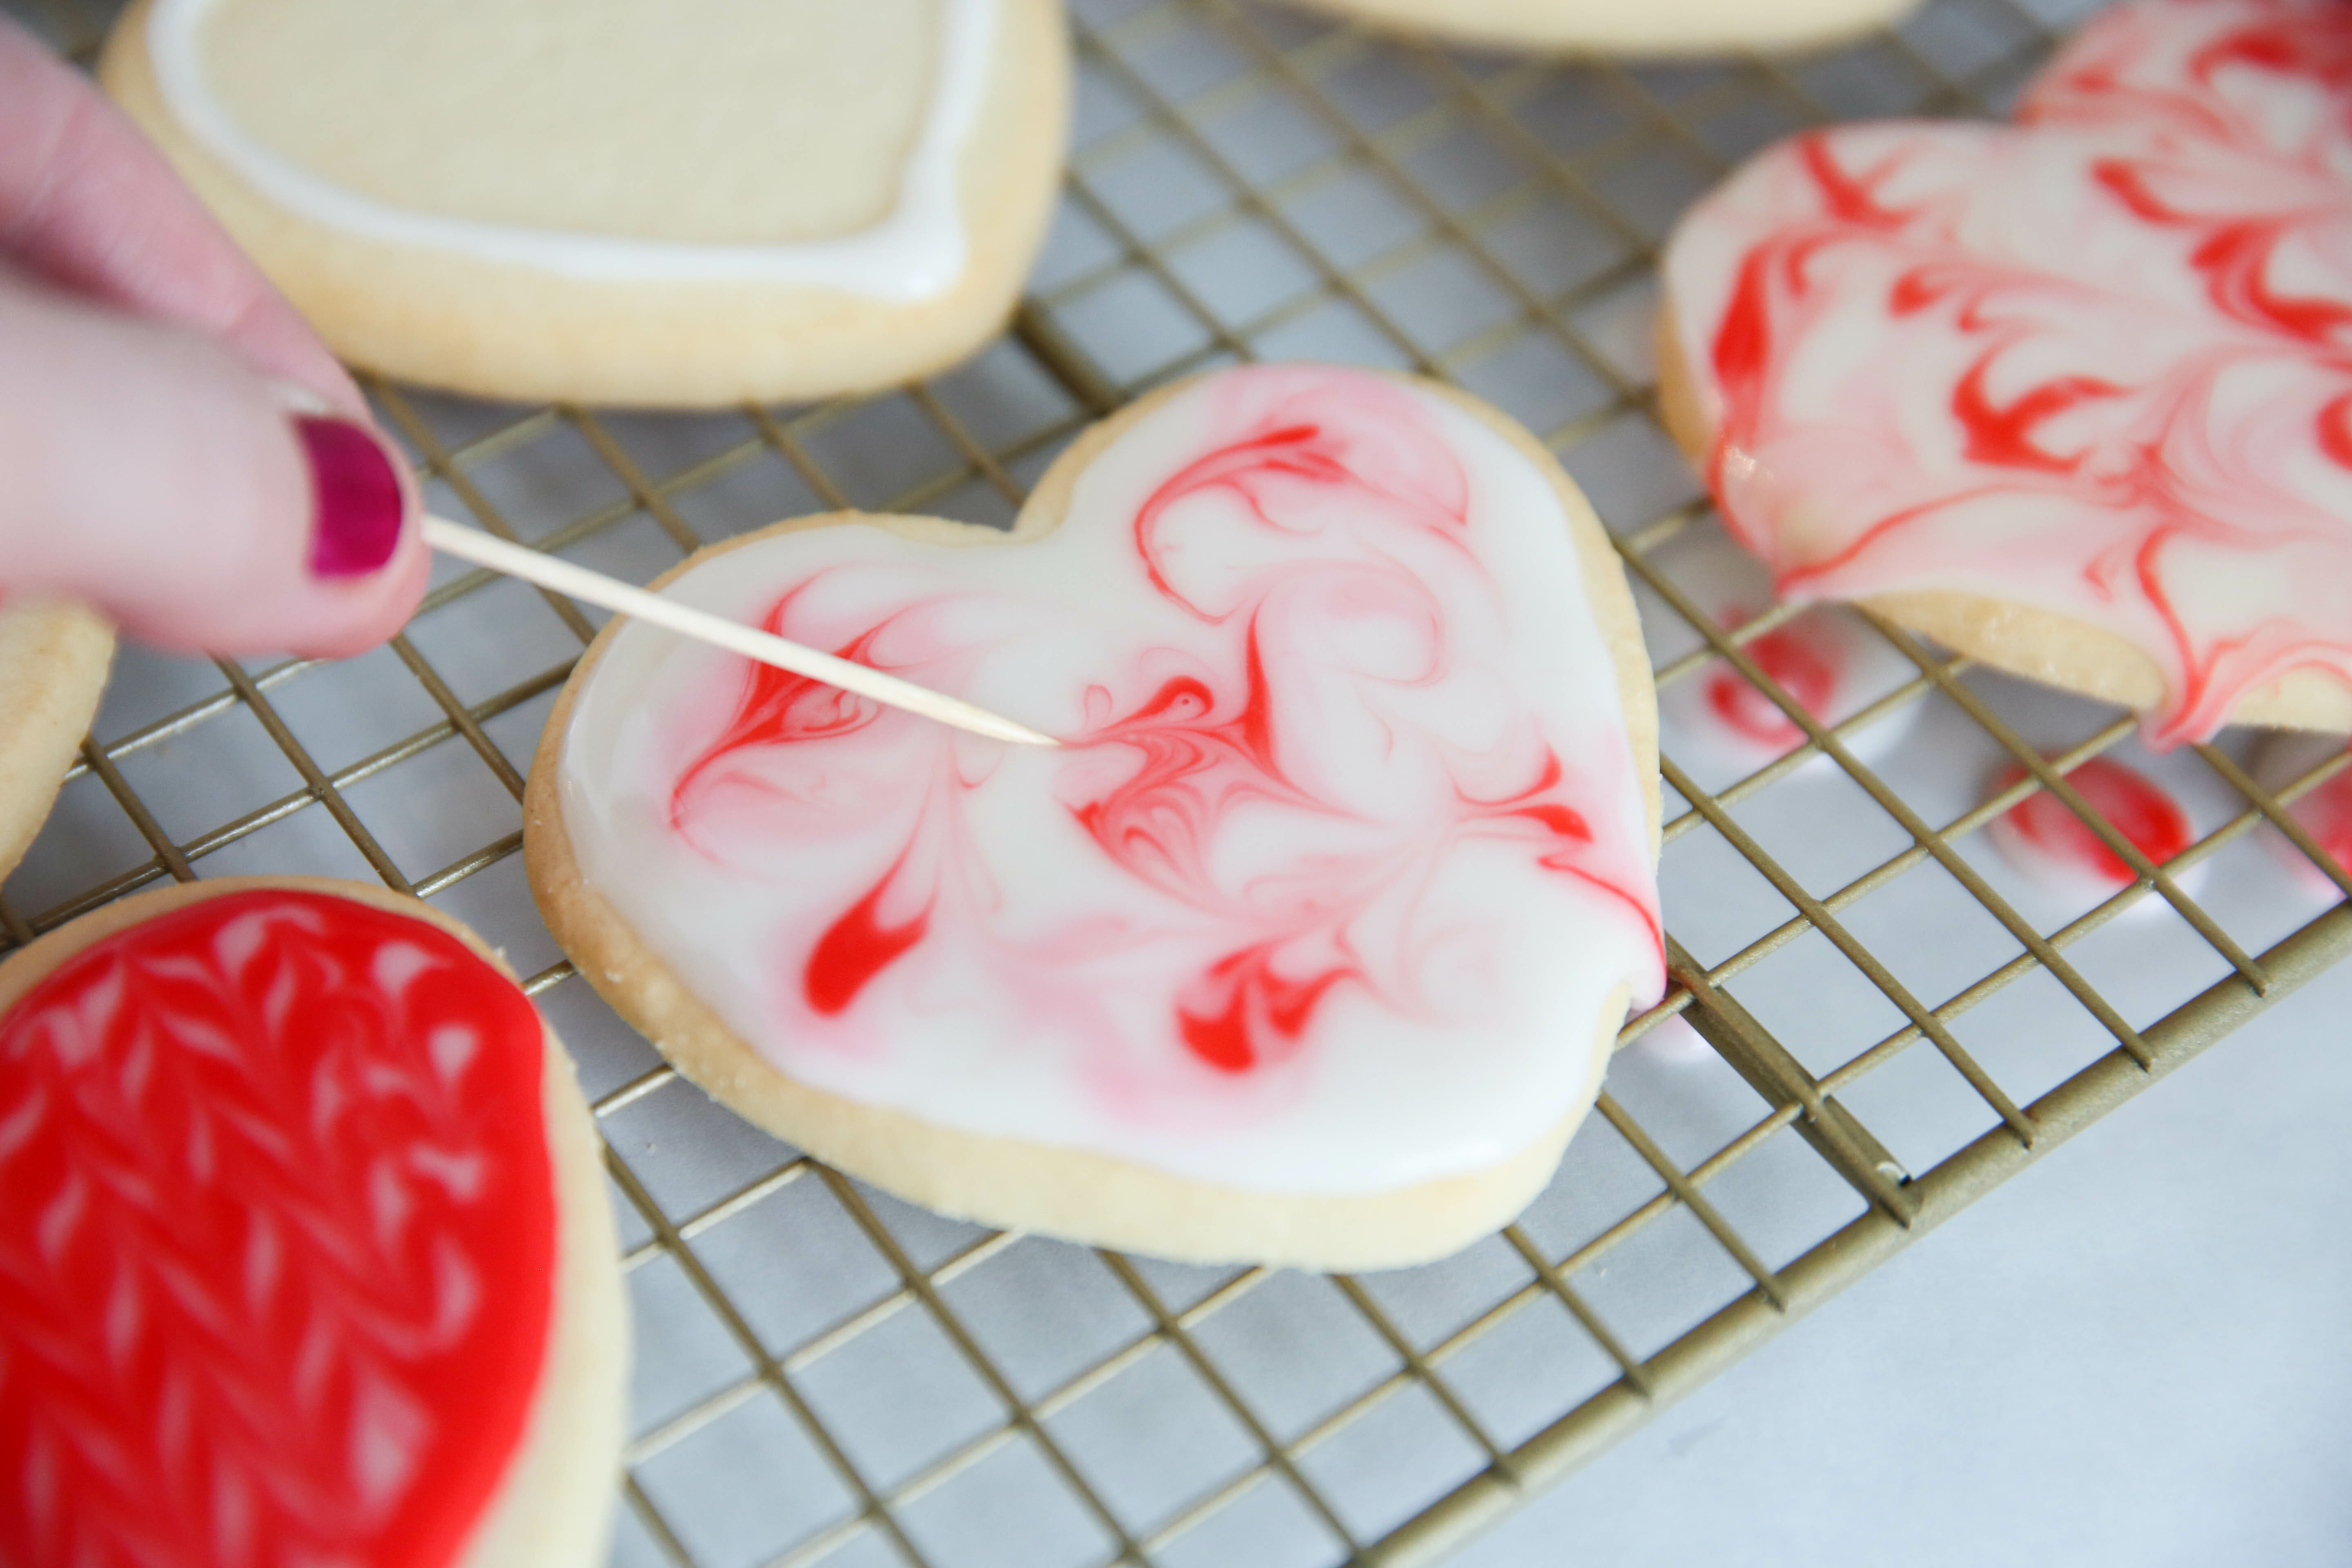
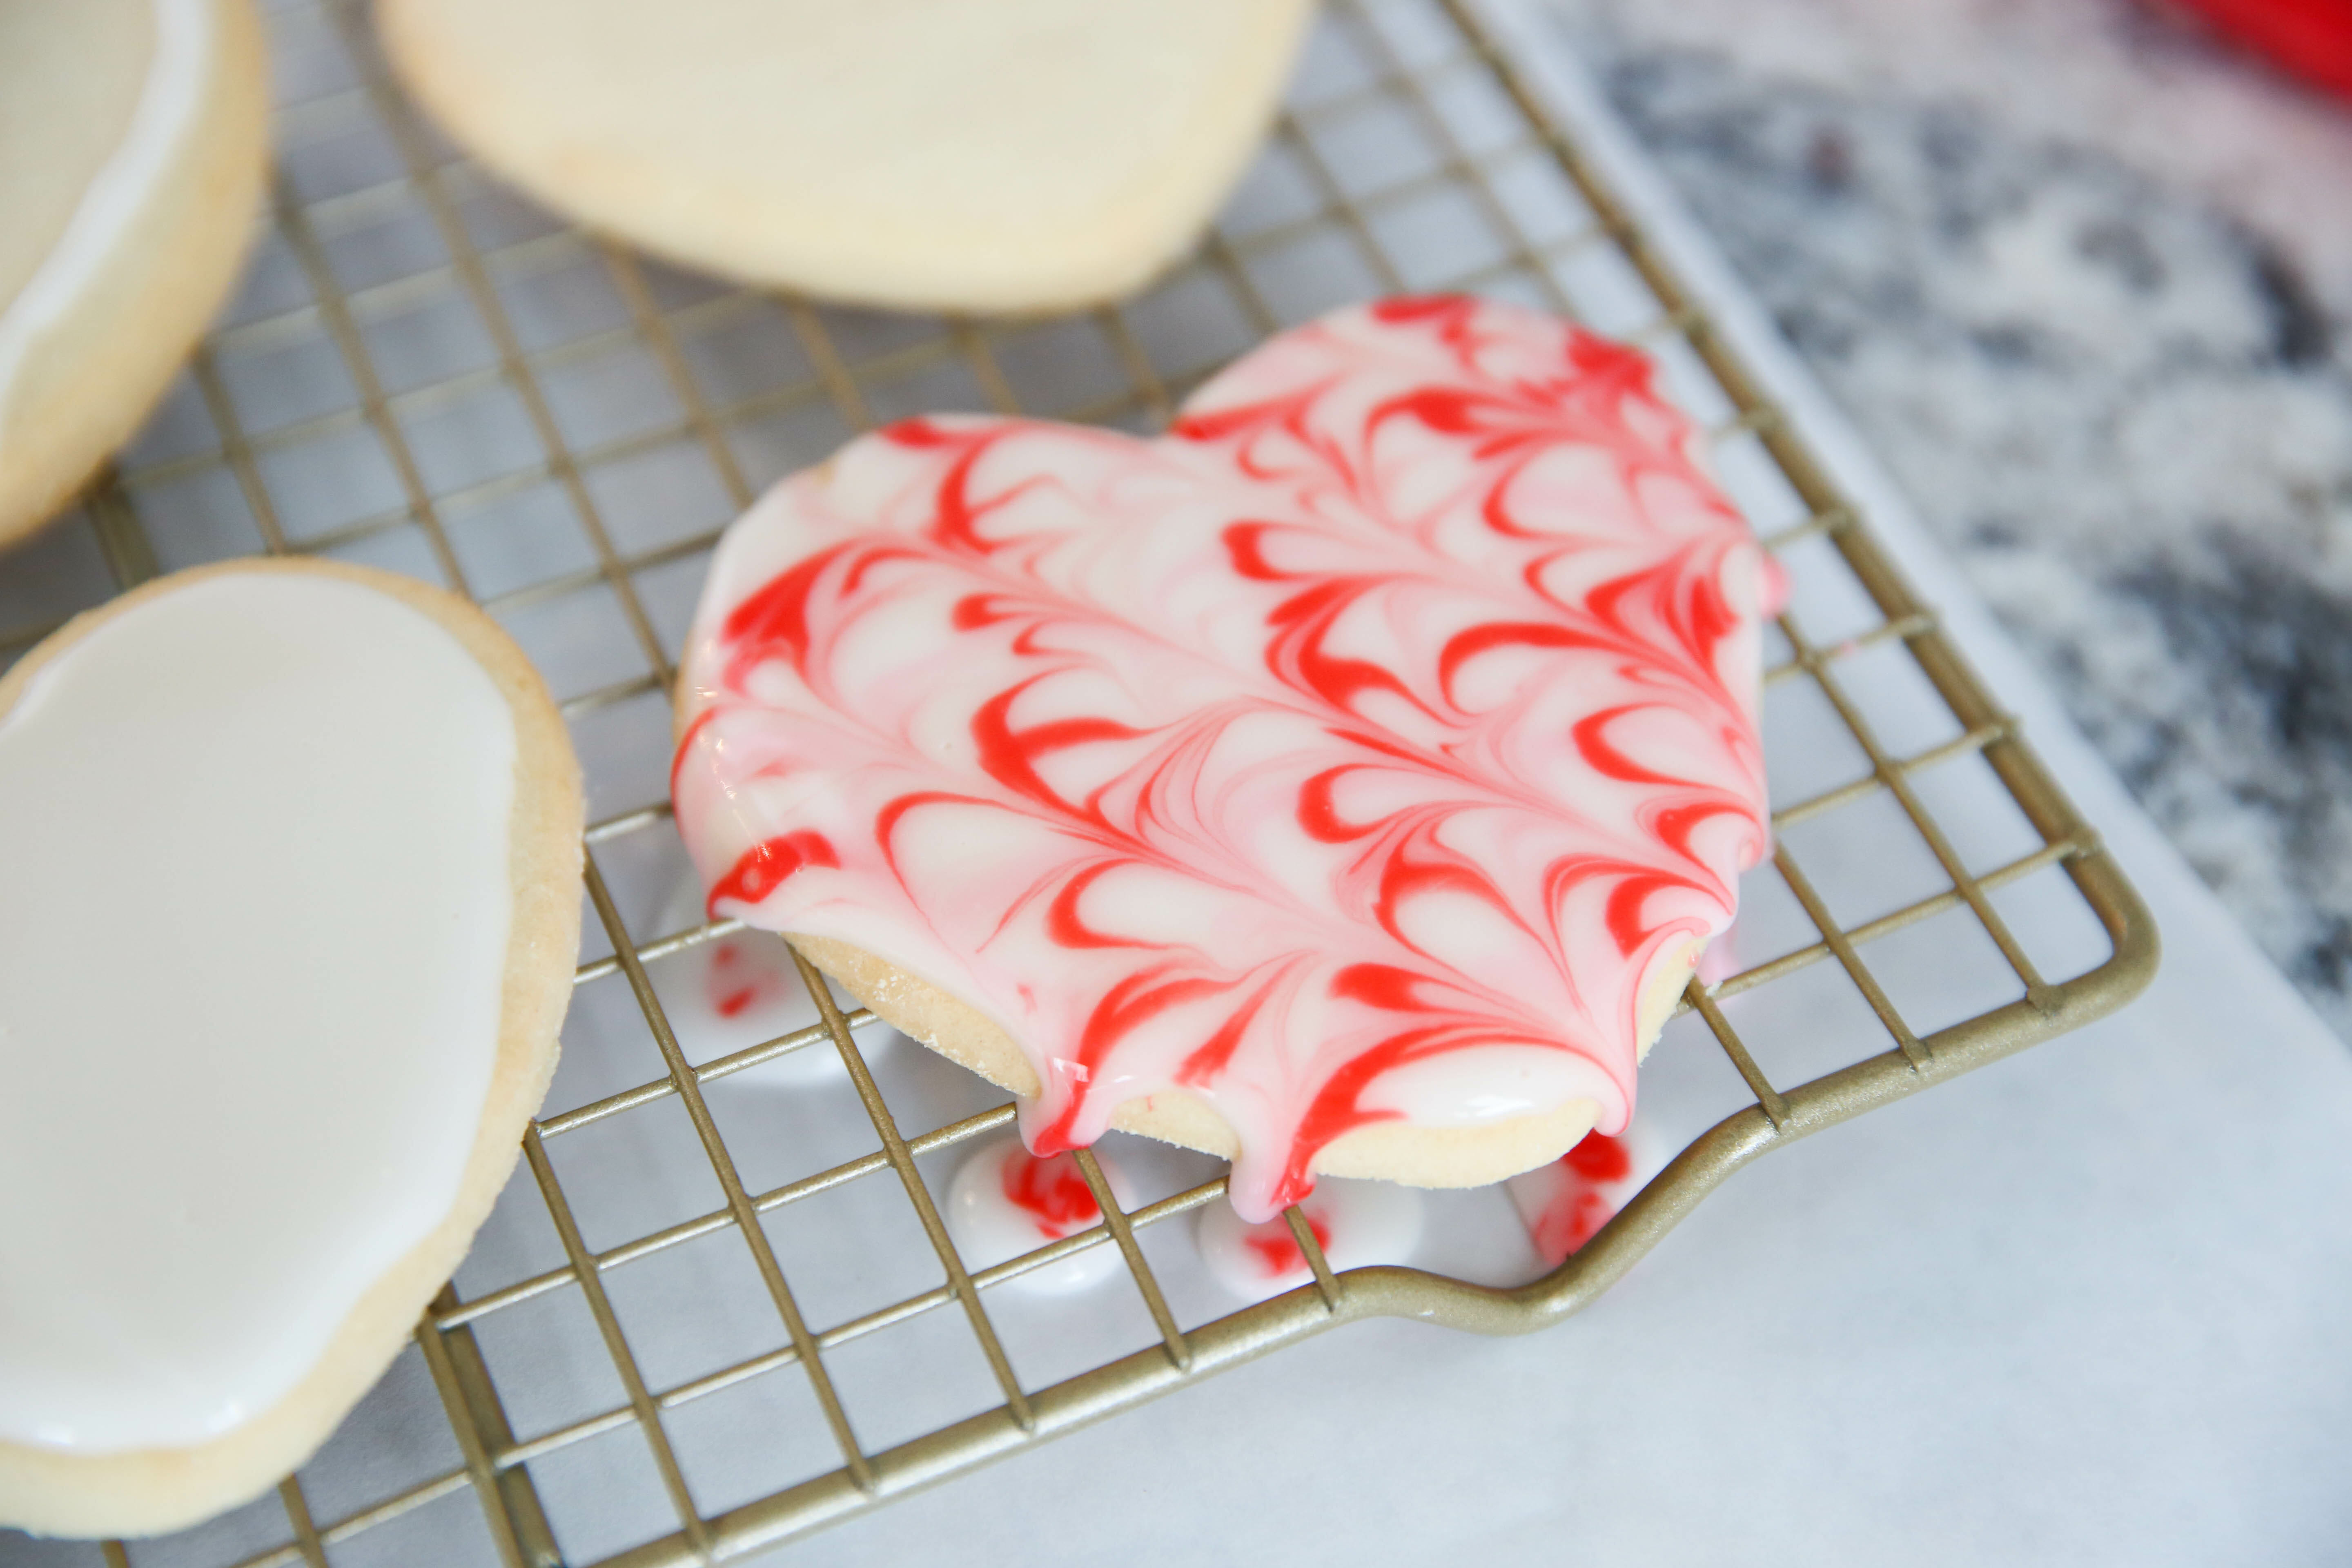
While the icing is wet, you can mix colors and create all kinds of fun things. Try glazing in one color and then adding other colors from a piping bag with a very small, plain opening, and drag the designs with a toothpick to create gorgeous works of art.

You honestly can’t make an ugly cookie here.
Another method is to pipe an edge around your cookie, and then wait for a few minutes for it to firm up. When you’re piping, you’ll want to add a bit more powdered sugar to thicken up the icing just a bit.

Once hardened a a little, go back in with your glaze and fill in the space. That outline will work as a dam and give you nice clean lines.

Wet-on-wet icing will marble and swirl together. I actually did this whole batch this way because I didn’t have time to let mine dry very much.

If you want to pipe designs on top of your cookies, you’ll want to wait until your first glazing layer is dry to the touch, which can take a couple of hours. You’ll want to leave them out un-covered to dry. You can see a great example of this method in this post, where I made darling little Owl Cookies.


I also used that method when making these Valentine Cookie Pops.
Either way, you’ll want to let these cookies dry all the way before stacking or handling too much.

They develop a sheen and are dry to the touch after a couple hours, but they’ll need to really dry for most of the day, or overnight to be completely dry.


Whenever I update ancient posts like this one, I always feel like I’m erasing a bit of history when I delete old, outdated photos, so I’m going to leave a few of the originals here- just because. 
Frequently Asked Questions
How long do these keep? The icing will last longer than the cookies. For most cookies, I would say they are best eaten within a couple of days. Store stacked in an airtight container.
Related Recipes
Did You Try This?
I’d love to hear from you! Snap a picture and tag me on Instagram, then come back and give this recipe a rating!
Print
Glacé Icing
- Total Time: Varies Depending on Method
Description
These sugar cookies are as delicious as they are beautiful! Such a fun way to decorate sugar cookies!
Ingredients
- 1 pound powdered sugar (about 3 3/4 cups)
- 1/4 cup + 2 tablespoons milk
- 1/4 cup + 2 tablespoons light corn syrup
- 1 teaspoon extract (I use almond because I use almond in my sugar cookies, but other flavors like vanilla, lemon, and peppermint are also delicious)
Instructions
- With a whisk, combine sugar and milk until smooth (no lumps!) Then stir in corn syrup and extract.
- You will use this same recipe for both glazing and piping. Thickened, you can pipe outlines, and as you thin it, you can use it for “flooding” cookies. Make sure to let them dry overnight to fully harden for stacking.
- Prep Time: 5 minutes
- Drying Time: 6-8 hours


Questions & Reviews
Hello!
I see many of us are discovering your yummy post still, so long after posting.
I am about to make a gazillion (not really, but MANY) mazarin (almond) tartlets for a ladies gathering at church. The dollop of almond filling in the short butter crust bakes up high a bit but settles down flat upon cooling. A thin powdered sugar, water or milk and almond flavored glaze tops each. I’m trying to think of why your wet-on-wet, dragging a toothpick through colored glaze accents might not work. It seems to me like the application and technique would be similar enough to achieve the same result. I’m hoping to make them extra special but there’s always the glaceed cherry half that lazy me could plop down in the middle… 😉
Have you ever attempted that technique on other applications?
Kindest regards and thank you for sharing!
I’m not sure- but you could use my recipe here and increase the amount of almond extract just a bit and see how it goes!
Hello! How much powdered sugar should be added to create the thicker icing for piping/creating edges? I don’t think an exact amount is suggested anywhere. I’m thinking of using the thickened formula to “draw” thin patterns on star and snowflake cookies!
I don’t have an exact amount- you kind of just have to eyeball it since it will change depending on your specific circumstance. Just add a little at a time!
Thank you so much for this post! Your glaze recipe saved my 8th grade graduation cookies for my son. I couldn’t get the Royal icing to flood, so I used your glaze method and then the Royal icing to write on the cookies. I will tag you in on my Instagram post. Everyone complemented on the cookies. I dried my cookies in a dehydrated too speed up the drying process????
The icing dried a little “duller” in color, but has a sheen It is not as vibrant as fresh glazed. Is this normal?
Even 12 years later, you’re still getting rave reviews!
I have always wanted to learn how to decorate beautiful cookies, but Royal Icing is just soooo icky tasting and chalky. I am a professional confectioner/baker, and no one in my very rural area makes anything like this, so I thought I could corner the market if I could find a recipe that I could work with and would not taste like Tums, I wish I could show you the pics. I am so impressed with how well they came out I want to hug you. I have a little experience decorating more simple cakes, so I have a grasp on how to do this already, but I never dreamed my first cookies would look as good or BETTER than the ones I drool over on etsy. The glaze had hardened up by the next morning, still had a nice sheen to it, and while I don’t eat sugar, I have had rave reviews from people who despise royal icing the way I do. THANK YOU! THANK YOU! THANK YOU!
I know this is a super old post, and I love it, but I have a question. I’m wondering if you’ve tried freezing cookies AFTER they’ve been iced with this amazing stuff? I want to make them for our church Christmas dinner, but I won’t likely have time to ice them the day before. Any thoughts?
I never have, but if you have time to skim the comments on this post, others have. I believe it works just fine. You’d need to just freeze them in a single layer until completely frozen and then layer between sheets of parchment. Definitely let them come to room temp in a single layer as well. If you’re making a lot, I’d test first!
I’m so glad you left the old pictures on there because I came back to your site looking for this same recipe which I used YEARS ago but none of the pictures looked familiar until I saw the old ornaments. Thank you! 😀
I have been making this type of icing nag for quite some time and won’t change to the standard royal icing. The taste and hardness don’t compare with the softness of this icing. I do have a question about freezing the frosted cookies. I have 274 St. Patrick’s Day cookies to do and I would like to be able to freeze some of them while I finish the rest. Have you frozen these and what problems did you find when thawing them? Do they come out exactly like you frosted them, glossy and pretty or did they get blotchy? I only want to freeze them for maybe a week.
Thank you.