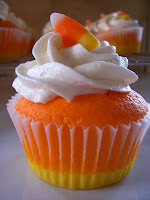
One of the most common questions we get is how to get the swirly cupcake icing. This is something I really wondered about, too, for a REALLY long time and honestly, I had a hard time finding clear instructions. It was almost like there was this code of secrecy among cupcake-eers. Well, I’m here to bust that code right open, not only because it makes your cupcakes impressive and professional-looking, but once you get the hang of it, it makes frosting cupcakes SO much easier and faster!
Also, I’m in no way affiliated with Wilton; I recommend their products only because they’re inexpensive, easy to find at “normal” stores, and widely available in most areas.
Here’s what you’ll need:
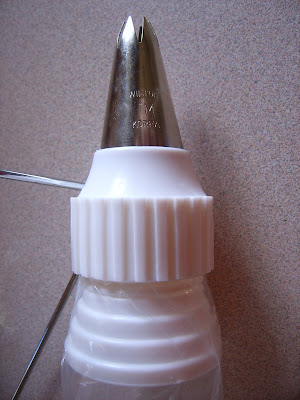
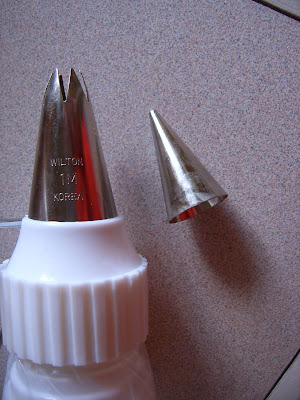
—A Wilton 1M star tip. The easiest is to grab this from Amazon! Although Walmart sells Wilton products, I haven’t been able to find this particular tip of the coupler that goes with it at Walmart; you can also try to go somewhere like Michael’s or Hobby Lobby.
As you can see, the 1M tip is significantly larger than a standard decorating tip:
—A large coupler that fits the 1M tip. These are the plastic rings that attach the tip to the bag.
—Cake decorating bags. Not an absolute must-have; you can use a heavy-duty Ziploc bag. But I really do love the disposable cake decorating bags.
Basically, you want to hold the bag at about a 45-degree angle with one hand (most likely your dominant hand) controlling the frosting flow near the top of the bag and your other hand down near the tip. With the tip nearly touching the surface of the cupcake (near the center), gently squeeze the bag. With the frosting consistently flowing, move the tip from the center of the cupcake to the edges and go all the way around and then back toward the middle.
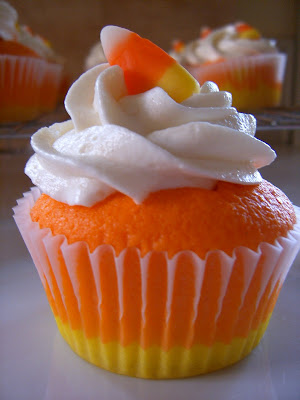
Now…I had an entirely different post planned for today. And then on Monday night, I checked the Our Best Bites email and saw something about Sara’s candy corn pizza right before I went to sleep. As I was drifting away, I had this idea pop into my brain, clear as day, for Sara’s Colorburst Cupcakes, only made with candy corn colors! I frantically ran to the store the next morning and got a cake mix, a pot of yellow food gel (let’s not talk about what happened to the last one), and some full-fat sour cream because the non-fat yogurt I had in the fridge wasn’t going to cut it for these bad boys. In my frazzledness, I accidentally picked up a white cake mix instead of a vanilla cake mix, but I found this doctored-up recipe from Ann Byrn. I did replace the vanilla with almond extract on a whim and I didn’t regret it–they were mighty tasty.
Candy Corn Cupcakes
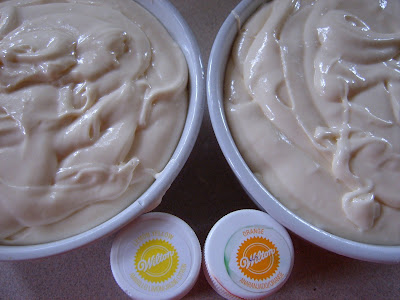 Mix about 1/2 heaping tsp. of yellow coloring into one bowl of batter and 1/2 heaping tsp. of orange coloring into the other bowl.
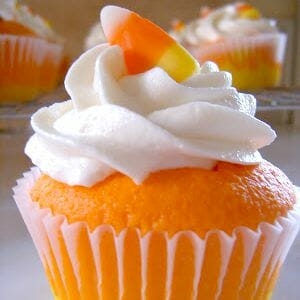
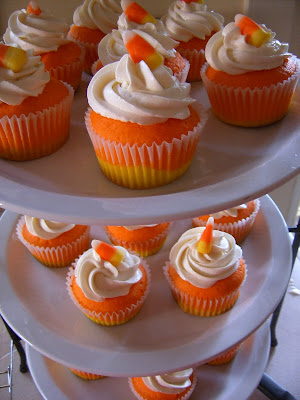
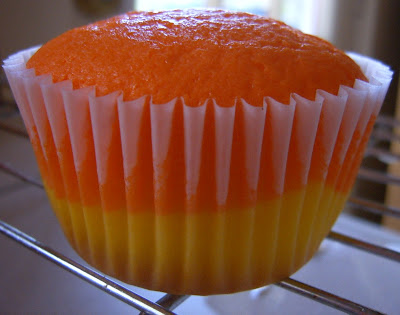 When ready, frost the cupcakes and garnish with a candy corn. When you cut them open, they look like this:
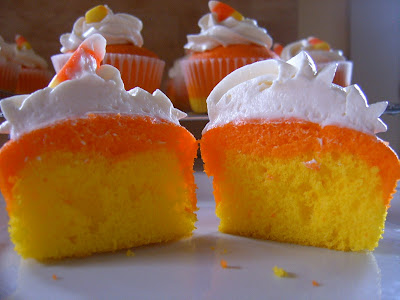
Candy Corn Cupcakes
Description
These fun and festive fall cupcakes are delicious, and so much easier than they look!
Ingredients
- 1 18.25-oz. white cake mix (I prefer Duncan Hines)
- 1 c. sour cream
- 1/2 c. vegetable oil
- 3 large eggs
- 1 tsp. almond extract
- Yellow and orange Wilton food gel (about a heaping 1/2 tsp. of each)
- A double batch of Perfect Cupcake Frosting and Filling (link in post)
Instructions
- Preheat oven to 350 degrees. Line 2 24-cup muffin tins with white paper liners (although you may not make it to 24 cupcakes). Combine all ingredients except for food coloring in a large bowl and beat on low speed for 1 minute. Scrape down the sides of the bowl and then beat on medium for 2 additional minutes.
- Divide batter equally into two bowls; you should have about 2 1/4-2 1/2 c. of batter in each bowl. Mix about 1/2 heaping tsp. of yellow coloring into one bowl of batter and 1/2 heaping tsp. of orange coloring into the other bowl.
- Divide the yellow batter evenly among the muffin tins. I used a standard cookie scoop, which measures about 1 Tbsp. I only had enough to make 20 cupcakes with the cups filled about halfway. Holding the edges of each pan firmly, bang the pan a few times on the counter to level out the batter. Repeat the process with the orange batter. Bake for 20-22 minutes or until a toothpick inserted into the center of a cupcake comes out clean. Remove from oven and allow to cool for about 5 minutes in the pan and then allow to cool completely on a cooling rack.When ready, frost the cupcakes and garnish with a candy corn.


Questions & Reviews
Just went out and got 2 of the 1M tips. I always wanted to do my frosting like this Soooo excited to try it out on my St. Patty's cupcakes tomorrow.
Just found your site and having so much fun popping around and seeing all your great recipes and tips.
So Iam Way excited to try this i am baking it right this moment actually. And to tell you the truth i wen out on a limb and used the recipie to make cakes instead of cupcakes. i hope it turns out. i guess i should of asked yall first. I guess we will see the end result in 8 minutes. Wish me luck and thanks a ton for the awsome recipies and ideas ladies. I am truly a die hard fan i would say i use at least of your recipies a week. Thanks A Million!!!
Adorable cupcakes and great tips!
Thanks!
Whitney
Adorable cupcakes and great tips!
Thanks!
Whitney
Okay, danagal, I think I've figured out who you are (these mysterious screennames without pictures throw me every time…) I'm trying not to give too much info away online, but did we talk about Superman the other night? If you're not who I think you are, I'm at a complete loss… 🙂
I can honestly say, these little cupcakes are delicious, Kate! Thanks for bringing them to the party! I LOVED the frosting, soooo good. Try these, people!
Oh me oh my. I came across your idea for these cupcakes on Think Different Act Normal and knew what had to be done. Thank you for such a great idea! Here's a link to my not-as-colorful version. Too adorable!
http://laurenspired.blogspot.com/2009/10/success-in-form-of-cupcake.html
Jamie, this is something we've been hypothesizing over on our Facebook page for this post. And to be honest, we really don't know why this happens to some people or in some cases and not to others. I have one light-colored aluminum pan and it is COMPLETELY and utterly trashed. Disgusting. But it turns out beautiful cupcakes! 🙂 I also have two dark blue silicone pans and they turn out okay cupcakes, but it's more of a problem with the rise and not the color.
Here are the ideas we've come up with:
–The Liners. I have noticed that I get prettier results when I use Cake Mate Liners instead of Betty Crocker. I haven't tried the Wilton liners.
–The Pan, Part I: I don't know if anyone else does this, but I always, I always use cupcake liners, a) because I'm lazy and b) because my pan is disgusting. And sometimes (because of a), if there's no visible yuckiness in the pan, I'll just put it back in the cupboard without washing it. I'm starting to think that if you do this a lot, you may have a thin layer of residual oil in your pans and that that may be causing the liners to turn brown when they bake.
–Someone also mentioned that if you have a very dark pan, it might help to reduce the heat to 325. I haven't tried this and I don't have a very dark metal pan, so I don't know… 🙂
Anyway, these are the ideas we have so far! If anyone else has any, please let us know! 🙂
OK so these are so stinkin' cute I can hardly stand it. I ran to the store tonight and bought everything I needed to make these tonight so they'd be ready for Halloween tomorrow. I love anything that resembles a candy corn because I have a Halloween birthday, and up until I was about 8 years old I thought candy corns were "happy birthday hats" that came out this time of year just for ME!
SO question- when I made my cupcakes the bottom half looks brown, not yellow. Once I cut it open it looks yellow, but through the cupcake liner it just looks brown so it kind of ruins the illusion of looking like a candy corn. Any suggestions for next time? I only baked them for 20 minutes so it's not like I burnt them.
Thanks for the fun idea!
They had everything needed at my Joann's.
I did find the 1M Star tip at 2 of my local Wal-Marts but it was in a cupcake decorating set. It had 4 different tips & 8 disposable decorating bags.
Thanks for the great recipe. I made orange and black cupcakes for my son's class party. What a hit. The cupcakes are yummy by themselves (without frosting) but the kids had fun frosting them. Multiple colors were a hit! I am fairly new to your blog but I really love it! You guys are awesome!
everything pink-
No, we won't ever tire of it 😉
I forgot I had soccer snack tomorrow. Hooray! Guess what they're getting. I'm definitely going to buy the Wilton orange because I had a heck of a time blending my own from the Betty Crocker stuff in my pantry–it was hard to not have it come out looking like Thousand Island Dressing color and that is just NOT appetizing when we're talking about frosting.
keep the videos coming.
will you two ever tire of my telling you how amazing this website is??
Christine, I don't know for sure if they carry it at Joann's because it's been so long since I've lived by one (okay, like almost two years, but still… 🙂 ). However, if they carry other Wilton products, I can virtually guarantee that they carry colored food gel. I've gotten mine at Walmart, Hobby Lobby, and Michael's. If you get it at Walmart, don't get it in the food aisle–go back to where the crafts are. You can also find Betty Crocker food gel in the baking aisle, and they work GREAT except for the fact that the box of classic colors only comes in red, green, yellow, and blue (the others are neon, I think), so you'd have to try and blend your own shade of orange.
Hope that helps! Happy Halloween!! 🙂
Those are wonderful, just love them!
I'm making these tomorrow! I forgot to buy the larger coupler today so I'm going to have to use they tip that Lorraine gave. Wish me luck! They are going to make a bunch of adorable ballerina happy after class tomorrow!
Well… I was CLOSE when I attempted "fancy icing decorating with a icing bag and tip" when I made the lemon cupcakes!! Didn't think to start in the middle and go back. Can't wait to try it again! Plus I was already planning on making some cupcakes this weekend. Thanks for the tutorial! 🙂
These are soooo cute! Where do you get food color gel? Can I get that at Joann's or a specialty store?
Heidi–The recipe is definitely thicker than regular cake batter, but not to the point where it's difficult to work with. But it's oh-so delicious… 🙂 How did it turn out with the water?
Is the recipe missing a liquid measurement (water)? I just tried using it as written with only the sour cream & oil & eggs and it was super thick. I had to add about 3/4 c. of water to get it to cake batter consistency.
Oh darn, I wish I'd seen these yesterday. I just spent last night making cupcakes for my son's class party and these would have been perfect! (I ended up topping them with your nutter butter ghosts though).
Very cute cupcakes.. and great tutorial on frosting!
Wow, these cupcakes are inspired! They look so perfect!!
I just discovered your blog and I am so glad I did. Love the candy corn cupcakes idea. My youngest daughter is going to be a Candy Corn Witch for Halloween so we will definitely be making these!
So I had my Halloween Treat menu all planned out…until I found this! I am TOTALLY making these. SOOOooo cute! I wanted to add that I'm a Sociology major, and my husband is an engineer, so I totally loved your comment about how he thinks of good ideas and you get to use big words, lol. 🙂
Dani
Craftrookie.blogspot.com
Thanks Emily, but I can't take any credit- that's Kate! I'm surprised you couldn't tell from the video because my fingers are much fatter, haha.
Oh. My. Goodness.
Those are so cute, Sara. I love watching you in action – thanks for the video!
Videos really help me to learn…I must be a visual learner. Great cupcakes. Looks like a great way to ice them so I am going to try it!