When it comes to Valentine’s Day desserts, I’m usually looking for something that’s not just heart shaped or colored pink. I tend to want to make something extra…special. Not something extra hard, or extra complicated, but something that we don’t make very often that feels kind of fancy and fun. Enter, pavlova.
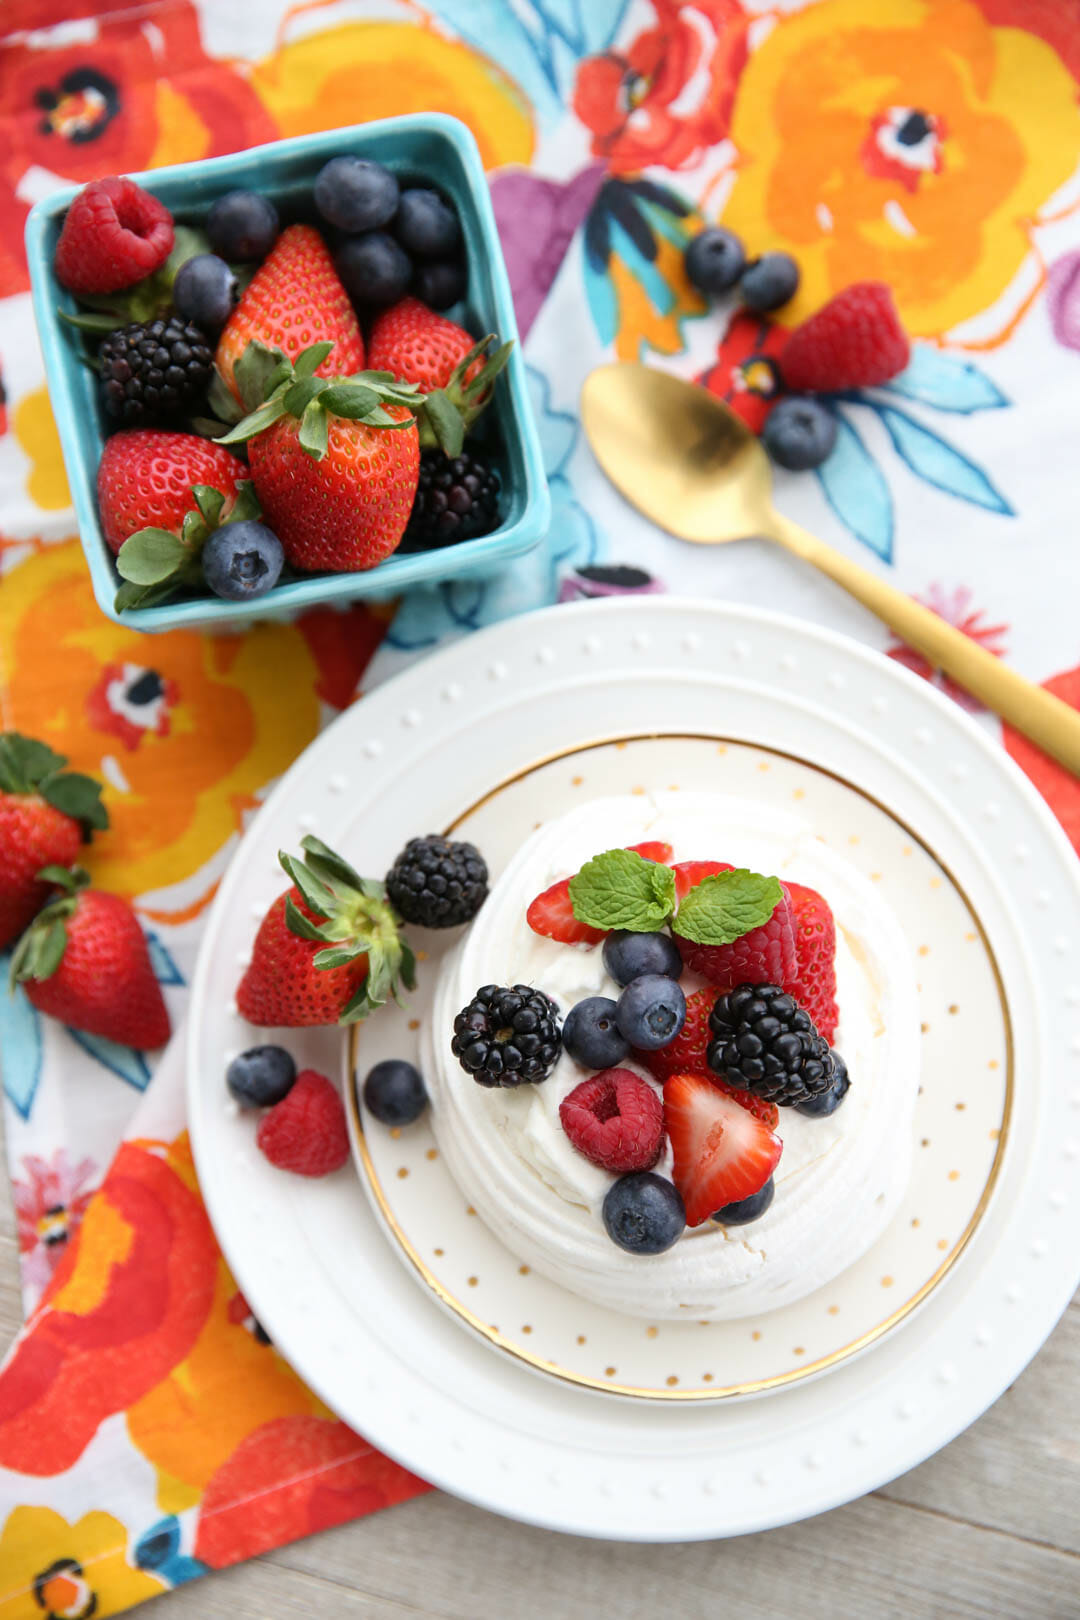
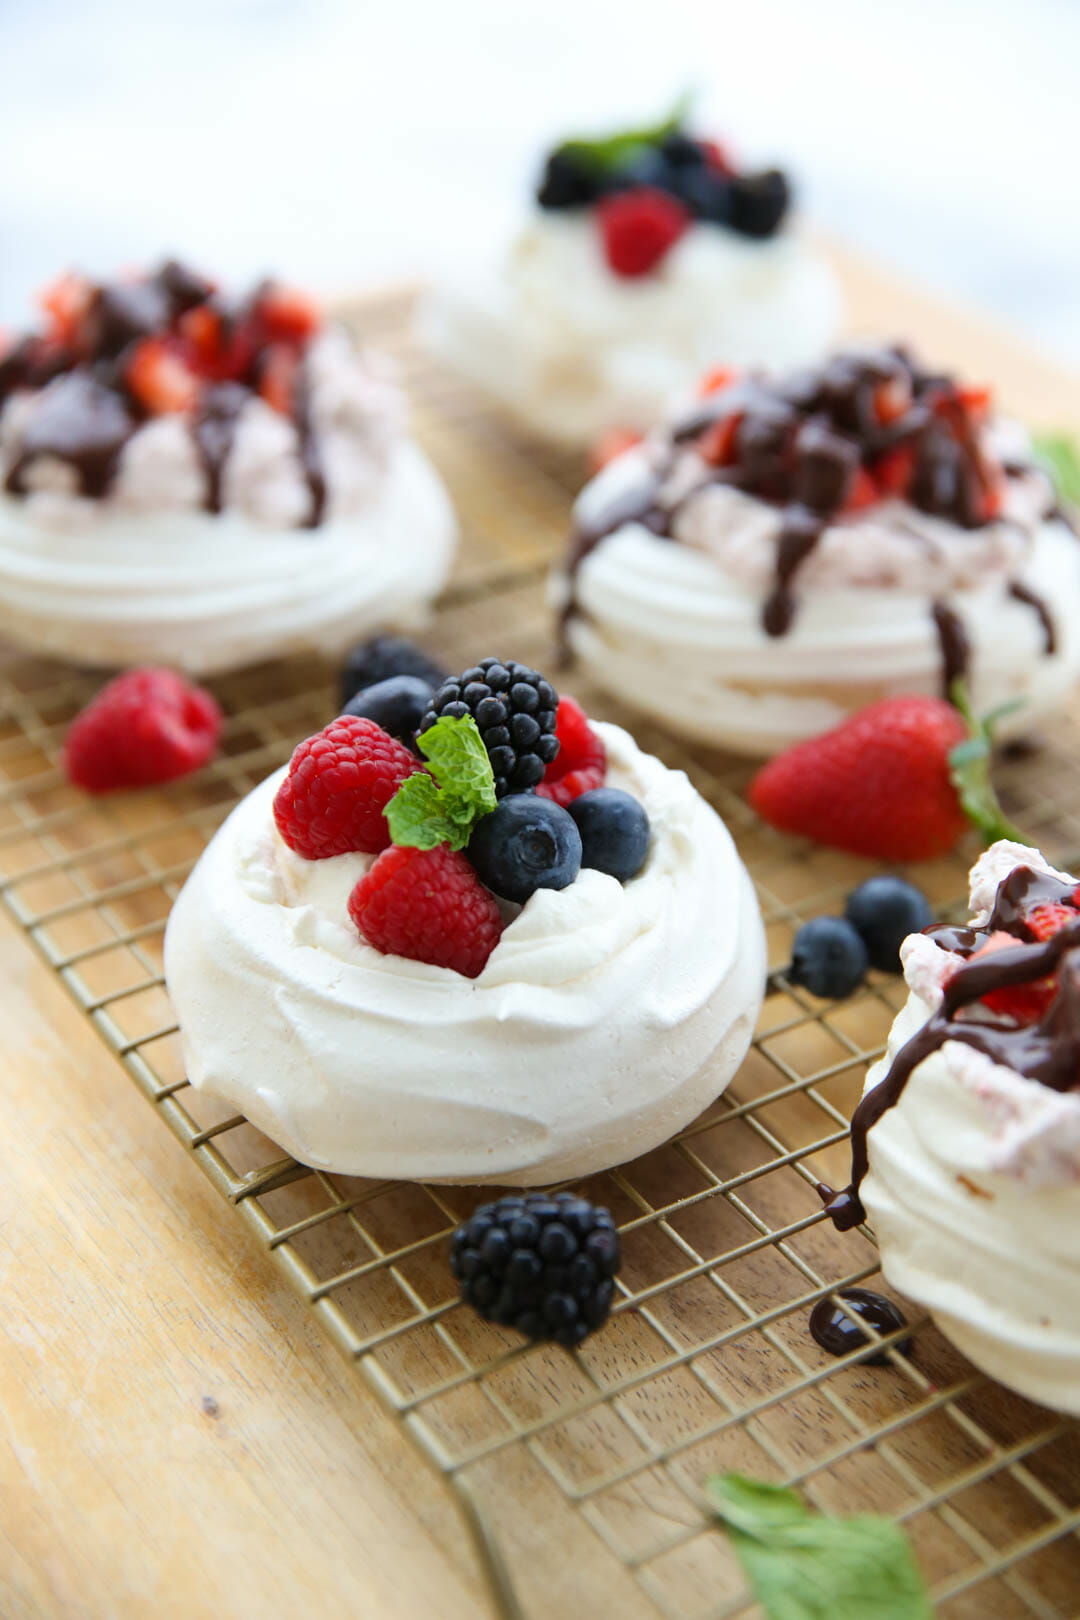
If you’ve never had pavlova before, it’s a dessert made of puffed meringue-like shells, baked so the edges are crispy and airy and literally melt in your mouth, and the centers are pillowy-soft and chewy, almost like a marshmallow. A little “nest” in the center is traditionally filled with whipped cream and topped with fresh fruit, but is a canvas open to creativity. They’re simple to make, yet look sophisticated and impressive, perfect for Valentine’s Day!
Ingredients Needed
This is just a preview of ingredients and method. Keep scrolling for full printable recipe.
Pavlova
- Egg whites
- Granulated sugar
- Cornstarch
- Vanilla extract
- Granulated sugar
Whipped Cream
- Heavy cream
- Vanilla extract
- Granulated sugar
Garnish
- Fresh fruit
- Chocolate ganache


How to Make Pavlova
- Let me show you how easy they are to make. You’ll need 4 egg whites. I don’t care how good of an egg-cracker you are, this is the time to crack each egg individually and add them to your mixing bowl one at a time. If you get any yolk in there, your whites will have trouble whipping up.
- You’ll beat them just for a minute or two, until soft peaks form. At that point you spoon in sugar and a little cornstarch a little at a time and then continue beating for few minutes until it’s smooth and glossy and holds a peak.
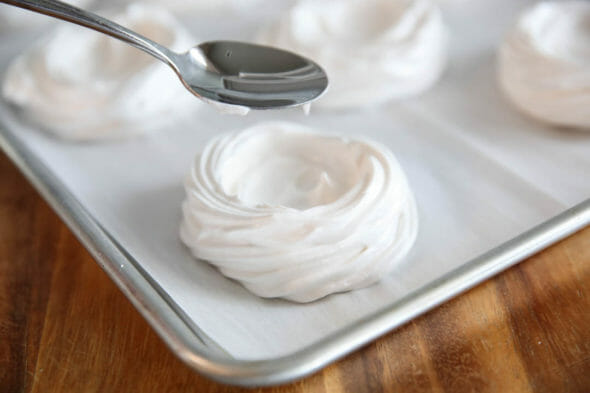
- You can make one big pavlova, like a giant pie you slice into wedges, but I prefer to make mini, individual ones. They’re absolutely adorable for one thing, and easier to eat, in my opinion. You can spoon mounds of the egg mixture and spread them out with a spoon, or do as I do and put the mixture in a piping bag. It makes it really easy to pipe round circles. If you want to make them uniform size, use something like a mason jar as a stencil and draw circles on parchment with a pencil. Flip the parchment over and then pipe around the circles, making a flat base and then a round layer or two around the outside edge.
- Then use a spoon to gently smooth out a little nest in a middle. I’ve left a few of mine piped, and I’ve smoothed out the edges on some so you can see the difference. It really doesn’t matter, just personal preference! They’ll bake at a fairly low temperature for a little less than an hour, and then they need to sit in the oven and cool slowly. They puff up a little while baking and then as they cool you’ll see some cracking, which is totally normal.
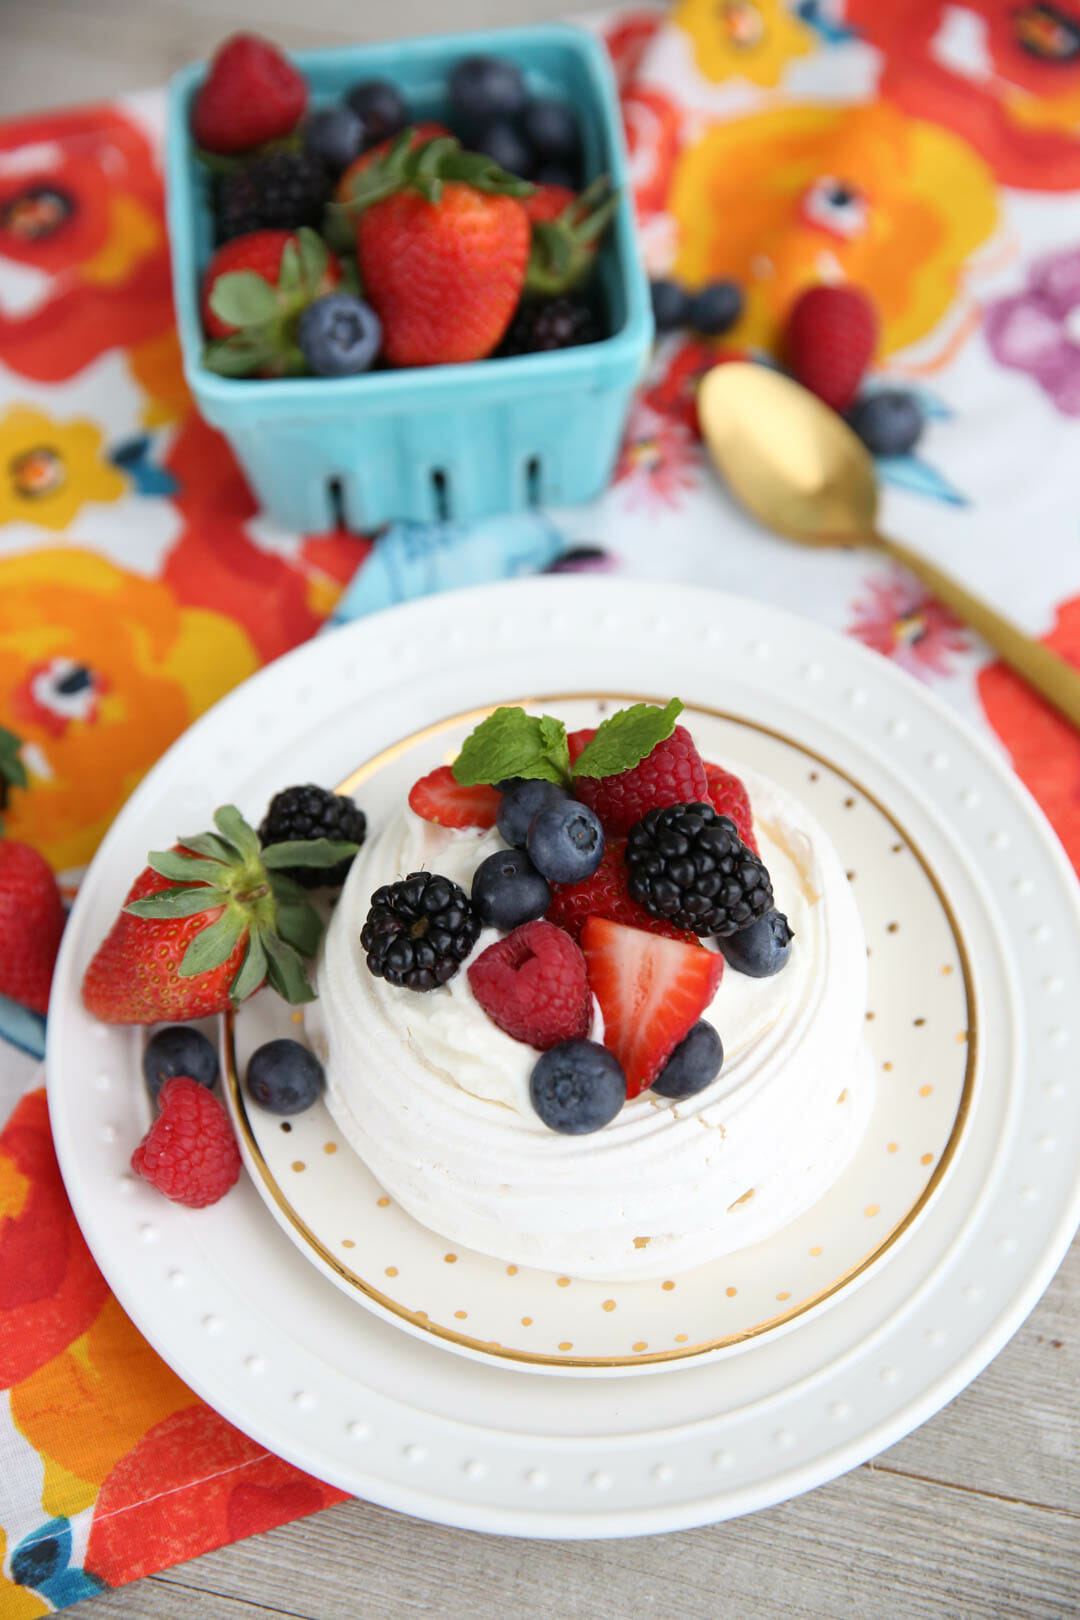
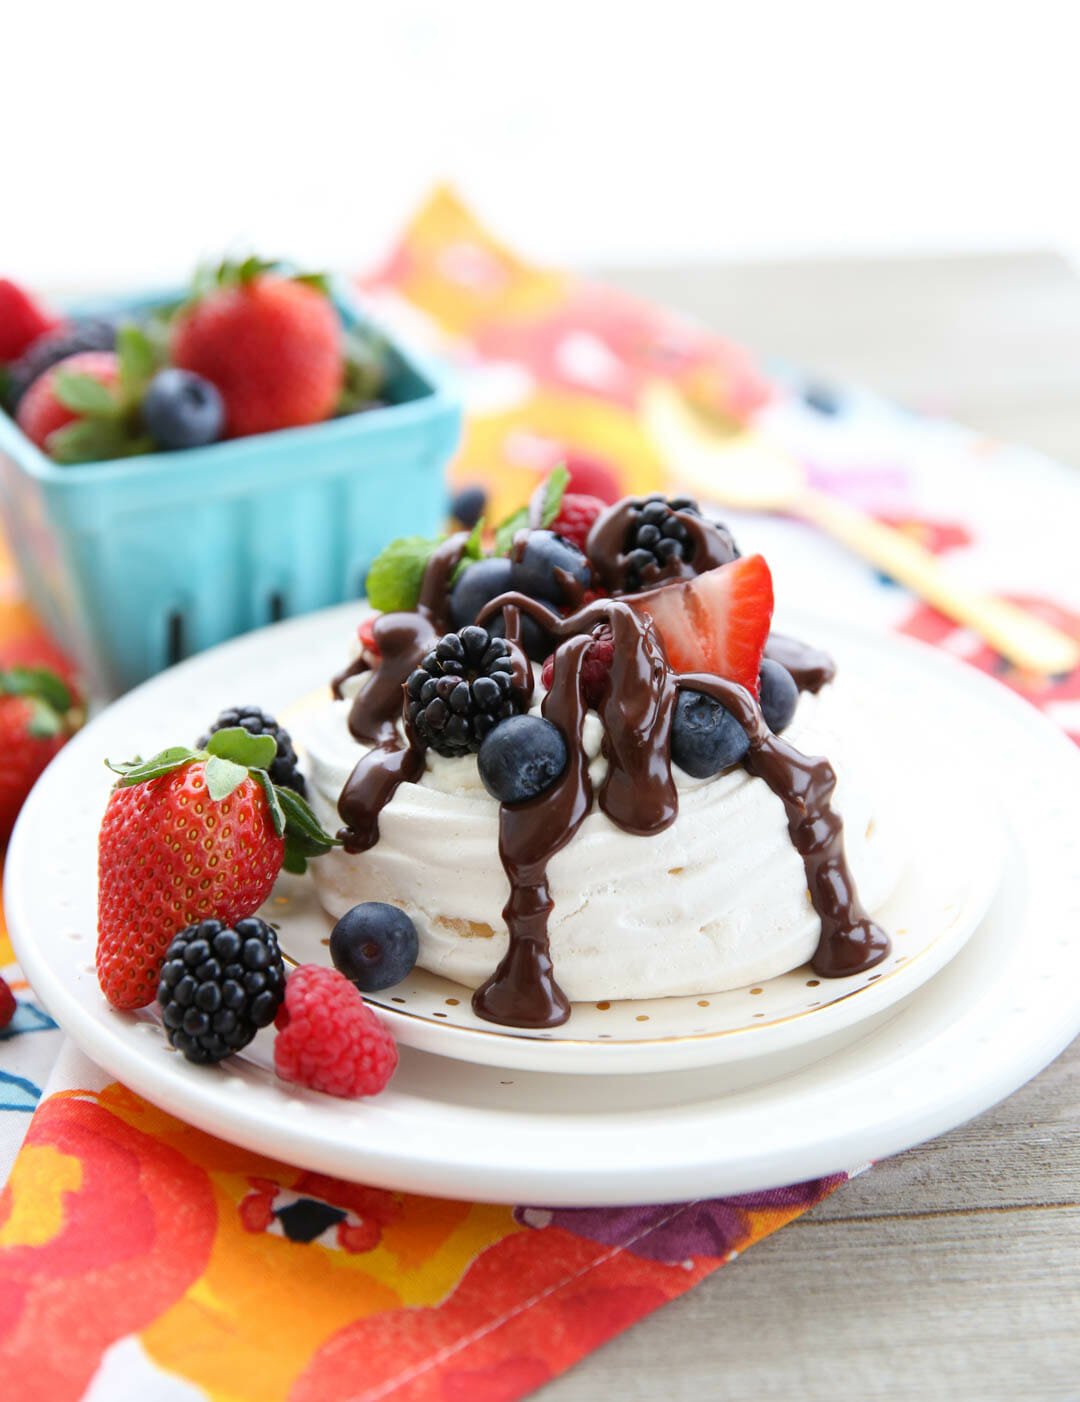
- After they’re cooled completely, you can fill the centers with sweetened whipped cream and fresh fruit. Drizzle a little chocolate ganache on there if desired as well!
Storing and Other Tips
- Store baked, undecorated pavlova in an airtight container in a cool, dry place. To preserve the crisp texture, do not refrigerate. Consume within two days for best results.
- Decorate immediately before serving.
- Top with your favorite fruits: Honestly any kind of fruit is fantastic here so use whatever is in season. Fresh peaches and other stone fruits, berries, kiwi and mango and tropical fruits, pomegranate, you name it. If you want to add a little decadence, top with a little chocolate ganache, too. How gorgeous is that?
- Another really amazing combo is filling them with my favorite Strawberry Whipped Cream, which you can find in this post here, and then topping with fresh strawberries and a chocolate drizzle.
- Whatever you do, you’ll want to know that the pavlova shells themselves are very sweet, so you’ll want to compensate by making your whipped cream a little less sweet than you normally would, and keeping your fruit unsweetened. It’s tempting to mix fruit with sugar, like you would for berry shortcake, or pouring over a sweet berry sauce, but I’ve found I really prefer a barely-sweetened cream and fresh fruit. If I drizzle with chocolate, I prefer a nice dark ganache.

Frequently Asked Questions
Once topped, pavlova needs to be enjoyed right away. If left to sit, moisture from the ingredients will eventually break down the texture of the shell and you’ll be left with a mushy dessert. It’s best to save those un-topped shells to enjoy later!
A meringue is typically crisp all the way through. Pavlova has a crunchy exterior with a soft, marshmallow-like center.
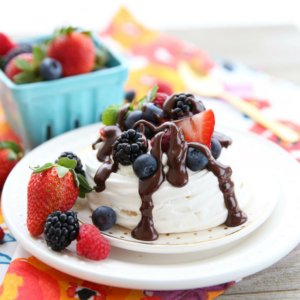
Pavlova with Fruit and Cream
Equipment
Ingredients
- 4 egg whites
- 1 cup granulated sugar
- ½ tablespoon cornstarch
- 1 teaspoon vanilla extract
- 1 teaspoon white vinegar
Whipped Cream
- 1 cup heavy cream
- 1 teaspoon vanilla extract
- 3 tablespoon sugar
- fresh fruit for topping
- chocolate ganache if desired; see notes
Instructions
- Preheat oven to 275℉. If desired, trace 6-8 circles onto a piece of parchment paper with a pencil (the top of a large, wide-mouth mason jar or drinking glass works well). Flip paper over and lay on baking sheet. Set aside.
- Place sugar and corn starch in a small bowl and whisk together. Place egg whites in a stand mixer with whisk attachment. Beat for 1-3 minutes, until soft peaks form. With mixer running on medium-high speed, slowly add sugar mixture, one spoonful at a time until all is incorporated. Increase speed to high and continue mixing 3-4 minutes longer, until mixture is smooth and glossy and holds stiff peaks.
- Add vanilla and vinegar and mix to combine, scraping down edges with spatula. Place mixture in a piping bag and pipe rounds onto prepared sheet. (Alternately you may simply spoon mixture onto the 8 rounds and shape with a spoon.)
- Use a spoon to make a little indentation in the center of each mound.
- Place pan in oven and decrease temperature to 250℉. Bake for 45-50 minutes, until edges are set and sound hollow when tapped. Turn off oven and with oven door cracked open, let pan cool completely.
- Pavlova shells may then be stored in air-tight containers for a day or two, or filled.
- To fill, whip cream, vanilla, and sugar until soft peaks form. Spoon into center of each shell and then top with desired fruit.
Notes
- If you’d like a little ganache, simply heat equal parts of heavy cream (by volume) and chocolate chips (by weight). For example, weight out 4 ounces chocolate and pour over it 4 ounces (by volume) heated cream. Let sit for about 5 minutes and then whisk until smooth.
- Store baked, undecorated pavlova in an airtight container in a cool, dry place. To preserve the crisp texture, do not refrigerate. Consume within two days for best results.
- Decorate immediately before serving.
- Top with your favorite fruits: Honestly any kind of fruit is fantastic here so use whatever is in season. Fresh peaches and other stone fruits, berries, kiwi and mango and tropical fruits, pomegranate, you name it. If you want to add a little decadence, top with a little chocolate ganache, too. How gorgeous is that?
- Another really amazing combo is filling them with my favorite Strawberry Whipped Cream, which you can find in this post here, and then topping with fresh strawberries and a chocolate drizzle.
- Whatever you do, you’ll want to know that the pavlova shells themselves are very sweet, so you’ll want to compensate by making your whipped cream a little less sweet than you normally would, and keeping your fruit unsweetened. It’s tempting to mix fruit with sugar, like you would for berry shortcake, or pouring over a sweet berry sauce, but I’ve found I really prefer a barely-sweetened cream and fresh fruit. If I drizzle with chocolate, I prefer a nice dark ganache.


Questions & Reviews
Our favorite combination in this house is lemon curd, whipped cream, and toasted almonds. Of course, it does not look much like a Valentine dessert, but other than that it is perfect in every way because you have the tart lemon curd, the smooth and creamy whipped cream and the crunchy toasted almonds. All of that with the sweet pavlova make it a keeper!
Could these be piped into a heart? Or would that just look blah by the time it was cooked and everything?
I think they could! I would just over exaggerate it a little to compensate for a little puffing. Let me know how it goes if you try it- good idea!
I did the hearten and they turned out cute! Mine were a little bit browned though, even though I only cooked them for 45 min. Should I lower the temp next time or cook them for less time?
Ya, either/or! Make sure they are in the middle of the oven (not near the top) and you’re not using a convection setting. Then I’d just keep an eye on them and take them out sooner.
These are the perfect dessert for a gluten free dinner guest tonight. In the oven already!
I’ve never tried pavlova either, but it looks like something I could handle! So pretty (and yay! So easy!)!
So pretty! I’ve actually never had pavlova but I think I need to add it to my list of things to try!
Would love to see a picture of the inside of one. Also, there’s no mention of the vinegar in your narrative….is it necessary or a preference?
The vinegar helps form the outside crust while keeping the center soft. Don’t leave it out!
I love making pavlova. It is usually our Easter dessert! I have never made mini ones, though, so I’m excited to try these! Your photos are gorgeous 🙂
Here’s a little pavolova trick: use those leftover egg yolks to make home made lemon curd! Then fill the bottom of the merengue nests with a nice dollop of curd and top that with your whipped cream filling. So yummy!
Yes! Great tip!
I love lemon curd! We need a good recipe for that from you guys.
Had it? Never heard of it until today, looks dreamy!
Oh my goodness, I love Pavlova! Your pictures look divine! I will definitely be making these for valentines day!