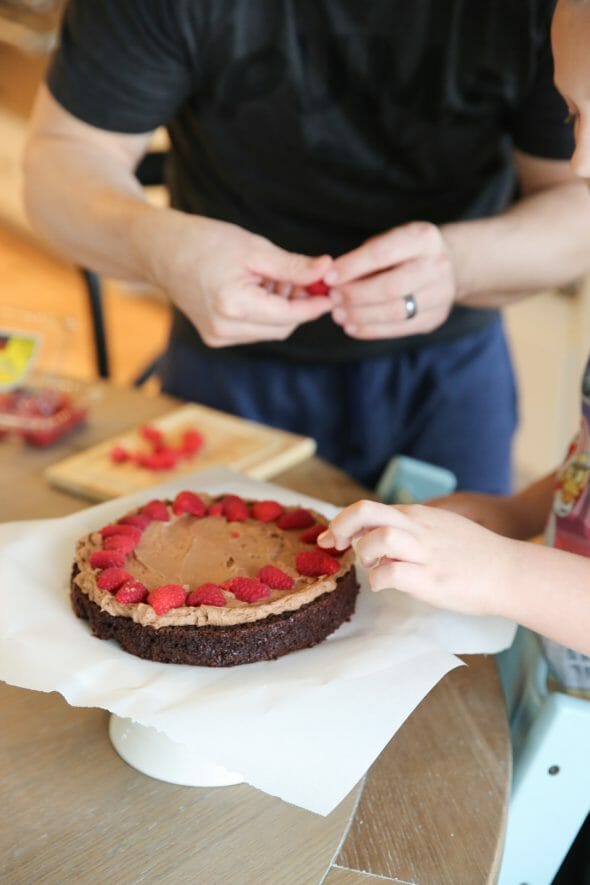
I mentioned on Instagram recently that one of my family traditions is baking on Sundays. Everyone in our family loves taking turns picking something yummy and helping out. My husband wanted to try this Chocolate Raspberry Layer Cake from King Arthur Flour so we whipped it up last Sunday and it was so good. They do a bakealong every month and it’s kind of fun to try new things. This Apple Braid was also one of their Bakealong recipes!
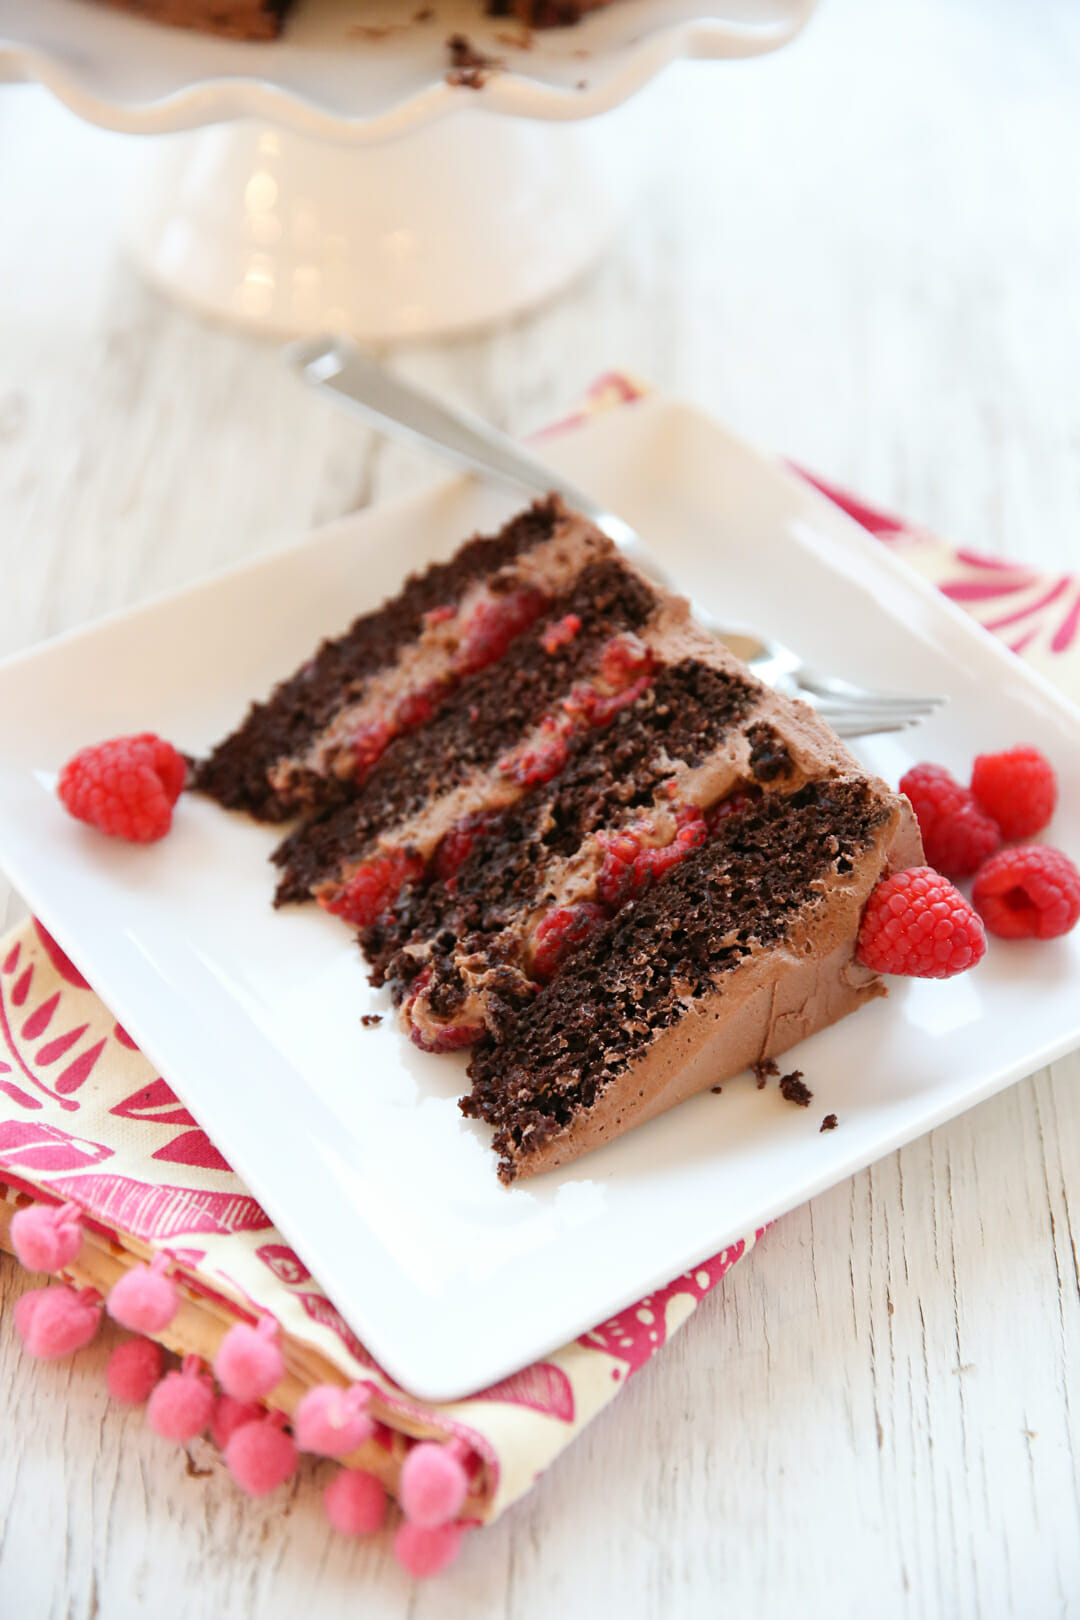
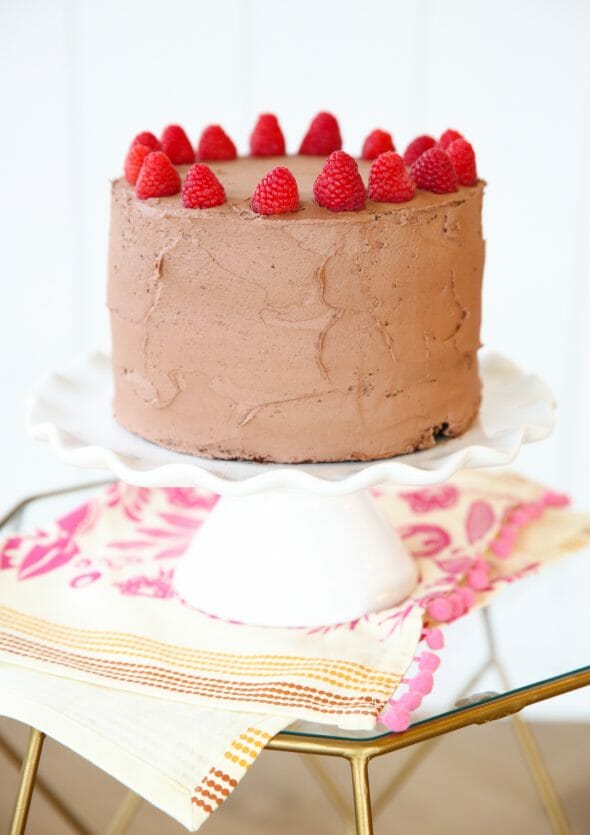
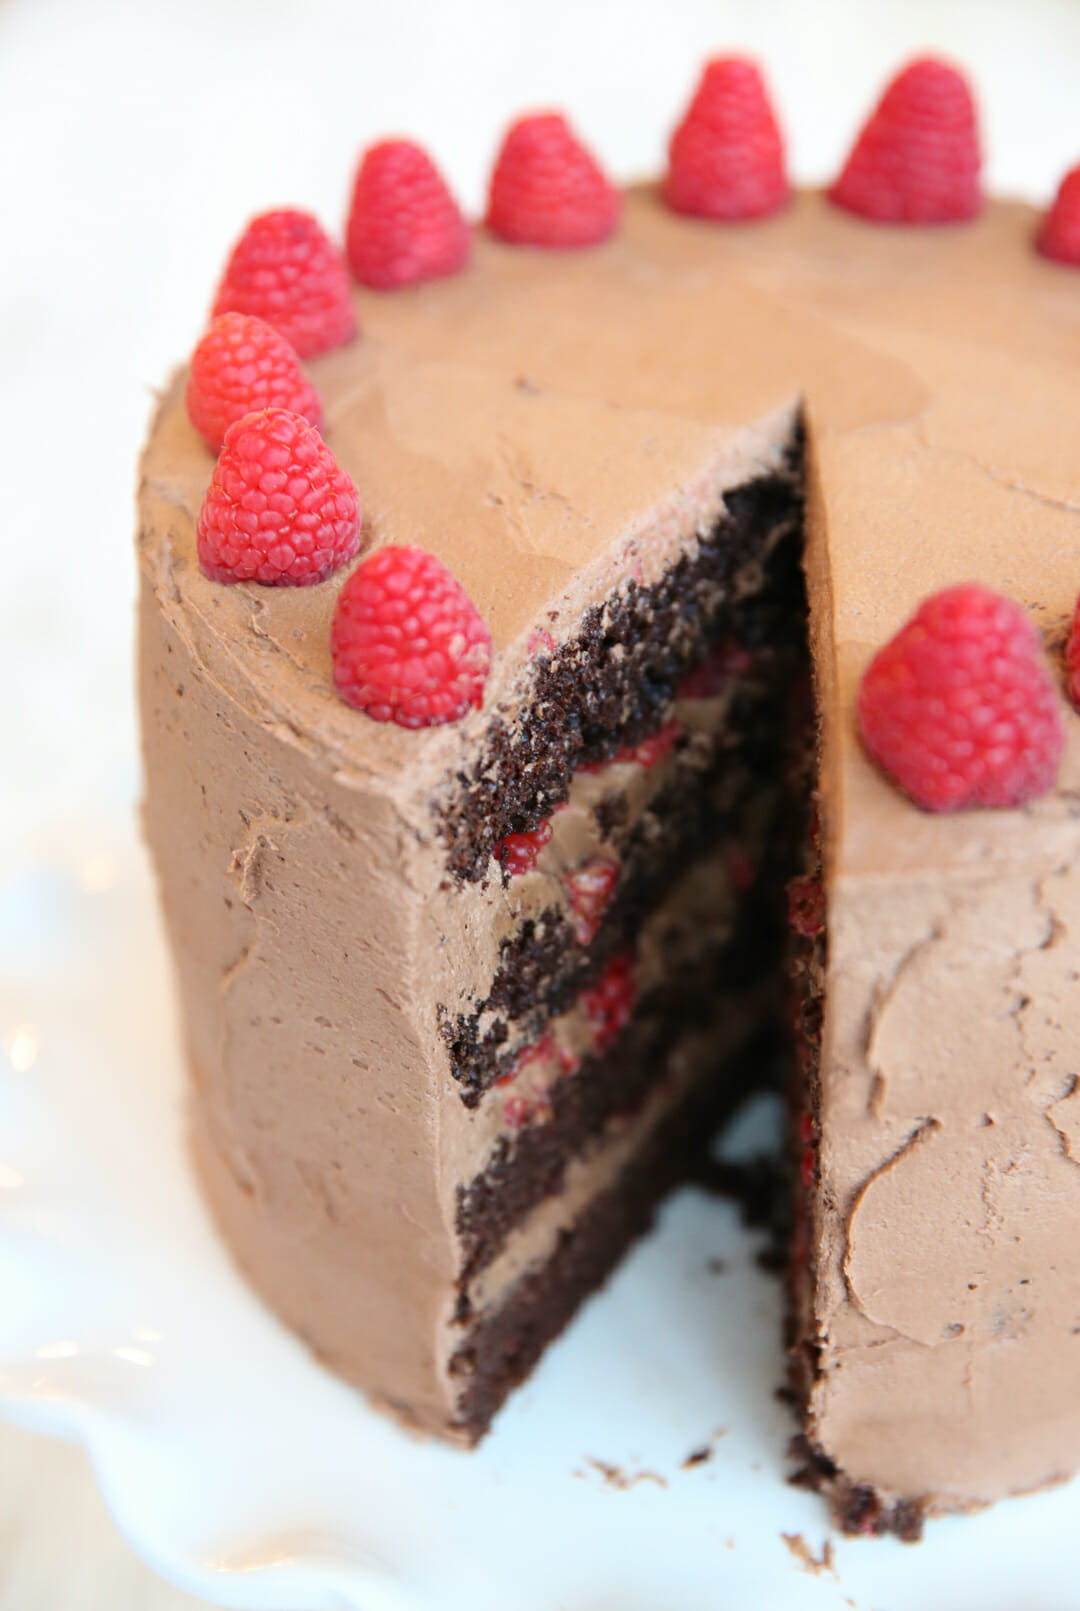
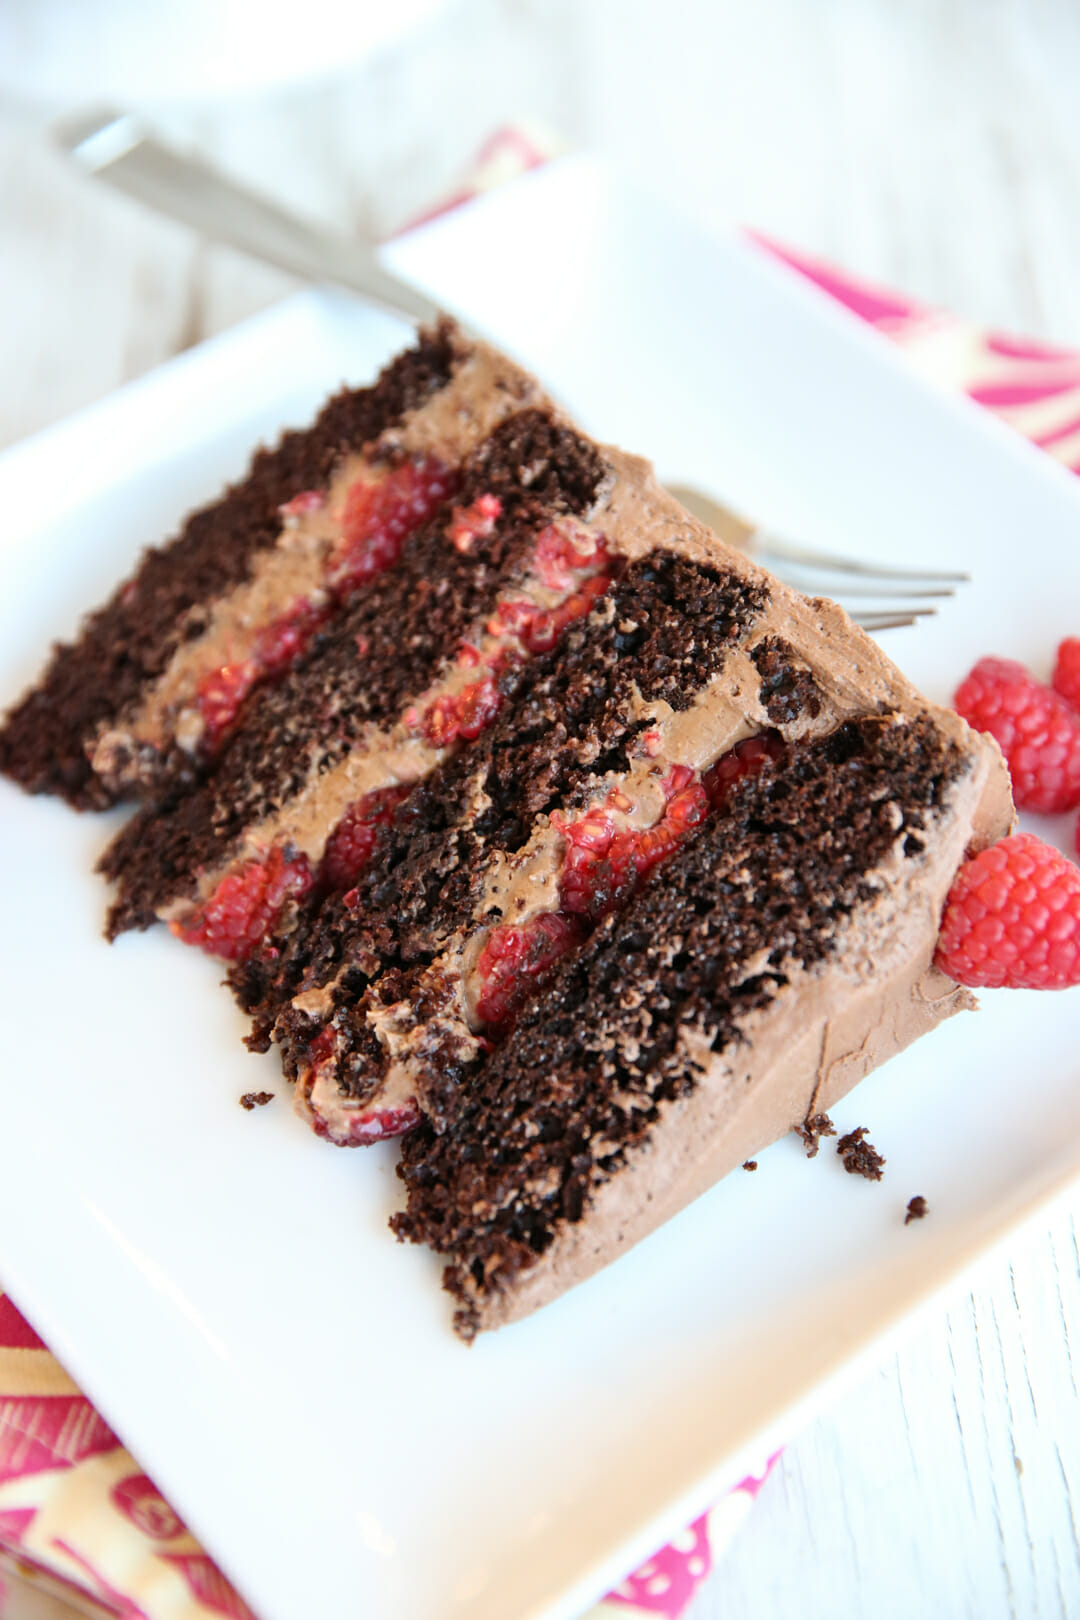
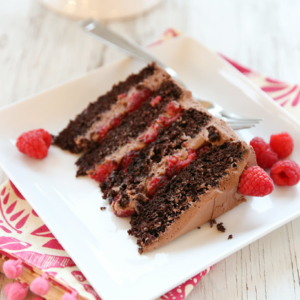
This cake was a hit. It has 4 really great layers of chocolate cake (I’d make the cake part again for use with other fillings, even) and it’s layered with an easy chocolate mousse and fresh raspberries and then iced in a chocolate buttercream. It’s a great special occasion cake, but also just fun to make on a lazy Sunday like we did.
Ingredients Needed
This is just a preview of ingredients and method, keep scrolling for full printable recipe.
Cake
- All-purpose flour
- Baking soda
- Baking powder
- Salt
- Granulated sugar
- Cocoa powder
- Vegetable oil
- Buttermilk – You can replace this with plain yogurt. Greek or regular, non fat, low fat, or full fat will all work!
- Boiling water – Boiling water helps the chocolate to “bloom,” which just means you get a more intense chocolate flavor and a moist, tender crumb in the finished cake.
- Vanilla extract
- Eggs
Filling
- Butter – Use real butter if you can!
- Cream cheese – Full fat or low-fat, avoid fat free.
- Powdered sugar
- Vanilla extract
- Salt
- Chocolate chips – Or chopped bar chocolate, semi-sweet.
- Heavy cream – Heavy cream has thickeners that give body to the filling, making it more stable when the cakes are stacked.
- Instant ClearJel – Optional. ClearJel is a modified cornstarch thickener that helps stabilize the filling. If you live in a warm climate, it wouldn’t be a bad idea to add it. You can find it on the baking aisle by the canning supplies.
- Fresh raspberries – Washed and dried ahead of time so they’re ready.
Frosting
- Butter – The original recipe called for part butter, part butter flavored shortening, but I prefer all real butter here.
- Salt
- Powdered sugar
- Unsweetened cocoa powder
- Milk – Any percentage will do.
- Vanilla extract
How to Make a Chocolate Mousse Cake with Raspberries
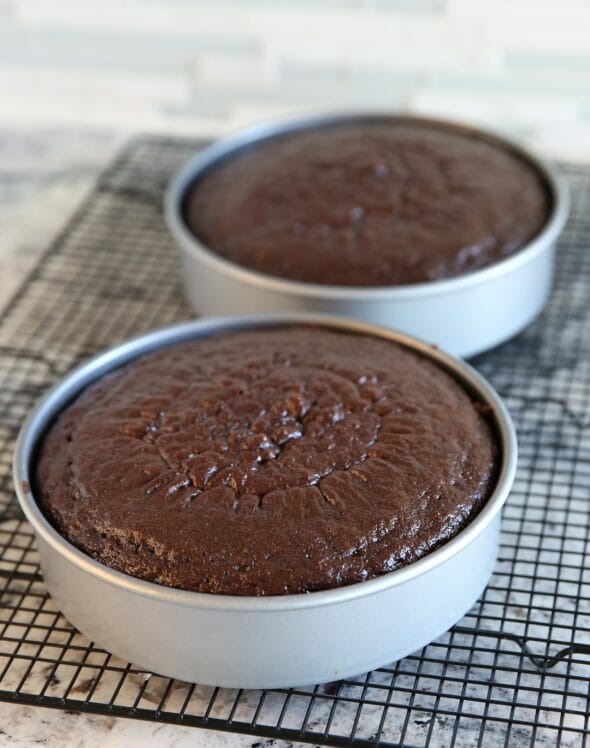
- This cake starts out with 2 beautiful, perfectly chocolate-y 8-inch cakes. You’ll slice them both in half to create 4 layers.
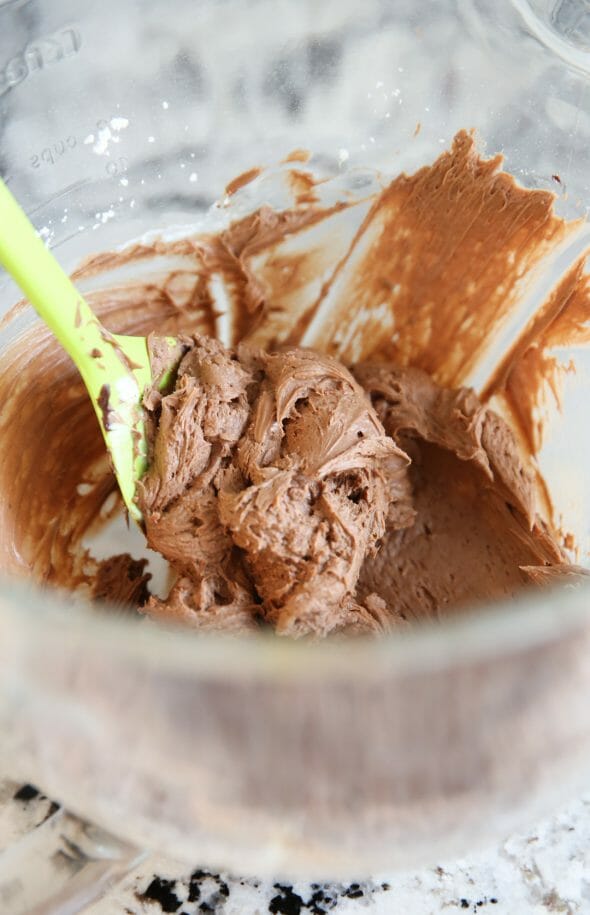
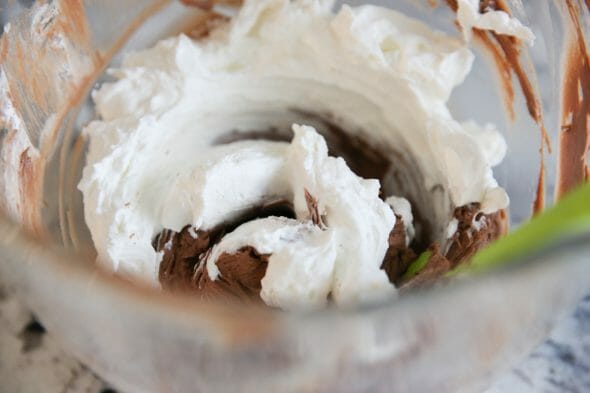
- The filling for this cake is an easy chocolate mousse. It starts with a thick chocolate-cream cheese mixture, which is then lightened up by folding in whipped cream to make is light and fluffy.
- You’ll layer each of the chocolate cake layers with fresh raspberries (they’ll lay nicer if you take the time to slice each one in half). The fresh berries with their slight tartness balance the sweetness and richness of the cake and filling. This cake stacks high for an impressive presentation!
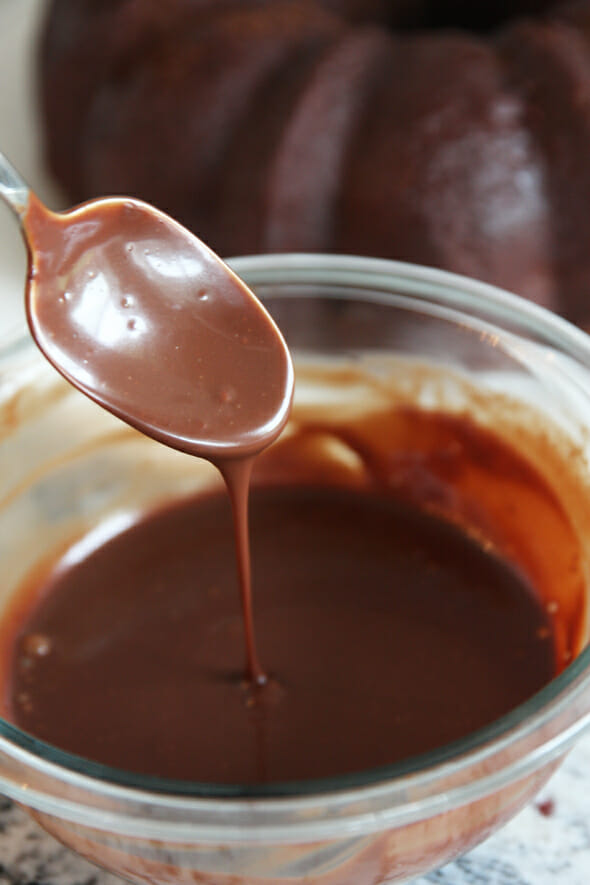
- The last step is to frost the cake. This is one step where I would make a change to the original recipe. It calls for a combination of both butter and butter-flavored shortening. I’m not opposed to shortening in baking, but I didn’t love it in the frosting because the taste came through.
Next time I think I’ll use all butter in place of the shortening. And I would definitely make this cake again! If I had more time I would have whipped up a little ganache using the extra cream from the filling and drizzled it around the edges, but it’s great plain-Jane like this, too! Just pop a few berries on top and you’re good to go.


Storing and Other Tips
- Because the cake filling contains cream cheese and whipped cream, it should be refrigerated after 2 hours.
- Store the finished cake, or any leftovers, covered in plastic or in an airtight container in the refrigerator and enjoy within 3-4 days for best results.
- If serving from the fridge, allow the cake to sit at room temperature for 30-45 minutes to soften.
Frequently Asked Questions
Yes! The cake layers will freeze well. Bake them ahead of time, cool completely, and wrap tightly in plastic and then foil. Freeze for up to 2 months. When ready to assemble, make your filling and frosting fresh. You can fill and frost the layers directly from the freezer, just be sure to allow thawing time before serving.
Yes, the fully assembled cake can be stored, tightly covered, in the refrigerator for up to 24 hours. When ready to serve, let it sit out at room temperature for 30-45 minutes to soften.
Absolutely. Almond extract would make a great addition. But you could easily switch up your berries or use other extracts or flavoring oils as desired.
Chocolate Mousse Cake with Raspberries
Ingredients
Cake
- 1 ¾ cup all-purpose flour
- 2 teaspoons baking soda
- 1 teaspoons baking powder
- 1 teaspoon salt
- 2 cups granulated sugar
- 1 cup unsweetened cocoa powder natural or Dutch-process
- ½ cup vegetable oil
- 1 cup buttermilk or yogurt, Greek or regular, nonfat, lowfat, or full fat
- 1 cup boiling water
- 2 teaspoons vanilla extract
- 3 large eggs
Filling
- 2 tablespoons soft butter
- 8 ounces cream cheese 1 brick, room temp
- 1 cup powdered sugar
- ½ teaspoon vanilla
- ⅛ teaspoon salt
- ⅔ cup semisweet chocolate chips melted
- 1 cup heavy cream
- 1 teaspoon Instant ClearJel optional*
- 1 ½ to 2 pints fresh raspberries washed and dried
Frosting
- ½ cup butter-flavored shortening I would sub butter next time
- 8 tablespoons unsalted butter (1/2 cup), room temp
- ¼ teaspoon salt
- 4 cups powdered sugar sifted
- ½ cup unsweetened cocoa natural or Dutch process
- ¼ cup milk
- 1 teaspoon vanilla extract
Instructions
Cake Layers
- Preheat the oven to 325°F. Lightly grease two 8″ round pans at least 2” deep (and preferably 3” deep); four 8″ round pans at least 1 1/2” deep; or three 9″ round pans. If you have parchment rounds, line the pans with parchment, and grease the parchment. Note: If your pan assortment doesn’t include any of these particular combinations, you can bake the cake batter in batches; the unbaked batter won’t suffer while awaiting its turn in the oven.
- To make the cake layers: Weigh your flour; you’ll find its weight by toggling to “ounces” at the top of the ingredient section above. Or measure it by gently spooning it into a cup, then sweeping off any excess. Whisk together the flour and remaining dry ingredients in a large mixing bowl; or combine thoroughly using a stand mixer equipped with the whisk or beater attachment. Check to make sure there aren’t any hard lumps in the mixture; if there are, press them through a sieve.
- Combine the oil, buttermilk or yogurt, boiling water and vanilla in a medium bowl or large measuring cup. Add to the dry ingredients and beat at medium speed for 30 seconds to 1 minute, until the batter is smooth.
- Scrape the sides and bottom of the mixing bowl, then beat in the eggs one at a time. Mix on medium speed for another minute, or until smooth.
- Divide the batter among the prepared pans. Bake for 45 to 50 minutes for two 8” pans; or 25 to 30 minutes for four 8″ pans or three 9″ pans, until the cake just begins to pull away from the edge of the pan, and a tester inserted in the center comes out with just a few moist crumbs. Remove from the oven and place on a rack to cool for 15 minutes. Run a table knife around the edge of each pan to free the crust, and turn the cakes onto the rack to cool completely. While the cake layers are cooling, make the filling.
Filling
- To make the filling: In a large mixing bowl, combine the butter, cream cheese, 3/4 cup (3 ounces) of the confectioners’ sugar, vanilla, and salt, mixing at medium-low speed until smooth. Melt the chocolate; a minute or less in the microwave should be sufficient to soften the chips enough that you can stir them until completely melted and smooth. Add the melted chocolate to the bowl and mix on medium-high speed for 1 minute, or until a bit lightened and fluffy.
- Whisk together the remaining 1/4 cup confectioners’ sugar with the Instant ClearJel. Beat the heavy cream until soft peaks form, then add the confectioners’ sugar mixture. Beat just until the cream is stiff; guard against over-beating, which will turn the cream grainy. Fold the whipped cream into the cream cheese mixture; scrape the bowl, and stir to combine any sticky residue. Finally, fold in the chocolate mini chips, if you’re using them.
- Split the cake layers horizontally if you’ve baked two deep 8″ cakes; trim any domes off the tops if you’ve baked three or four individual layers. Place the first layer on a serving plate (line the edges with strips of waxed or parchment paper to keep the plate clean), and spread it with one-third of the filling (1 cup; 7 5/8 ounces; 216g). Cut 1/2 pint of raspberries in half lengthwise (rather than around the circumference), and place them over the filling, covering its entire surface. Repeat until all the layers are stacked; place the last layer bottom-side up for a flat surface on top.
- Once the layers are assembled with filling and raspberries, place the cake in the refrigerator or freezer for at least 30 minutes to firm it up. This will make frosting the cake much easier since the layers are less likely to slide around and chilling helps prevent the cake from shedding crumbs as you frost. While the cake is chilling, make the frosting.
Frosting
- To make the frosting: In a large bowl, beat together the shortening, butter, and salt.
- Sift the confectioners’ sugar and cocoa through a strainer to remove any lumps, and gently beat into the butter mixture alternately with the milk. Add the vanilla. Beat on medium-high speed for 2 minutes, or until fluffy.
- To finish the cake: For the best-looking cake, do the frosting in two steps. First, spread a very thin layer of frosting around the sides and across the top; this is called a crumb coat. You should actually be able to see the cake through the frosting in spots, it’s that thin. Refrigerate the cake for 20 minutes to let this layer set up.
- Once the cake is chilled, use the remaining frosting to coat it thoroughly and evenly. The frosting will be thin, but the cake should be completely coated, with no bare patches. If you have any leftover frosting, use it to pipe decorations on the top and/or around the base.
- Refrigerate the cake until ready to serve. Garnish with fresh raspberries just before serving.
- Store any leftovers in the refrigerator for up to 3 days; freeze for up to a week.
Notes
- Because the cake filling contains cream cheese and whipped cream, it should be refrigerated after 2 hours.
- Store the finished cake, or any leftovers, covered in plastic or in an airtight container in the refrigerator and enjoy within 3-4 days for best results.
- If serving from the fridge, allow the cake to sit at room temperature for 30-45 minutes to soften.
- Substitute 1 cup hot brewed coffee for the water in the recipe, if desired; this will enhance the cake’s chocolate flavor without adding any coffee flavor of its own. Alternatively, add 1 1/2 teaspoons espresso powder to the batter along with the other dry ingredients.
- The total weight of the cake batter will be about 50 ounces (1417g). To ensure your layers are all the same size, divide the batter’s weight by the number of layers you’re baking, and weigh the amount into each pan. For two deep 8″ layers, use about 25 ounces (709g) batter in each. For three 9″ layers, use about 16 1/2 ounces (468g) in each pan. For four shallow 8″ layers, use about 12 1/2 ounces (354g) batter in each pan.
- Instant ClearJel will help stabilize the filling if the cake is baked and served during particularly hot weather.
- When making the frosting, use natural cocoa for mild, milk chocolate-type flavor and lighter color. For darker frosting with richer, more assertive chocolate flavor, use Dutch-process cocoa.
- Substitute 1/2 cup unsalted butter for the shortening in the frosting, if desired. If the weather is particularly hot, shortening will help stabilize the frosting.
- Cake layers, frosting, and filling can all be made up to three days ahead, and the cake assembled just before serving. Store the layers, well wrapped, at room temperature; refrigerate the frosting and filling in airtight containers or tightly covered bowls. When you’re ready to assemble the cake, remove the filling and frosting from the fridge and warm at room temperature until soft enough to spread easily.
- The entire cake can be made ahead and frozen, tightly wrapped, for up to a week. (Don’t add the fresh raspberry garnish on top if you’re going to freeze the cake.) Thaw cake overnight in the refrigerator before serving.
Nutrition


Questions & Reviews
It looks so good~ I love chocolate cake. Just realize that it’s a long time since last time I had one. Thank you for sharing the recipe!
Could you sub strawberries for the raspberries?
Sure! Strawberries have more moisture, so I would assemble it just prior to eating just so they don’t get too juicy on everything.
This is my go – to special occasion cake! Love KAF!! This cake is great because it uses things I mostly have around (except for the cream and berries). I usually do berries on only one layer because of picky children. ? Yum!!!!
This cake looks amazing!
This cake looks amazing! And I’m loving to white cake stand. Where did you find it?
I’m not sure where that’s from, probably Home Goods or something like that- that’s where I find most of my cake stands!