Recently on Instagram I asked my followers what types of things they (you) would liked to learn how to do this year. Things in the kitchen you’ve always wanted to try but never had. There were so many great comments and ideas on there and one that popped up quite a bit was artisan bread. I knew that we definitely needed to start with this recipe for Easy No Knead Overnight Artisan bread because, PEOPLE. Listen up. YOU DO NOT HAVE TO BE A BREAD MASTER TO MAKE THIS.

Hands Down the Easiest Bread You Will Ever Make
It is quite simply, the easiest, and possibly the most delicious, bread in the world and it requires zero bread making skills. This takes literally 90 seconds to prepare. It only requires 3 ingredients, 1 bowl and a wooden spoon. There is no kneading. You literally dump 3 ingredients in a bowl and the next day have an insanely gorgeous artisan bread loaf with a crazy crackly crust and tender chewy insides and you will just sit there staring at it telling everyone in a 50-foot radius, “I MADE THAT.”

Equipment needed for No-Knead Bread
The one special thing you will need for this recipe is a heavy enamel coated Dutch oven. If you don’t have one of these, you can try it in any heavy oven-safe pot with a lid you can find, but I’m telling you right now a heavy Dutch oven is a great investment. It’s a workhorse in the kitchen and you’ll get so much use out of it. It’s the perfect pot for braising Pot Roast, making dishes like my Oven Braised Chicken, Honey Balsamic Drumsticks, cooking soups on the stovetop and more.
There’s no need to spend over $300 on a Le Creuset (I mean, unless you want to?) You can order a Lodge brand for $60 and free Prime shipping. Amazon Basics actually makes one as well now for just over $40. I ordered one to compare and I’ve only used mine once but it seems like a great option. I did notice my Amazon pot said oven safe to 400 (whereas the lodge is safe up to 500 and this particular recipe cooks at 450, just FYI) They both come in a rainbow of gorgeous colors. When recipes refer to cooking in a “Dutch Oven” this is what they’re talking about. Click here to grab a Lodge Brand, and Here to check out Amazon’s brand!
How to make No-Knead Dough
So let me show you in just a few steps how we’re making this bread. It starts with all purpose flour, warm water and yeast. Okay and a little salt, so I guess technically 4 ingredients.
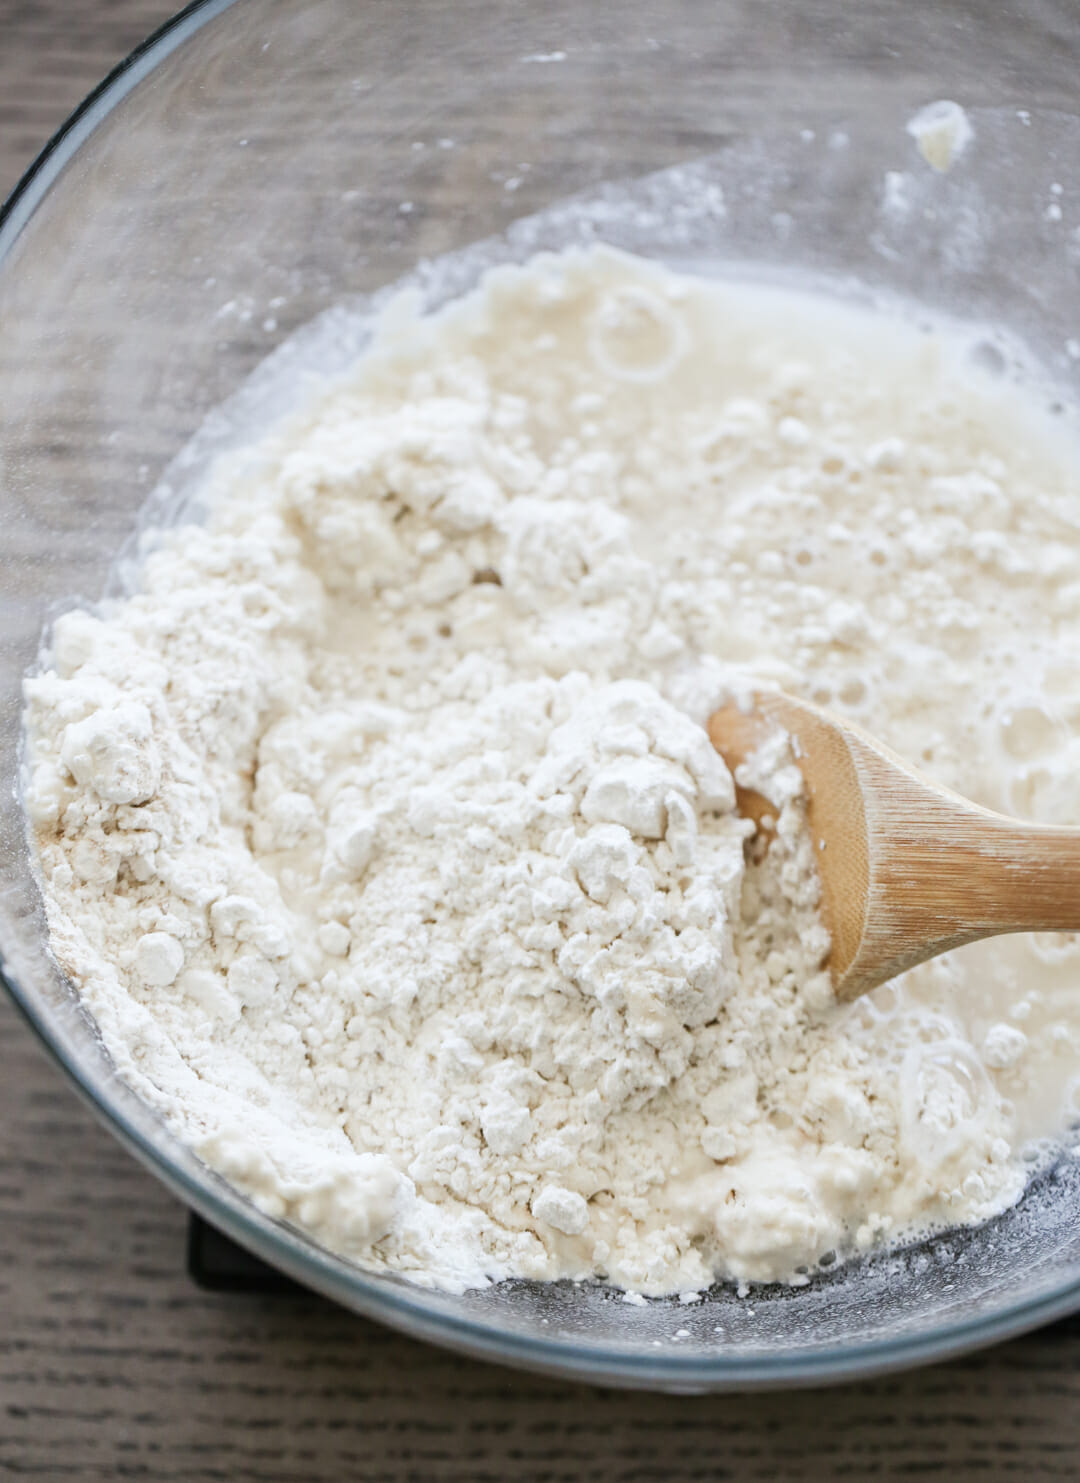
You will stir these ingredients with a spoon to mix them up and that’s it! Done.
I do want to say something about the flour, here. I think this recipe does count on people over measuring their flour. When I actual weigh my flour to get an exact weight for the 3 cups, this dough is extremely wet and loose. Like, I can’t form it into a ball, it’s more of a thick liquid. And the bread turns out amazing and soft and beautiful. When I scoop my flour with the measuring cup (something we are constantly telling you not to do,) the dough is still on the wet-sticky side, but it looks more like most people’s photos of this dough, and you can actually form it into a ball. And it turns out delicious. So what I’m saying is, this dough is extremely flexible. Try it a few times and see what you like, but don’t ever get worried it’s not going to work because it always works! Just don’t add tons more flour because you think it should be the consistency of playdough. Because it shouldn’t. Overall your dough should be quite loose and sticky, but feel free to just dunk your measuring cup in your flour bag and haphazardly scoop. This is one instance where that totally works!
Let the Dough Rest
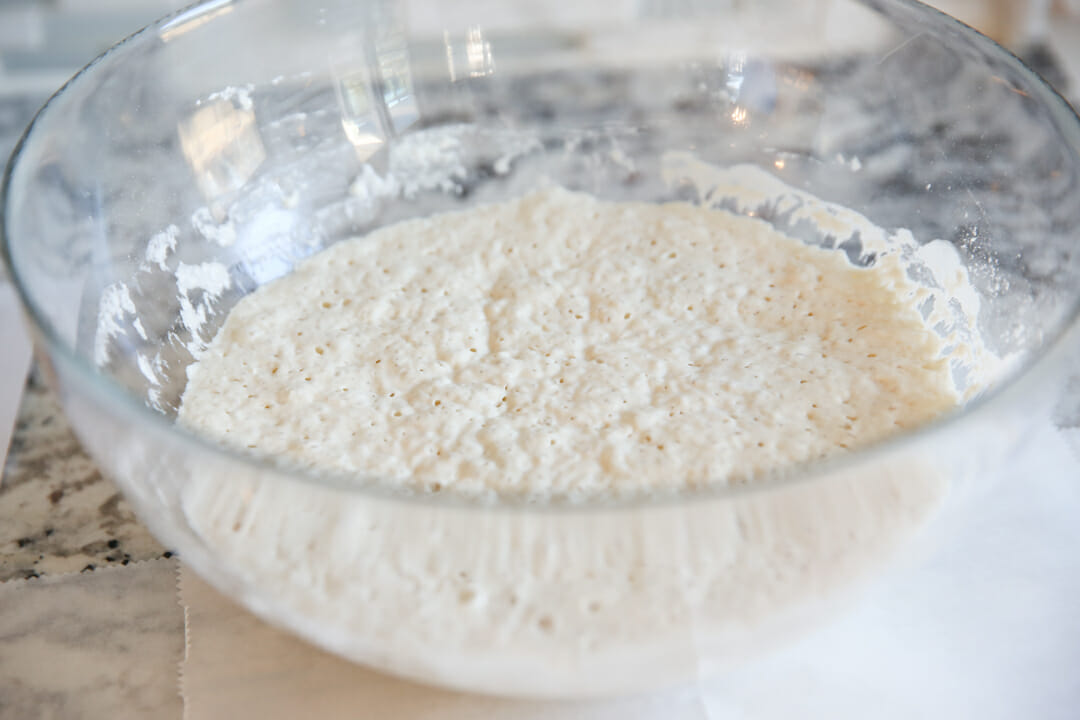
Once that’s all mixed up, just cover with plastic, leave on your counter, and come back and visit it tomorrow. It needs to sit for anywhere from 8-18 hours. I always just mix up the dough the day before, but technically you could do it early in the morning and have it for dinner as well. Just know the longer it sits, the better the texture will be so I recommend at least 12 hours.
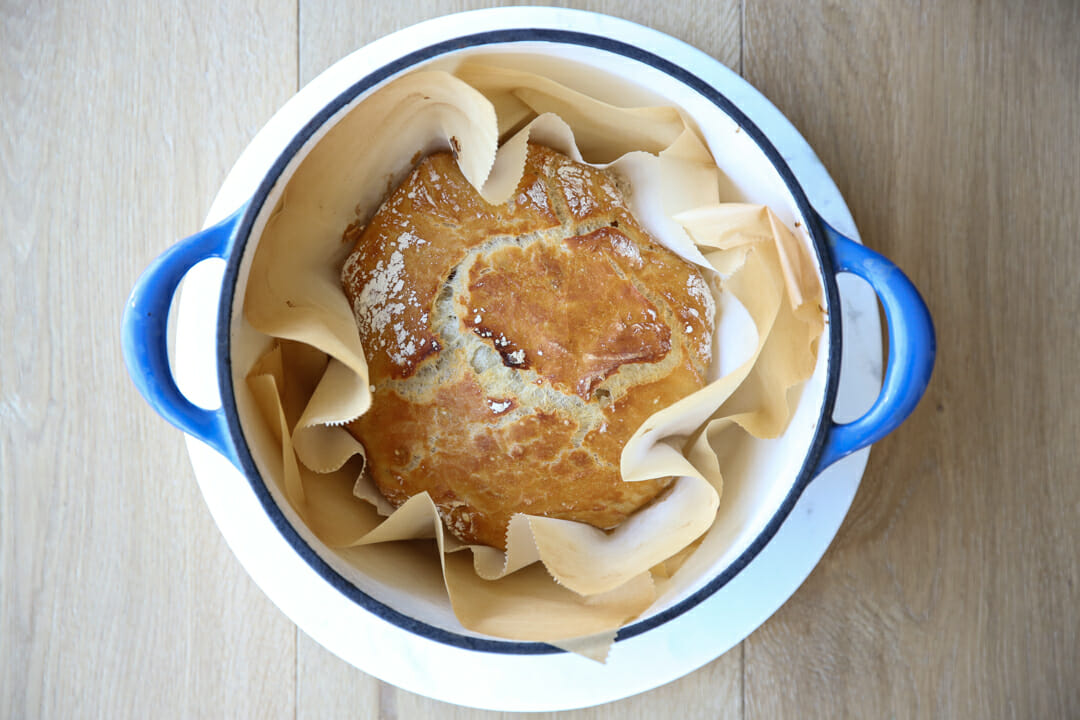
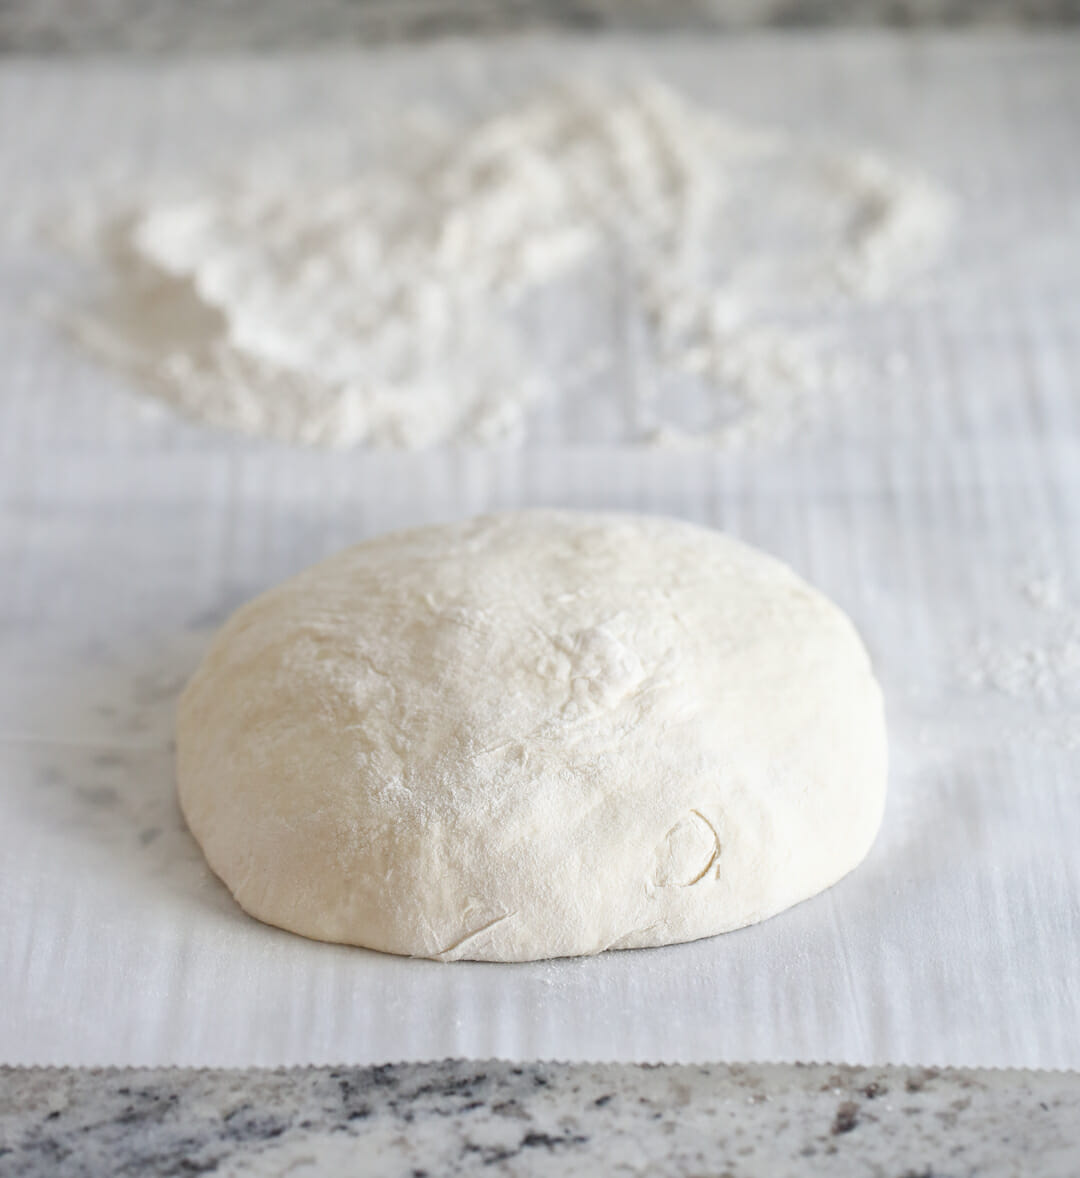
At this point you’ll just scrape it all out onto a generously floured surface- I put it directly onto a piece of parchment paper. Remember your dough will be REALLY sticky so sprinkle flour all over it where you’ll be touching it and handle it gently so it doesn’t get all over you. Fold it on top of itself a couple times (remember no kneading) and form it into a round-ish shape. Let it sit for 30 minutes. During that 30 minutes you will place your empty, covered dutch oven in your oven preheated to a screaming hot 450 degrees. We’re creating our own little bread oven here.
Baking No-Knead Bread
When it’s preheated you will CAREFULLY (can’t stress that enough) remove your crazy hot pan from the oven, transfer your bread into it, and place the lid on. DON’T FORGET YOUR LID IS PIPING HOT. I always keep a towel over the handle while it’s on my counter just to be safe. Pop that pot back into the oven to bake. You can see I just lift my whole parchment paper that my bread was sitting on and put it into the pot.
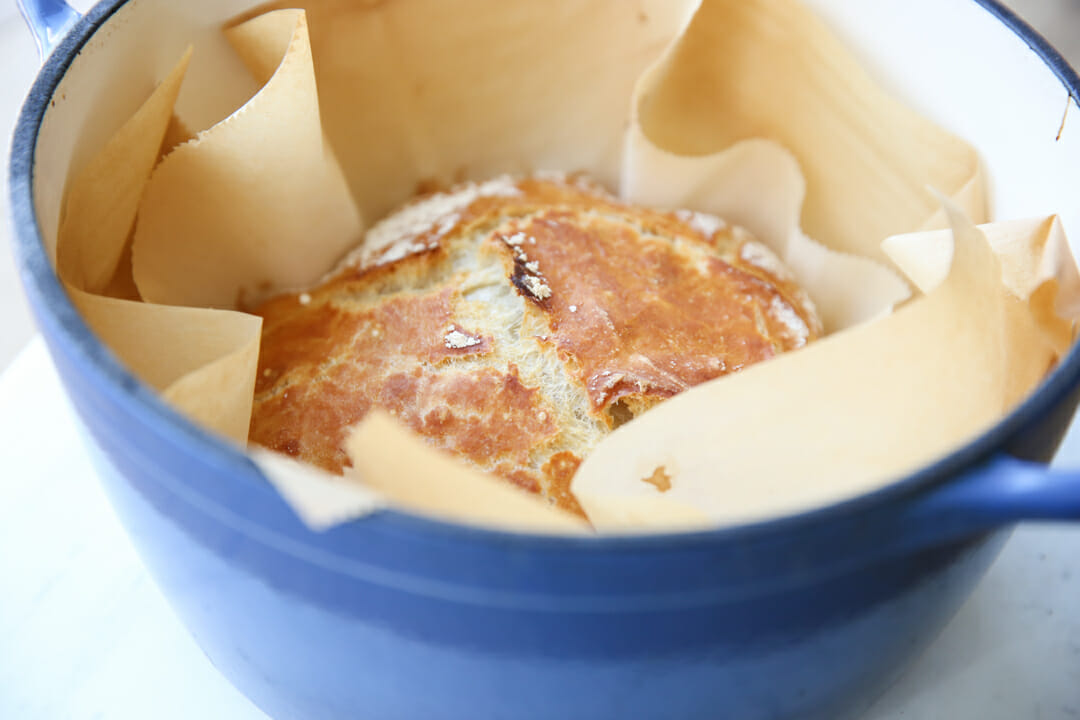
about 40 minutes later your house will smell like a straight-up European bakery.
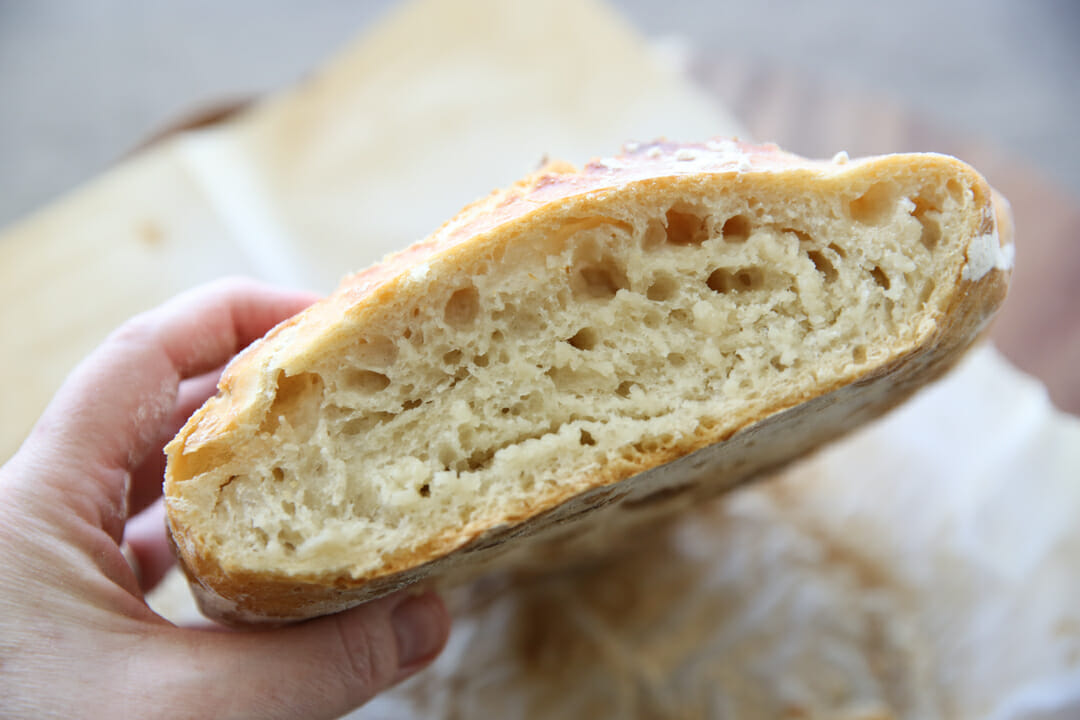
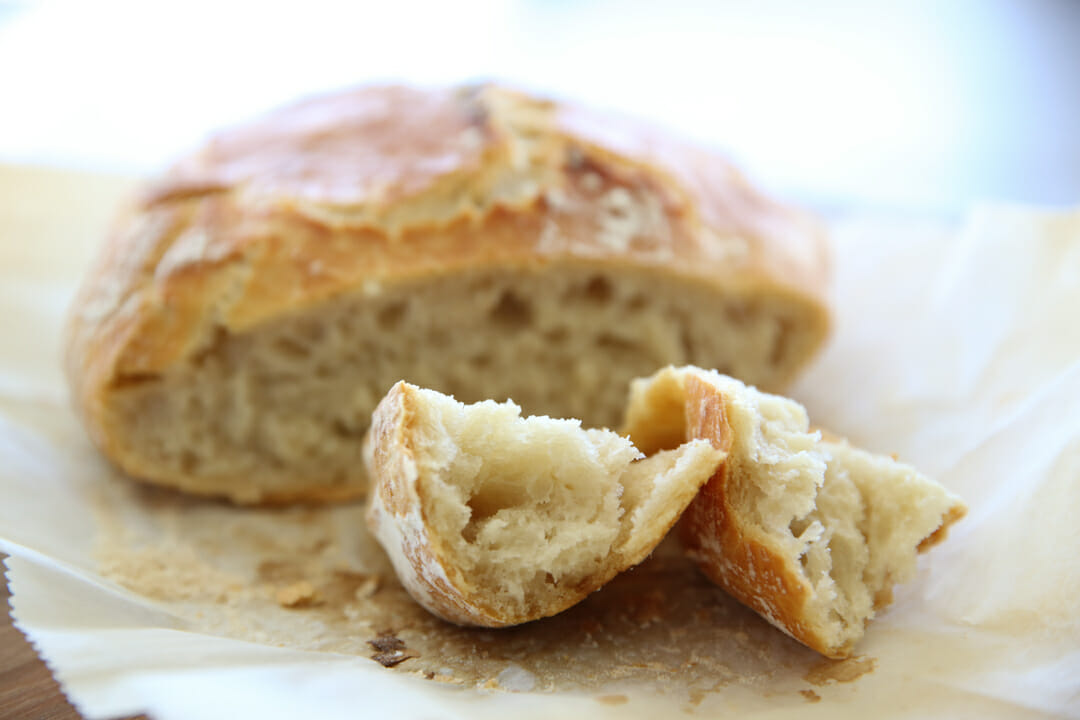
This bread has a super crispy crust and a chewy soft inside. It’s the kind of bread you rip off in chunks and slather with butter while it’s still warm, or dunk in a bowl of soup, or dip in olive oil. It’s amazing.
It’s so crazy easy you can literally make it every day. This fact is both useful and dangerous.
This is one of my favorite things to gift new neighbors or a friend who needs dinner. Pair it with a pot of soup, or a bottle of nice olive oil for a sweet gift!
Print
Easy No Knead Overnight Artisan Bread
Description
Amazingly simple artisan bread that requires no kneading. You can see Jim Lahey’s Original recipe, here.
Ingredients
- 425g (about 3 cups) all-purpose or bread flour, more for dusting
- 1/2 teaspoon instant yeast*
- 1 1/4 teaspoons salt
- 1 1/2 cups (340g) warm water (about 110 degrees, like warm, not hot, bath water)
Instructions
- In a large bowl combine flour, yeast and salt. Add water, and stir until blended; dough will be shaggy, sticky, and quite loose. Cover bowl with plastic wrap. Let dough rest at least 12 hours, preferably about 18, at room temperature.
- Dough will be dotted with bubbles and much looser/wetter than it was the day before. This is normal! Generously flour a work surface- I recommend parchment paper to make this process really simple, but you can also work on a cutting board or silicone mat and then transfer your dough to a piece of parchment before baking- and place dough on it; sprinkle it with a little more flour and very gently fold it over on itself once or twice. If your dough is super loose here, like so loose you can’t even form it into a ball, it’s more of a blob, you can generously flour so it doesn’t stick to your hands. Let rest about 30 minutes.
- While dough is resting, preheat oven to 450 degrees. Put a covered 6- to 8-quart heavy covered pot (cast iron, enamel, ceramic) in oven as it heats. When dough is ready, carefully remove pot from oven. Pick up parchment paper with dough (blow off excess flour sitting on parchment if you need to) and place directly in pot. Cover with lid and bake 35-40 minutes, then remove lid and bake another 10-15 minutes, until loaf is golden and browned.
Notes
*Jim Lahey’s original recipe (featured in the NY Times, here) only uses 1/4 teaspoon yeast, whereas recipes dotting the internet often use up to a full teaspoon . I tested batches at 1/2 teaspoon all the way up to 1 teaspoon and did not find much difference in the finished loaves. So I usually use 1/2 teaspoon.
Jim’s original recipe also involves a second rise of 2 hours . I’ve found, along with the rest of the internet, that the quick 30 minute rest featured here works just fine, and I actually had better results with the 30 min rise than I did with the 2 hour one! But you can certainly make this a few times and play around with it- it’s a very flexible recipe.
You can also try add-ins like a handful of parmesan and some snipped herbs, etc.


Questions & Reviews
Has anyone tried this with a gluten free flour?
Made it today and it was excellent!!! I used bread flour but I’m wondering if you’ve tried it with white whole wheat flour.
I havne’t tried that, but I bet it would work just fine!
Can one use a cloche bread baker with this recipe, or is the dough too loose to hold a shape before baking?
You can definitely try that- I’ve done it before. Sometimes my dough is way too soft and other times it holds up great- kind of funny that way!
Can sourdough start be used instead of yeast for this recipe?
I’ve never tried that but I would guess it would work just fine. If you try it I’d love to hear how it turns out!
Can I use 2 cups of white flour and 1 cup of whole wheat flour.
You can certainly experiment with that, though I haven’t tried it with whole wheat!
I bake bread about once a week. It’s been really hot and humid, so I didn’t want to heat up the kitchen yesterday afternoon. I decided to give this recipe a try. It was the easiest recipe ever and made a beautiful loaf! This will be my new go-to rustic loaf recipe.
If I double tge recipe can I still bake in a 6 qt Dutch oven or will it be too large? I’d like a bigger leaf without having to bake twice
I haven’t tried that but I feel like just from eyeballing it would probably work? If you try it out let me know!
wow!!! just wow. Easy, simple and beautiful
It’s so easy and sooooo good. My family loves it. Make a new loaf every few days.
Delicious and SO easy! I used 1c whole wheat flour. Next time I’m trying the herb add-ins, or maybe roasted garlic. Yumm!!
Will this work with gluten free flour?
I’ve never tried that, but I’ve heard it works!
I’ve made this recipe many times and it’s always great. I live in a very dry place and always have to add an extra 1/4 cup of water. Don’t be afraid to add extra water if you live in a dry area.
Can you use a bread metal tin if you don’t have a Cast iron ?
you can- I always use my cast iron so you’d just have to try it out but I think it should be fine!
My husband and I love this bread. The first couple times I made it all was great. The last 2 times the dough was so wet and sticky I couldn’t form a ball, just a clump. Also, the loaves turned out kind of flat. It was still very crunchy on the outside and delicious.
I think maybe I needed to let the dough rest longer( the second rest)? I had forgotten that part the third time.
A lot of things influence that- humidity, temperature, exact amount of flour, yeast…. just knead in a little extra flour next time as you’re forming it into a ball.
Easy and so yum!
Worked brilliantly. I used all wholemeal flour and found I needed to add 1/2 cup extra fluid (I chose to use milk). Left it for around 17hours before cooking. Used an enamel casserole dish as my Dutch oven. It was a hit!!! Can’t wait to have a play with different flavour profiles. I’m thinking either garlic and thyme or garlic Parmesan for my next attempt.
I’m so pleased with how the bread turned out. With this bread loving group, I hesitate to say that we didn’t finish the whole thing today. 😉 (There are just 2 of us.) I am wondering how to store it. Made it in the afternoon and had to have some right away. When we went to cut more for dinner, the side that was sliced was dry, but the inside was still great. Should I store it in aluminum foil? Ziploc bag? Both? I’m sure we will be finishing it tomorrow so I hope it won’t get too dry in foil or soften the crust in the ziploc. Thank you for a great recipe and the feeling of success!
We’ve been wrapping it in a flour sack towel and placing it cut side down (still wrapped) in the microwave. This seems to keep the moisture. It does not soften the crust, since the flour sack towel “breathes.” For reference, we live in eastern Idaho at about 4500 ft altitude.
For the other high altitude people – we’ve had good luck baking this at 425 for the initial bake (with the lid), and 375 for the final 10 minutes.
I only have the packets of instant yeast Fleischman’s- the packet says it’s 21/4 tsp.. -Dumb question -Should I just measure out of the packet or use the whole packet?
measure out of the packet- you can get 4 loaves out of that one little packet so just save what you don’t use in the freezer for next time!
I only have regular yeast, not instant. I notice there is an * next to the instant yeast in the ingredients but no where can i find what the * means. Could you please let me know what I need to do if I am using regular yeast. Thanks
Hi Sharon! The asterisk is in the notes section- it just refers to a note about the quantity of the yeast. If you don’t have instant yeast, I would just proof it in your water first, and then add to the flour. Hope that helps!
I saw this recipe and decided to make it. I needed a Dutch oven so ordered the one you recommended, the amazon one and now going back and reading I see the temp needs to be 450 degrees but as noted above plus rechecking I see what I ordered has a 400 degree max. What is your recommendation, do I cook at 450 anyway, use the lid still or substitute the lid for tinfoil. Wish I would have noticed before I ordered. I’ve waited a month for this to come, was so excited to get it and now I’m worried I’m going to wreck it buy using it at too high a temp. Hope to hear back. Thank you.
I have the exact same one and it’s what I use for this recipe so I personally think it’s just fine 🙂
Has anyone used a proofing oven for the first “rise”? How long did it take to get bubbly?
You can certainly place the dough in a warm place and bake on the same day. It will work just fine and be delicious! But the flavor and texture development you get with the extra long rise is extra good.
Thanks! Being an impatient baker, I used my proofing oven and it was done in less than 2 hours and freaking delicious! I’ll give the longer proof a try, I promise!
This recipe is not only easy peasy but it’s sooooooo yummy! I have made so many loaves in lockdown and given them to family in my bubble. Only downside is it’s too easy to eat ????
Best recipe ever! Easy and delicious. I’ve made it multiple times and it turns out each time! I use a heavy bottom ceramic dish and tinfoil since I don’t have a dutch oven.
Yummy and easy
Has anyone tried this with gluten free flour?
After 18+ hours my dough looked the same as it did at the beginning. It’s cool and rainy here in northern California so I set it in the microwave to rise. Perhaps still too cool? I also used Bob’s 1:1 gluten free baking flour. What do you think went wrong for me?
I would assume it’s because you used gluten free flour. How did it turn out after baking?
Parchment paper stuck to the bread like skin. Had to slice off sides and bottom. What a waste. I feel so bad because it was so pretty and bottom crust was crisp. Paper was Tesco house brand
Can I spray oil onto paper or put dough In Dutch pot without it altogether instead?
I’ve baked this hundreds of times and literally never had that happen! Did you not have a dusting of flour over the dough? That should help!
Easy, worked like a charm!
Omg I’ve been making bread and testing recipes for years and never ever have I had such an amazing turnout the bread was so crispy on the outside and so soft and spongy on the inside we ate the whole loaf in one seating. The kids and husband couldn’t stop raving about how good it was. Great recipe well done.
In response to some of the comments about the dough being too dry and then adding more water….mine does that too. Is super dry but I leave it and don’t add more water and as it sits it becomes much more wet and looks more like the picture but not until I leave it for several several hours. So try just following the directions and I think you’ll be surprised. Love this recipe!!! Went to get more flour for this bread today because if quarantined hot bread is a must!! Store was all out of flour. So I’m off tomorrow in search of flour again! ????