Have you ever made hand-tossed ice cream? This interactive summer activity ends in a sweet treat that kids can’t resist! A few simple ingredients go into a bag, which goes into another bag filled with ice and salt. Then comes the fun: these bags get tossed and shaken until the contents freeze into delicious ice cream. (Don’t worry, they get taped up well!)

Ingredient and Equipment Notes
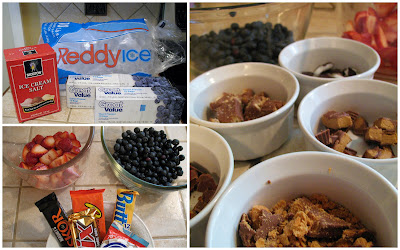
- Simple Ingredients – The ice cream itself requires 2% milk, cream (regular whipping cream or heavy cream will work), sugar, and vanilla. Feel free to grab your favorite toppings and mix ins, such as strawberries, blueberries, and crushed or chopped Butterfingers, Twix, peanut butter cups, or Skor bars.
- Ziploc Freezer Bags – Remember that these bags are going to be abused quite a bit! I would stick with name brand bags for this recipe. You’ll need quart sized freezer bags for the ice cream and gallon sized freezer bags for the ice.
- Ice – This recipe calls for 10 lbs of ice, which is one bag if buying from the store. You’ll need to be able to fill two gallon sized freezer bags initially, then possibly some more for refills as the ice melts during tossing. If using your own ice at home, fill several gallon bags ahead of time from your ice maker.
- Ice Cream Salt – You can find ice cream salt in the baking aisle next to the other salts. Rock salt works just as well.
- Waterproof Tape – Duct tape works well. This is to seal the bags so your ice cream and salty ice don’t leak and mix.
- Gloves – Optional, but helpful to keep little fingers from getting too cold.

How To Make Hand Tossed Ice Cream
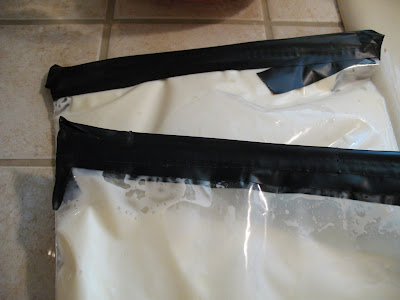
- In a large bowl, you’ll combine some sugar, milk, whipping cream, and vanilla. You’ll then divide this mixture between a couple of quart-sized freezer bags, squeeze out all of the air, seal, and tape shut.

Then you’ll place one filled bag inside one gallon-sized bag and sprinkle 1 cup of ice cream salt around the smaller bag. Add as much ice as you can comfortably fit into the gallon-sized bag, squeeze to remove excess air, and zip shut. Maneuver the ice around to make sure there’s ice on all sides of the smaller bag inside. Place in freezer while you repeat the process with the second bag.
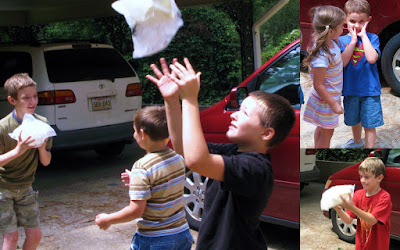
When the second bag has been prepared, head outside. Be sure to bring the leftover ice and rock salt because you’re probably going to need to drain some of the salty water and replenish the ice supply while you’re tossing the ice cream. Let each kid take a turn (or a couple) tossing the bags of ice cream into the air or to each other. It gets C-O-L-D, so a pair of gloves won’t hurt anybody!
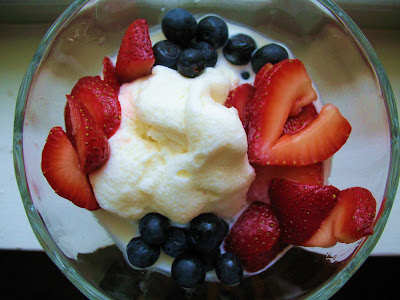
- After about 10-15 minutes, remove the quart-sized bag and rinse off the saltwater. Cut a hole in one corner of the bag and squeeze the ice cream into individual dishes. Let everyone add their desired toppings and have at it! It might be a little melty, but I promise, not a single person will complain!
Frequently Asked Questions
Does the ice cream freeze well if we have leftovers? This is a recipe that’s best enjoyed right after tossing. Because the ice cream is freezing, but not getting any air mixed into it like traditional ice cream, it’s more of a melty soft serve dessert.
How do I plan ahead/ plan this for a larger group of kids? Prep your ice cream mixture and complete the steps through taping the quart-sized bags closed. Store these in the fridge for up to a couple of days. When ready to use, help the kids add the smaller bags, ice, and salt to the larger bags and get shaking!
Serving Suggestions & Related Recipes
Air Fryer Crumble Topping or Homemade Magic Shell Topping would be fun additions here. Hot Fudge Sauce or Buttermilk Caramel Syrup would also be delicious!
Looking for more fun ideas to do with the kids? Check out these other Our Best Bites favorites:
Oven-Dried Apple Chips {Two Ways!}
Homemade Hot Pockets
Frozen Pudding Pops
Edible Playdough and Finger Paint
Did You Make This?
I’d love to hear from you! Snap a picture and tag me on Instagram, then come back and give this recipe a rating!

Kids Week: Hand-Tossed Ice Cream
Ingredients
- ICE CREAM
- 2 cups 2% milk
- 2 cups whipping cream
- 1 cup sugar
- 1 1/4 teaspoons vanilla
- Desired ice cream toppings and mix-ins we used sugared strawberries, blueberries, and crushed or chopped Butterfingers, Twix Bars, York Peppermint Patties, Reese's PB Cups, and Skor Bars
- SUPPLIES
- 2 1- quart Ziploc freezer bags I used Walmart brand and wished I'd sprung for the big guns
- 2 1- gallon-sized Ziploc freezer bags ditto on the name brand
- 10 pounds ice one bag
- 2 cups ice cream salt
- waterproof tape like duct tape
- gloves optional, but keeps little fingers from freezing
Instructions
- 1. In a large bowl, combine sugar, milk, whipping cream, and vanilla. Have one of your larger little helpers hold open one quart-sized bag and pour half of the mixture into the bag and zip shut, squeezing out all the air. Use duct tape to tape the opening shut (we actually, in a pinch, used electrical tape and it was fine!). Repeat with second bag.
- 2. Place one filled bag inside one gallon-sized bag and sprinkle 1 cup of ice cream salt around the smaller bag. Add as much ice as you can comfortably fit into the gallon-sized bag, squeeze to remove excess air, and zip shut. Maneuver the ice around to make sure there's ice on all sides of the smaller bag inside. Place in freezer while you repeat the process with the second bag.
- 3. When the second bag has been prepared, head outside. Be sure to bring the leftover ice and rock salt because you're probably going to need to drain some of the salty water and replenish the ice supply while you're tossing the ice cream. Let each kid take a turn (or a couple) tossing the bags of ice cream into the air or to each other. It gets C-O-L-D, so a pair of gloves won't hurt anybody!
- 4. After about 10-15 minutes, remove the quart-sized bag and rinse off the saltwater. Cut a hole in one corner of the bag and squeeze the ice cream into individual dishes. Let everyone add their desired toppings and have at it! It might be a little melty, but I promise, not a single person will complain!


Questions & Reviews
We have done this before and it was a HUGE hit with the kids. Thanks for sharing!
I've heard of doing this before, the pictures made it look so yummy. I think we'll give this a try.
what a great idea! keeps the kids busy for a whole 10-15 min!!!
I've had this before, but had no idea how to do it myself. Thank you!
What a great, easy way to make ice cream! Will bookmark this for when my little girl is old enough to help, cuz I think I'd look pretty silly doing this by myself! 🙂 Thanks so much!
I love the way you incorporated the kids to help making this dessert. I love me some ice cream!
I've never tried this and have always wanted to! Thanks for the fun activity to do with my kids.
Yum
I remember using one of those old churning things to make ice cream as a kid but this looks like way more fun! And I agree- ice cream is a food group in and of itself. Yummy!
melacan at hotmail dot com
Fun! I have a ball I make ice cream in and you can kick it around, but it doesn't make very much. This seems like a great idea! Thanks!
We haven't made this in a while, and the weather is FINALLY getting hot, so maybe a stop at the grocery store is in need so we can have some yummy homemade ice cream! Thanks for the idea!
Yummy! I don't think my 2 year olds would be patient enough for this though, maybe next year.
That looks so fun!
Sounds like a fun summertime activity!
This recipe looks better than the one I've used. We wrapped ours in newspaper and taped it to make a ball to toss around (helps it not to get your hands as cold and messy too).
Looks like so much and so yummy. I can't wait to try
I love it! Great pictures:)
SO FUN! I want to win!!
I've done that!! We've done the #10 cans, and we've done the baggies, but we usually wrap them in newspaper to make them more "football-ish." The trick is in draining the saltwater bag before you open the ice cream bag…
This looks like a lot of fun! My family used to do something similar, but we would roll cans back and forth with the ingredients inside. Keep bringing on the great kid friendly ideas! I especially love cool treats!
Reminds me of summer science camp. YUM!
This looks like fun!
This is one of my favorite ways to make ice cream! Kids love it!
YUMMY!
My kids will love this!
This looks so good! Thanks for sharing.
Fun! I've seen this recipe before but your post really makes me want to try it!
Looks divine!
So cool, my kids will love this one!
What a fun way to work off the calories before you dive into a big bowl of icecream. Yummy!